
Super Game Pi: 3D Print Your Own Large-Screen SNES Gameboy — from AdaFruit


![]() Anyone who knows a passionate gamer, or is one, is probably well aware that this isn’t just a fascination with the games, but often also includes a penchant for checking out all hardware, tweaking and creating systems, hacking files, using retro platforms, and experimenting with a lot of DIY projects.
Anyone who knows a passionate gamer, or is one, is probably well aware that this isn’t just a fascination with the games, but often also includes a penchant for checking out all hardware, tweaking and creating systems, hacking files, using retro platforms, and experimenting with a lot of DIY projects.
Gaming and 3D printing enthusiasm often go together because it is a creative world of people who like not only to make their own alternate reality sometimes, but who gain great joy from trying new things and making things work better for their gaming needs whenever possible—in terms of performance, and often—portability. Sometimes that means taking on a DIY challenge.
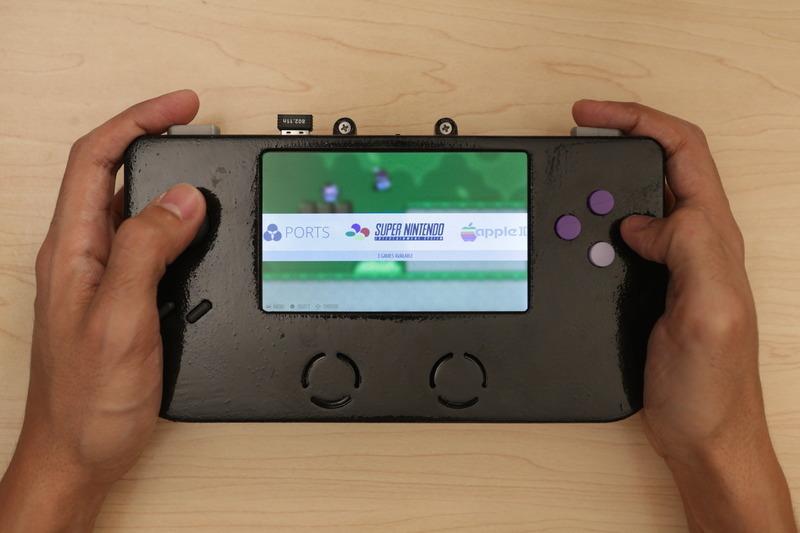
The gameboy is a staple. And what could be more fun than building your own? Adafruit is giving you all the tools you need, as an advanced maker, for a pretty complex, but fun, 3D printing project that you can download and modify to your heart’s desire. Dubbed the Super Game Pi, it’s easy to construe that you’ll be needing an ever-useful Raspberry Pi computer for this handheld device, which features:
- 12 buttons
- Analog joystick
- Stereo speakers
- 5” HDMI display
- Raspberry Pi A+
- RetroPie image

If you are an experienced DIY’er and have some pretty mad ‘maker’ skills, this project, probably taking about six hours of your time (expect the parts to take at least six to eight hours to print), certainly looks like a productive way to spend your Saturday morning. It’s certainly a challenging DIY project that will yield awesome results and fun for the rest of the weekend and beyond. One thing to keep in mind before starting is that the parts are on the larger side, so you will need either a 3D printer that has a large build envelope, or you will want to send this out for 3D printing from a third party service. Cura is recommended for slicing. Click here for information on downloading the files.
 PLA is recommended for the 3D printing process of the enclosure which houses all the electronics. You should not require any support material. Adafruit wants you to enjoy a smooth finish on the enclosure, so they recommend using an epoxy resin for 3D printed parts called XTC-3D Coating. It not only gives your new portable gaming device a shiny look, but also smooths out all the lines and ridges.
And how to find the buttons for your controller? You may have done something like this before, as Adafruit recommends taking an old SNES controller apart and sawing off the PCB’s into sections. For connecting the buttons to the Pi, you will want to refer to the video below to see the suggestion regarding modifying jumper cables and soldering the wires to the PCBs. Adafruit recommends using TPE flexible filament like Ninajflex for 3D printing the L and R shoulder buttons, giving them the preferred and suitable rubbery texture convenient for gaming.
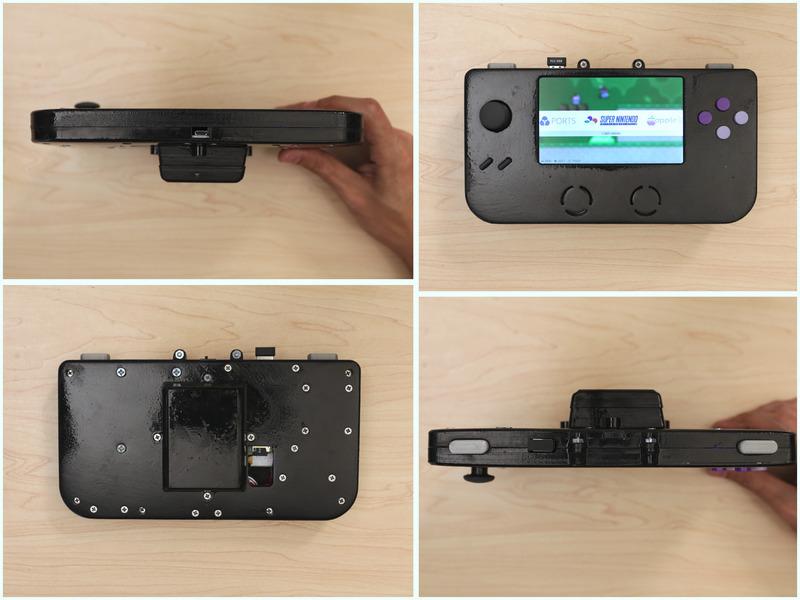
The Super Game Pi features a 5″ HDMI display, and due to the flexibility afforded by the Raspberry Pi, you can use virtually any emulator running Emulationstation.
For auditory, Adafruit recommends the ST2012 2.8 watt class D amplifier, due to its compact nature, offering two channels, which are more than specific for this project. They used two small speakers which are simply mounted and snapped in place inside the 3D printed enclosure.
Wiring and circuitry are not as challenging in this project as you may expect, since you have a clearly outlined diagram to refer to, as well as a GPIO cheat sheet. The Super Game Pi is powered by the PowerBoost 500C charging breakout, which is convenient in that it’s easy to charge with a micro USB cable. You’ll want to use a pretty large battery, with the 660 milliamp battery 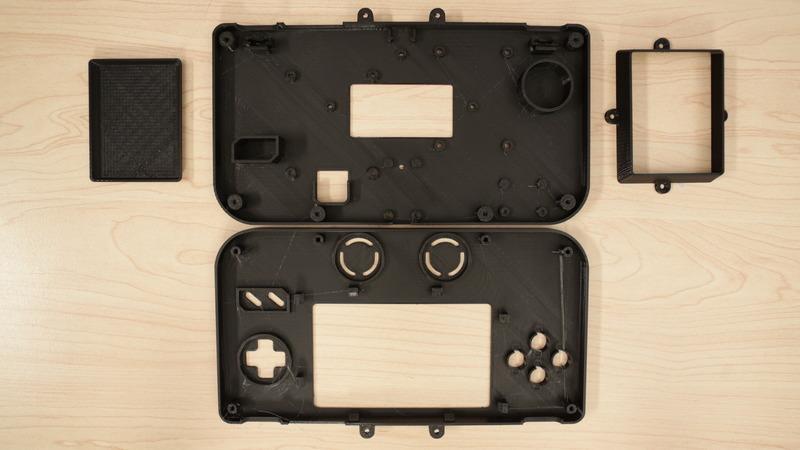 recommended, as it offers around six hours of gaming time.
You will also want to download and burn the RetroPi image to a micro SD card. This involves connecting your Pi to your wireless network, which can be done easily with a USB connector. After that, you will need to configure and save the files so the Raspberry Pi is able to format the operating system to match the resolution of the 5″ HDMI display.
All the steps are laid out succinctly in the AdaFruit learning guide so that you have a seamless and fun way to make this 3D printed gaming device. This project has support for way more games, a bigger screen, and decent sound.
To make your own Super Game Pi, you’ll have to 3D print the enclosure, hack an SNES controller and solder electronics. With this project, you will find yourself with access to a large volume of games, nice big screen, great sound, and a comprehensive controller. Click here for the full tutorial.
Parts needed:
- Raspberry Pi A+
- TFP401 HDMI Driver
- 5″ TFT Display
- Analog 2-axis Joystick
- Cupcade Adapter PCB
- 6600mAh Lithium Ion Battery
- SNES Controller
- PowerBoost500C

- Stereo 2.8W Class D Audio Amp
- 2x Mini Metal Speakers
- 40-pin FPC extension
- USB Mini WiFi module
Tools and supplies required:
- 3D Printer
- Soldering Iron
- Power Drill
- Panavise Jr.
- Helping-Third Hand
- PLA + Ninjaflex Filament
- Hakko Flat Pliers + Flush Diagonal Cutters
- 30AWG silicone coated strand wire
- Heat shrink tubing
- HDMI Flat Cable
- Female Jumper Wires
- 3.5mm Stereo cable
Are you planning to 3D print the Super Game Pi? Have you 3D printed anything similar on your own? Tell us about it in the Super Game Pi forum over at 3DPB.com.

Subscribe to Our Email Newsletter
Stay up-to-date on all the latest news from the 3D printing industry and receive information and offers from third party vendors.
Print Services
Upload your 3D Models and get them printed quickly and efficiently.


You May Also Like
3D Printing News Briefs, July 9, 2026: RIMPAC 2026, Software, Housing, & More
In today’s 3D Printing News Briefs, Massivit continues its focus on aerospace and defense manufacturing, and Meltio is collaborating with Phillips Corporation for RIMPAC 2026. Moving on to software, AMIS...
3DPOD 304: Precast Concrete AM with Greg Kerkstra, Mangrove
Greg Kerkstra is part of a family business that leads in the precast concrete industry. They’ve now turned to Progress Group’s large-format binder-jet concrete technology, which we covered here in...
3D Printing News Briefs, June 10, 2026: Grand Opening, Photoresins, Footwear, & More
We’re starting with some exciting news in today’s 3D Printing News Briefs: Stratasys just celebrated the opening of its new North American headquarters in Minnesota. Moving on, Nanoscribe is scaling...
Wells Fargo Backs ICON in Landmark Milestone for 3D Printed Housing
Qualification is an indispensable step on the path to legitimization for any new technology, but it’s still just one step: markets tend to remain unswayed without a co-sign from an...


