
i.materialise Offers Tutorial: Produce Color Scans with Microsoft Kinect & 3D Builder, Prepare for 3D Printing


![]() Like many, if you haven’t used Microsoft Kinect or 3D Builder, you’re probably curious. While we hear about both and have probably glimpsed them in broad strokes, now we can find out the details on how to really use them thanks to i.materialise, and you’ll find this especially helpful if you are looking for ways to scan objects in color and then make some really great 3D prints.
Like many, if you haven’t used Microsoft Kinect or 3D Builder, you’re probably curious. While we hear about both and have probably glimpsed them in broad strokes, now we can find out the details on how to really use them thanks to i.materialise, and you’ll find this especially helpful if you are looking for ways to scan objects in color and then make some really great 3D prints.
The tutorial teaches you how to import, edit, and 3D print the scans using the 3D Builder app, which you can download for free. Before you get too far into it though, be aware that to actually use Microsoft’s scanning solution, at least Windows 8.1 or 10 are required, along with the Kinect. You can also use the Xbox One with a specialized cable to connect to your PC and then install the free 3D Scan and 3D Builder apps. Once you have all the specific tools, three steps follow.

Step One
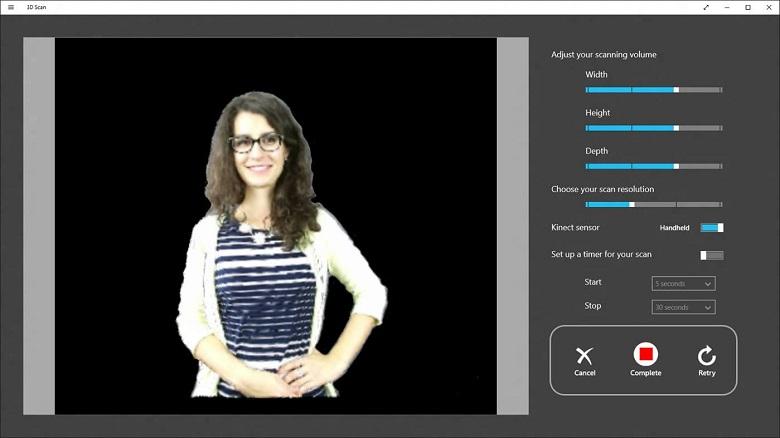
The 3D Scan app allows you to scan in color. i.materialise teaches you the scanning process, and then goes into more detail with 3D Builder. Again, you must have a Kinect to do this, and you can use it either in handheld or desktop form.
i.materialise then instructs you to scan the object or person, using the handheld mode and rotating around.
“Carefully pick the size of the area you want to scan and hold the Kinect sensor to ‘record’ your object, just like you would use a normal camera,” states the i.materialise team. “The app even lets you take 3D selfies using the one-click timer option.”
You can also use a tripod setup for the Kinect, placing the object on a turntable and then scanning.
Microsoft’s 3D Scan app makes scanning user-friendly.
Be aware of these issues that will affect your scan:
- GPU quality (Graphics Processing Unit) – better quality GPU means you will have higher frame rates with better scans. i.materialise recommends sticking to at least 20 frames per second (fps)
- Lighting – Try to avoid settings with shadows, and remember that the surface colors of your 3D scan are improved with diffused light
- Distance from the background – Try to maximize the distance between your background and the object to be scanned so that the scanner will not include background items.
- Reflections – Try to scan in an environment with as little reflections as possible, since reflections in the background can create noise around the scan
- Distance from the object – For the best results, place the object about an arm’s length away from the Kinect sensor (that’s 3 ft. or 90 cm).
Step Two
For importing and then editing your models, you’ll want to use the 3D Builder app, scanning, visualizing the model, editing, and then 3D printing.
Importing is as easy as starting the app and just choosing ‘Scan’ from the menu. Then you can edit, as well as viewing a more comprehensive video, which we’ve included below. i.materialise also offers a user guide with greater explanation about 3D Builder.
Step Three
You are ready to 3D print!
“Whether you are in need of a professional 3D print, don’t actually own a 3D printer or are looking for 3D printing solutions beyond plastic, there are many reasons for choosing an online 3D printing service,” states i.materialise. “And 3D Builder makes this even easier: you can order a professional, high-quality print of your model with i.materialise from inside the app. We will then print it in awesome materials such as stainless steel, multicolor, silver, gold, ceramic and more!”
To start the 3D printing process, just click on the ‘3D Print’ button and your model is being prepared. If you don’t have a 3D printer, this is where you want to choose ‘3D printing service.’ Also, be sure that the size of your print is set correctly.
If you are ordering through i.materialise, click ‘order online’ and it will be uploaded, providing you with a quote, as well as 100+ materials and finishes. It’s that easy to scan and then look forward to your 3D print. Read the full tutorial from i.materialise here. Discuss in the i.materialise Tutorial forum at 3DPB.com.
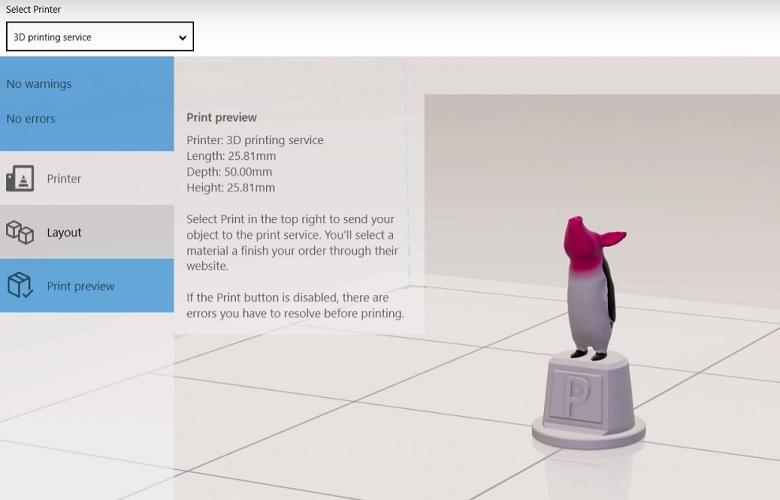
High-quality 3D prints can be ordered from within 3D Builder.
Subscribe to Our Email Newsletter
Stay up-to-date on all the latest news from the 3D printing industry and receive information and offers from third party vendors.
Print Services
Upload your 3D Models and get them printed quickly and efficiently.


You May Also Like
The Drone Economy Needed a Scalable Manufacturing Backbone. ADDMAN Built One
When ADDMAN closed its acquisition of Forecast 3D in January 2026, the headlines focused on fleet size and Southern California footprint. Six months later, those metrics feel almost beside the...
The Drone Industry is Showing Where 3D Printing Delivers Real Value, AM Research Report Finds
The rapid rise of drones is creating one of the biggest opportunities for additive manufacturing (AM). Whether they’re used on battlefields, inspecting bridges or crops, or delivering supplies, drones need...
The Longevity Economy Needs a Factory
Longevity has become one of the biggest stories in healthcare. Every week seems to add a new announcement about an anti-aging therapy, an AI-powered drug discovery platform, or a startup...
The SLS Market: Game of Trucks
This is truly an exciting moment in the SLS market. With HP‘s release of the 1200 and Formlabs‘ release of the X1, we can see the SLS market heating up....


