Technical Steganography: Concealing Secret Messages Inside 3D Printed Models


If you’ve never heard the term steganography, join the club. It’s the practice of concealing a file, message, image, or video within another…very James Bond, if you ask me. Your mission, should you choose to accept it, is to keep reading.
Four Ukrainian researchers explained steganography as a “method of transmission of the coded information message in a case of when the fact of its existence is suppressed” in their paper, “Hiding of Information Using 3D-Printing Technologies.” It’s replacing unimportant data with confidential information, and concealing it so no one will suspect that the built-in secret message is hidden there.
Originally, this practice was used to hide information in computer files, which are a type of container. But there’s a new kind of steganography that hides messages in artificially created containers; the redundancy is caused by the technical features of data transfer, processing, and/or storage.
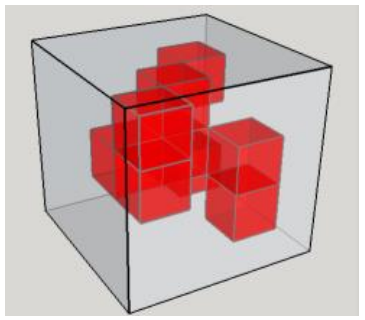
Fig. 1: Schematic of steganocoding an informational message into a fragment of a computer model of physical object.
These researchers used 3D printing to conceal data in solid objects. It reminds me a little of Fabrisonic’s method of embedding and merging layers of metal foil together in a solid-state with its UAM technology, but it’s definitely not the same. The research team’s method of technical steganography actually transforms informational messages into a 3D model, which is then put inside a 3D model of a container that will be 3D printed.
“The appearance of the resulting solid object, its operational and aesthetic properties do not change during the process of embedding the information message,” the researchers explained. “In addition, you cannot delete or distort this hidden message without destroying or significantly damaging the product.”
The idea is to embed data into a digital 3D model through secret key data, and the model is then printed inside a solid object, like a figure or toy. The message is actually converted into a binary form, and each bit of data becomes an internal piece of the 3D printed model.
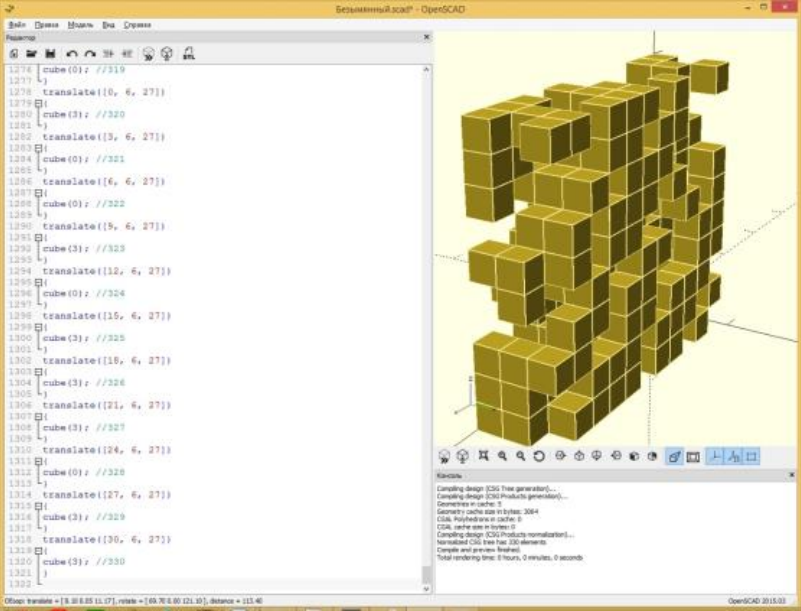
Fig. 2: Example of steganography coding using OpenSCAD. Source code (L) and 3D model of message (R).
The researchers used OpenSCAD for automated coding, and you can see in the image above how each character of the message was converted using ASCII-code. Source code was created using a special software, and then put in OpenSCAD’s working field. Then, all the physical 3 x 3 x mm bit models were put into an 11 x 3 x 10 mm container, which was later 3D printed on a Flashforge Creator Dual.
“Thus, as a result of steganography coding, the information message first becomes a three-dimensional binary matrix, which turns into a computer model of physical object. The computer model of the binary matrix is placed in the middle of the basic model of the container, so that its edges do not extend beyond the outer body,” the team explained.
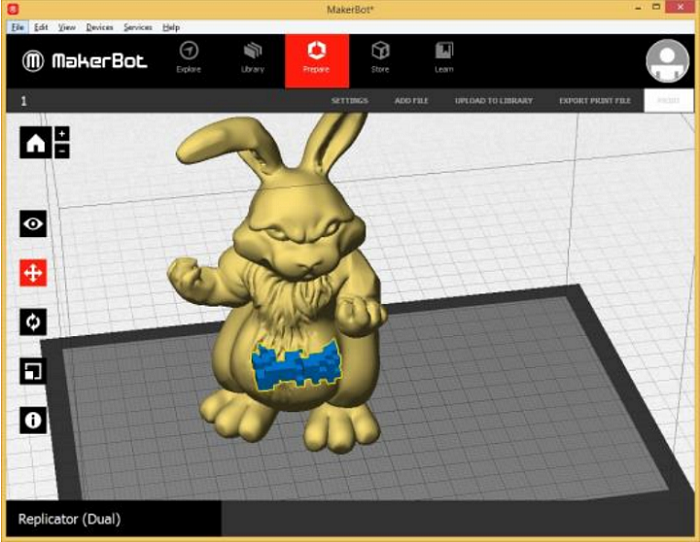
Fig. 3: Placing 3D model of the message in the middle of the outer container model.
In the 3D software, the matrix in the middle of the model can be placed in multiple ways:
- all filled cubes should be filled with different colors or materials
- all filled cubes should be left blank
Filling the cubes makes it easier to hide the message, but harder to read it. The second method reduces the weight of the 3D printed object that conceals the information, which is a dead giveaway – a detailed analysis would show that a secret message was inside.
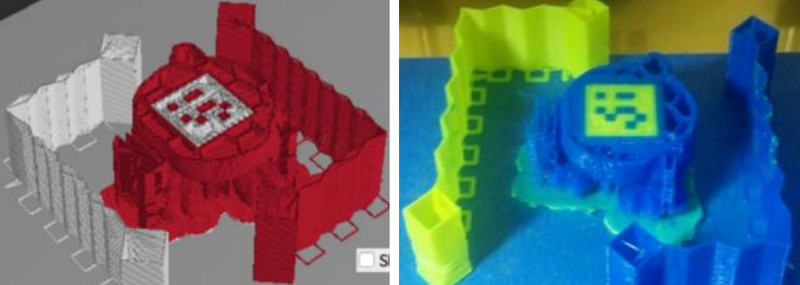
Fig. 4: Creation of the solid container object with built-in message on 68th layer of printing.
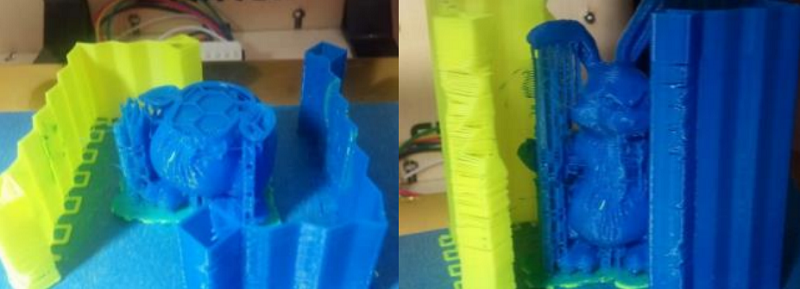
Fig. 5: 3D printing and finished product with built-in message.
In theory, to extract the embedded data, the 3D printed solid object would be scanned, and secret key data would decode the scanner data. However, a dependable way to extract data from 3D printed objects has not yet been found. This is mainly because the object can be printed using different methods, and out of materials that have a variety of properties. Scanning procedures have to take this into account if hidden data is to be retrieved without damage.
One possibility is a laser scanner, which uses a polarized, narrowly directed stream of “coherent, monochromatic” radiation flux, that “decreases as a result of absorption in the medium in some pre-stipulated number of times.” The team conducted an experiment to see if they could read the message hidden inside the 3D printed model without damaging either one, by subjecting the object to “narrowly focused laser irradiation” at different directions and angles; this would, in theory, help them ascertain its internal structure.
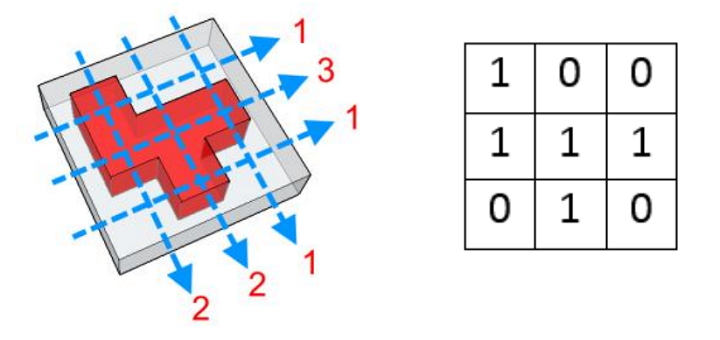
Fig. 6: Simplified scheme of irradiation of the printed object (L) and the expected result of data extraction (R).
“In this case, the initial dataset is the value of the radiation intensity, which decrease upon absorption,” they explained.
“The irradiation scheme of the finished product can be presented in simplified form in Fig. 6 on the left (when encoding information bits with empty and filled cubes). The indicated conditional value of the measurement result shown at the end of the arrows. This is a decrease in the radiation intensity (proportional to the thickness of the solid object).”
There are only two possible outcomes from these measurements, and one of them doesn’t match the expected result. A simplified explanation can be seen below – the staircase shape makes it possible to rapidly change the thickness of the object containing the message.
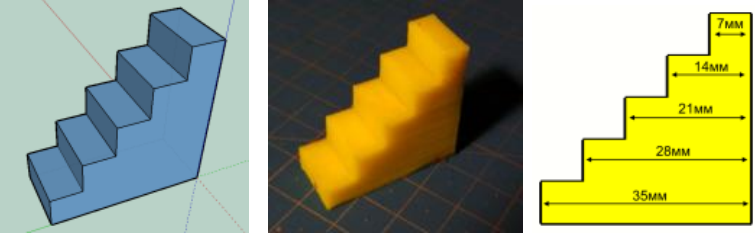
Fig. 7: Simplified physical model of information data.
Six values correspond conditionally to these information bit sequences:
- without filling: (00000)
- single fill/first step: (10000)
- two fillings/second step: (11000)
- three fillings/third step: (11100)
- four fillings/fourth step: (11110)
- five fillings/fifth step: (11111)
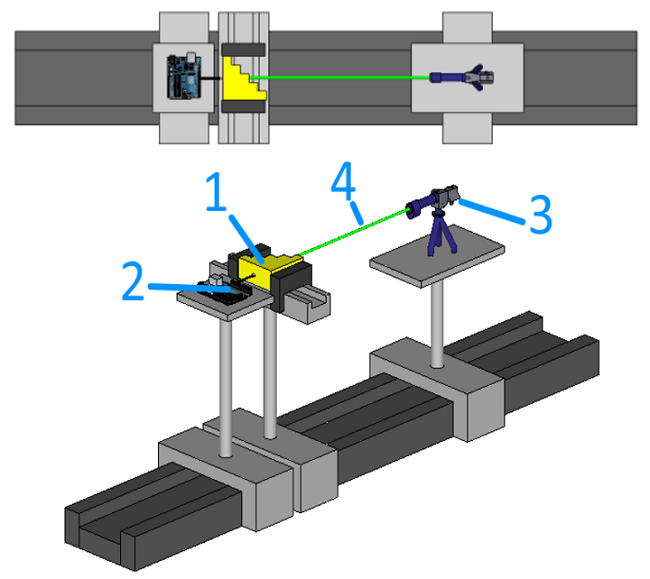
Fig. 8: The laboratory installation schematic. 1 – solid plastic staircase; 2 – photoresistor and microcontroller reading the data; 3 – laser; 4 – laser ray.
Materials have their own absorption index, and the material properties determine the coefficient of the absorption; generally, it depends on the wavelength of light. The team used lasers from the visible spectrum as monochromatic radiation, and passed a ray through the 3D printed object containing the hidden message. The plastic didn’t absorb the radiation, and so it fell on the 5 V photoresistor on the other side of the model.
“The resistance of a photoresistor decreases with increasing incident light intensity,” they wrote.
An Arduino Uno was used to read and process the data, which showed that resistance varied based on “the degree of excitation of the photocell.” Voltage changes were measured, digitized, and sent to a computer, equipped with software that displays the photoresistor’s value and can “calculate the arithmetic mean of the measurements.”
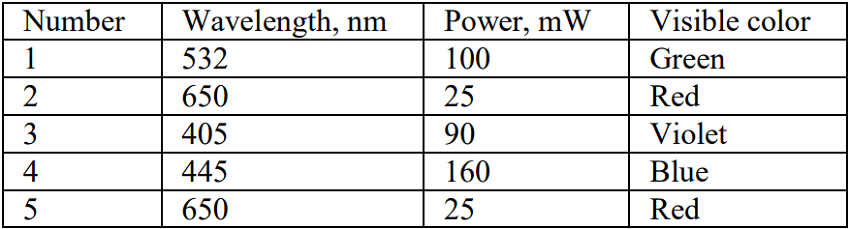
Table 1: Laser characteristics.
Multiple lasers were exposed to different thicknesses (stairs) on the 3D printed object, and the researchers took measurements of how much light passed through each section. The specific results are presented in the table below, but to put it plainly, the measurements allowed the team to recognize the material’s thickness, and “determine the content of the hidden information bits.”

Table 2: Measurement results.
While the experiment was successful, the researchers know that their results need more clarification.
“In particular, the unresolved issue is the choice of the type and characteristics of the laser, the consistency of these characteristics with the properties of solid-state object materials, the adjustment of photoresistors, and the like,” the researchers concluded.
By the way, the message the team hid was “Tomorrow never comes until it’s too late.” This post will now self-destruct…just kidding.
Discuss and other 3D printing topics at 3DPrintBoard.com or share your thoughts below.
Subscribe to Our Email Newsletter
Stay up-to-date on all the latest news from the 3D printing industry and receive information and offers from third party vendors.
Print Services
Upload your 3D Models and get them printed quickly and efficiently.


You May Also Like
UAS Additive Strategies: Register by June 30 to Learn About the Hottest Topic in 3D Printing
Last week, drone stocks surged on news that the Trump administration is considering a massive investment in the US unmanned aerial vehicle (UAV) industry. Earlier in 2026, the release of...
Stratasys Dental’s Negar Movahed Says They’re “Open for Partnerships”
According to “3D Printing for Dentistry 2025: Market Study and Forecast” by AM Research, the dental 3D printing market generated $5.2 billion in revenue in 2024—that’s nearly one third of...
3D Printing News Briefs, May 30, 2026: RIMPAC 2026, Acquisition, Ceramic Implants, & More
We’re kicking things off with materials news in this weekend’s 3D Printing News Briefs. Then it’s on to a hybrid manufacturing system for a maritime exercise, an expansion of industrial...
3D Printing News Briefs, May 23, 2026: Inserts, Racing, Cultural Heritage, & More
In this weekend’s 3D Printing News Briefs, 3D People has integrated threaded inserts into its online quoting tool, AM Solutions has introduced a more compact solution for automated cleaning and...