
A New 3D Printing Benchmark: A Danish Artifact the DTA


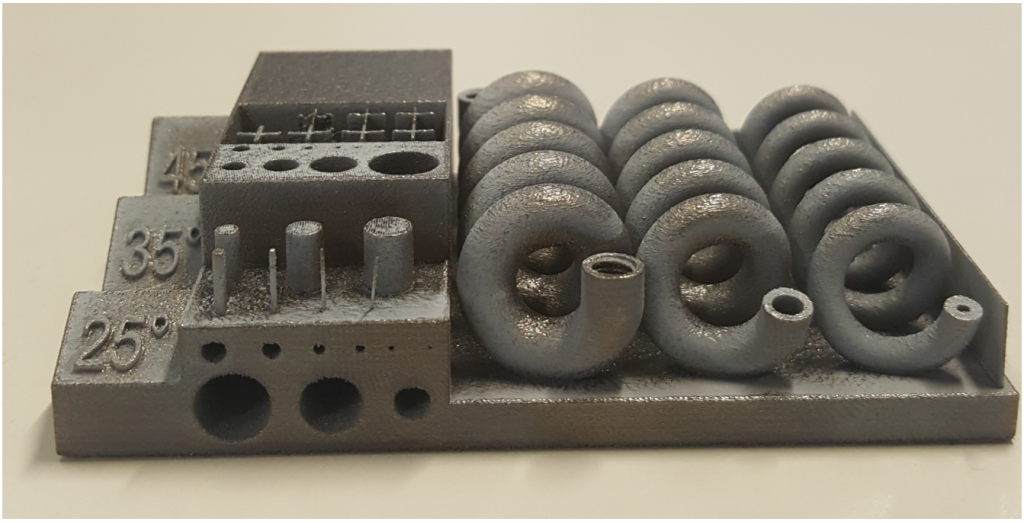
A view of the DTA.
Mandaná Moshiri, Guido Tosello and Sankhya Mohanty collaborated to create a new benchmark artifact for 3D printing. Their work was shared in conference proceedings of the Danish National Research Database. If you’ve ever bought a 3D printer you must know that benchmarking 3D printers is not really possible at the moment. We don’t as an industry have a Megapixel or DPI or some kind of Miles Per Gallon measurement of 3D print quality. There is not one number that can tell us which 3D printer is better. Even if we look at something like dimensional accuracy it is not a be all tell all way to test for quality nor is it universally agreed upon what the standard test is for dimensional accuracy in 3D printing. Things such as reliability and repeatability play a big role as well as does surface roughness and the strength of the part. These elements can all be different depending on where on the print bed the part was made. Software settings, firmware and airflow also have radical effects on 3D printed parts. The problem then on how to compare 3D printers with each other is a very difficult one indeed. The challenge of doing this fell to these three researchers at the Technical University of Denmark who came up with an artifact to test and benchmark 3D printers. Previously the US’s NIST came up with a similar artifact. In the desktop material extrusion world, Benchy is a well-known example of the same thing. Eventually, we will have to settle on a single test artifact.
The way this thing is designed and how it functions will have huge ramifications for our industry. If we get a test artifact that is universal printers will be optimized to print it, not other things. We will have a similar issue as the Nurenburg Ring effect, where cars are being optimized for fastest Nurenberg ring lap times, not general driving. Due to the fastest Nurenburg ring lap times being seen as a fair benchmark dozens of car companies have set up offices in the area to hire hundreds of people in total in a kind of mini Nurenburg lap time industry cluster. It will take a while for us to find a similar consensus and similar pitfalls. We could also have one artifact per technology or a whole bunch of competing artifacts, a veritable archeological dig of artifacts if you will. For now, it is certain that we do need a way to objectively compare 3D printed parts and that this will be an important part of our future. More than enough reason for us to interview Mandaná Moshiri about the Danish Test Artifact, the DTA. (This is not the official name of it, but, with your help, it could be).
Why is it so important to benchmark metal 3D printers?
When we think about additive manufacturing the first idea we have in mind is that it is a new technology capable to produce “in one go” what you need. This is not true (yet), after every production in a metal AM machine, the parts you produce need to undergo a quite long and complex sequence of post-processes. At the same time, there are a lot of different machines and different manufacturers on the market, and one of the main question is: what machine available currently best meets my needs? Is there a machine that can help me reduce post-processing as much as possible? Doing a benchmark of metal 3D printers is important, first of all to understand where are the differences among all the machines currently available but also to understand how much the technology advanced in the past years. How much does a product produced with one of the newest technology compare with a 10 years old, or more, machine? Where is the metal AM technology heading to?
Are there big differences between the output of such machines?
From my results, yes, it is possible to identify differences in the output among different machines. Of course the experience of the user plays a huge role in it, and this is why for the beginning of my “evaluation campaign” I asked directly to the machine manufacturers to produce the parts for me.
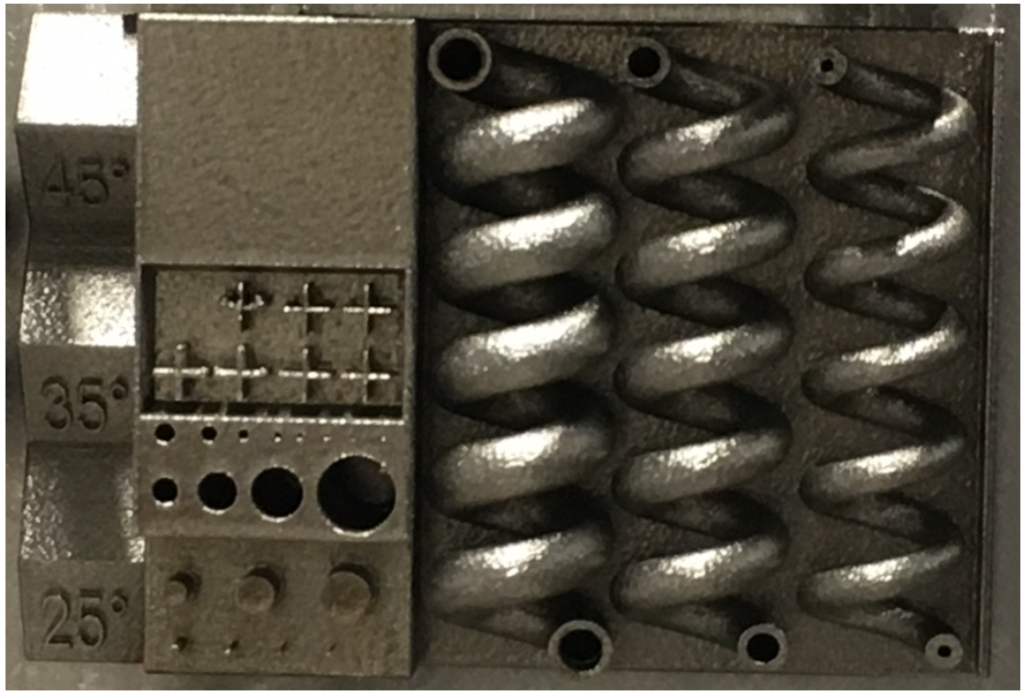
Another important point of this benchmarking is that I tried to keep a holistic view: the entire benchmarking is not just the spiral sample, it is also all the other cubes and cylinders and tensile specimens, on which I can perform my analysis and to get a global and complete vision of the properties of the parts I am getting from a machine. The aspects evaluated are related to the accuracy, precision, repeatability, homogeneity (in terms of density and residual porosity), residual stresses, mechanical properties, corrosion, built speed and complex features (the spiral is similar to a conformal cooling channel in moulds). Whenever I produce a part in a 3D printer, I would like that what I get is already my final, ready-to-use part, perfectly adapted to the final application, so the properties that I am looking at need to be a perfect balance of all the above. This is also why it is important to start evaluating them immediately in a benchmarking.
How come certain machines are better at certain objects?
The design of the benchmarking artifact with the spiral has been prepared considering product requirements rather than machine requirements. When I think about additive manufacturing I consider it a digital technology, capable to print what I need, but is still quite far from current reality. I need to know how close I am to produce directly what I need, and this is one of the main reasons for the benchmarking. Moreover, the product I produce, always needs to meet a balance of multiple properties, that I am evaluating through the aspects cited above, through multiple specimens and analysis.

Another view of the DTA, the whitish appearance is residue of a substance that was added to aid 3D scanning.
Are you familiar with the NIST Additive Manufacturing Test Artifact? How does your compare?
I have some experience with the NIST from literature. Comparing it with my design, I tried to keep it as manageable as possible, in order to give me an immediate response on machine capabilities, especially through some specific features. The smallest crosses, pins, holes and the lowest pyramid, were actually reaching dimensions already known to exceed the suggested minimum dimensions of the machine capabilities. I can see immediately if the machine was capable of producing them, and to what quality level. In the benchmarking presented I also specified the instrument to use for each evaluation, and I think this is very important to ensure the reproducibility of the analysis. I am planning to prepare a more complete paper or report in which I will present the design in more details and results I have collected.
For this design also, the objective was to prepare something that is manageable to use and evaluate directly in a production environment, keeping the holistic view with all the different samples.
Another aspect considered was the design for metrology: before completing the design and sending it for printing, I ensured that all features to be printed could also be measured with available equipment.
Or the 3DBenchy?
I have little experience with 3DBenchy, but, as for the NIST, I was looking for a holistic evaluation of machine capabilities, since what I am expecting from an AM machine is something that meets multiple requirements to be used directly in the final application.
How would I use your object as a machine owner?
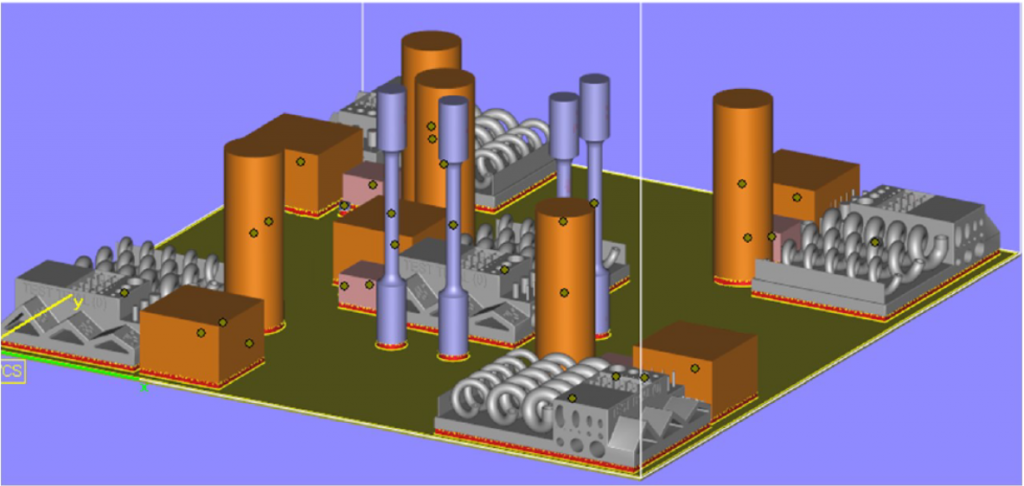
To use this benchmarking for the first time, place the STL file on the building platform as shown in the picture, and print the same platform at least 3 times. Then perform all the tests as described and compare them with other machine owners or machine´s manufacturers. The same design can also be used periodically on the same machine for quality-control, to ensure the machine printing quality is always the same.
How do you ensure that the people capture the right settings?
For my evaluation, I contacted the machine manufacturers directly, who should have the best knowledge of the machine, and asked them to print the parts, using the same material, and to not post-process any of the parts, because my intention is to see the machine´s capabilities only.
The benchmarking has been designed not to be a “defect finder” but to allow a holistic comparison. Of course, it is still possible to understand what problems generate which issues, for example, if there are problems with the laser focus, they can be detected from the analysis on pins and holes; if there are problems with the process parameters, they can be detected with the residual porosity analysis; and so on.
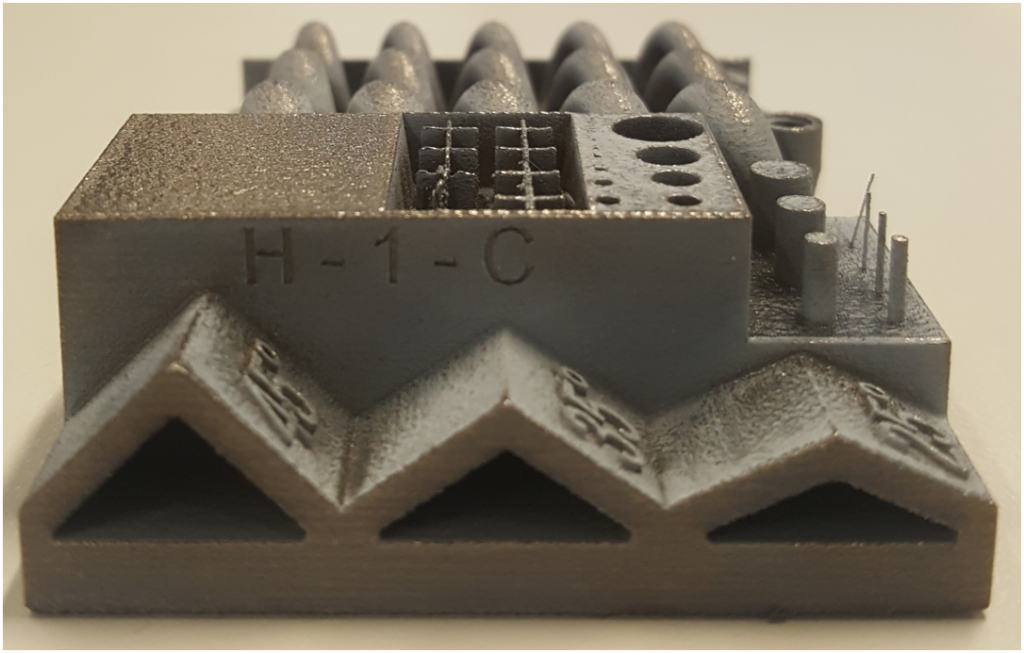
Side view showing labeling quality.
You don’t seem to look much at labeling quality, how things are embossed/extruded?
The idea was to keep the design manageable (apart from the spirals), starting from the known general AM design guidelines, so the types of different features are kept to a minimum, but these features are the most significant in order to give an immediate evaluation, and to be easy to use in daily production in the industry.
The lateral features and the complexity of the spirals were providing me with a lot of information.
There is a label on one side of the sample with the spirals, and I used it to keep track of the company – job number – position of the building platform. It has been essential considering the huge number of samples I had to deal with for this work.
A complete build platform.
When will the residual stress be measured?
I have evaluated the residual stresses using a 3D scanner, measuring the distortion of the parts after cutting from the building platform, and more specifically also on the distortion of the long thin wall on the side of the sample. Another method identified, but more complex in a production environment was the X-ray diffraction on the surface of the samples. The best case would have been to do all the measurement of the residual stresses before cutting the parts from the building platform, but for various reasons, this was not possible.
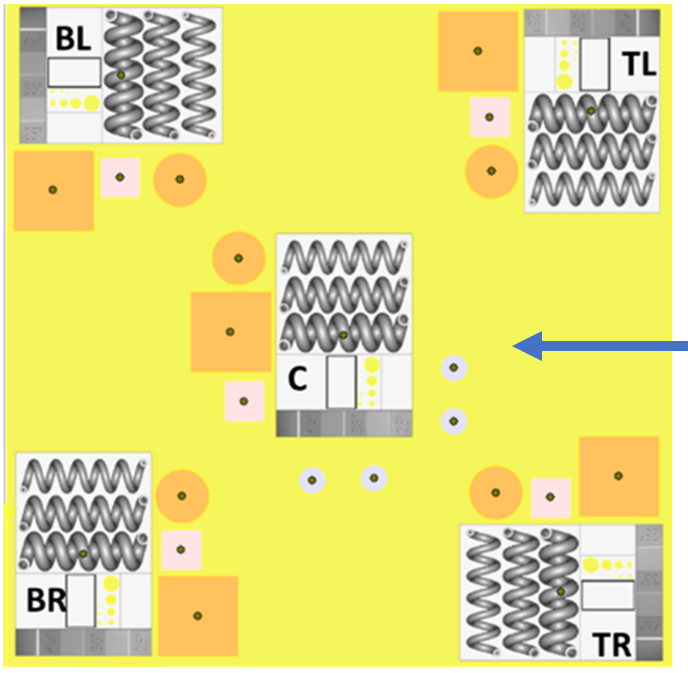
An image showing you the placement of the objects on the build platform. The blue arrow indicates the direction of the recoater.
How many parts do I print out?
3 platforms with all the samples repeated in 5 main positions (top left, top right, centre, bottom left, bottom right). This is necessary to evaluate the process repeatability. And repeatability is one of the main things to measure for making additive manufacturing a real industrial production.
Efforts like these are really important and we hope that the DTA or a similar object really becomes’ a standard soon. Effective benchmarking of printers is a real unmet need today. The paper explaining the DTA and how it was made can be found here.
Subscribe to Our Email Newsletter
Stay up-to-date on all the latest news from the 3D printing industry and receive information and offers from third party vendors.
Print Services
Upload your 3D Models and get them printed quickly and efficiently.


You May Also Like
Australia’s AMCRC Funds Titanium 3D Printing R&D
In terms of the global economy’s presently existing state, there is no realistic path to economic resilience that doesn’t start with critical minerals security. This is a problem for pretty...
3DPOD 305: Automating AM with Grenzebach’s Oliver Elbert
Oliver Elbert‘s over ten years in additive manufacturing have been spent automating LPBF. For large, high-volume, or critical parts, Grenzebach has provided custom automation solutions. Depowdering, powder handling, sieving, heat...
AMPulse Asia: Chinese IPOs, Defense Deals, and Dental 3D Printing Lead APAC Roundup
The second half of June brought a wave of additive manufacturing activity across China, Japan, South Korea, India, and Australia. From Chinese IPOs and funding rounds to defense, aerospace, construction,...
Austal, Curtin University and AMCRC Work on R&D Together
Australia’s Additive Manufacturing Cooperative Research Centre (AMCRC) works with 70 industry partners to deliver collaborative R&D projects. They also work on workforce development and technology transfer. It’s kind of analogous...


