Formlabs Explains How to Use 3D Printed Pewter Casting Molds to Make Full Metal Miniatures

![]() Let’s say you have a cool digital sculpture that you’d like to print into a figurine…no problem, that’s not difficult. But here’s where it can get tricky – what if you’re looking for a material with a little more pizzazz than plastic? Formlabs has published a tutorial on how to make full metal miniatures using 3D printed pewter casting molds. Metal offers a smooth surface that’s difficult to match, and pewter, a metal alloy composed of mainly tin, is extremely malleable, with a low melting point of around 170° to 230°C. The direct pewter casting process offers much better detail and surface finish than directly 3D printing metal, for a lower cost, and 3D printing a mold preserves detail, while saving on time and money – if there’s a problem with the casting, just melt your model down and re-use the metal.
Let’s say you have a cool digital sculpture that you’d like to print into a figurine…no problem, that’s not difficult. But here’s where it can get tricky – what if you’re looking for a material with a little more pizzazz than plastic? Formlabs has published a tutorial on how to make full metal miniatures using 3D printed pewter casting molds. Metal offers a smooth surface that’s difficult to match, and pewter, a metal alloy composed of mainly tin, is extremely malleable, with a low melting point of around 170° to 230°C. The direct pewter casting process offers much better detail and surface finish than directly 3D printing metal, for a lower cost, and 3D printing a mold preserves detail, while saving on time and money – if there’s a problem with the casting, just melt your model down and re-use the metal.
To get started, you’ll need a Form 2 3D printer and Formlabs’ High Temp Resin, along with CAD software, Autodesk Meshmixer, and a cure chamber, like Form Cure. You’ll also need a 3D model, either STL or OBJ, though Formlabs notes that if you’re using a solid model from Rhino or SolidWorks, the workflow will be a little different. Formlabs worked with Hero Forge to make a mini figure from its online customizer for this tutorial.
“Most models will be castable at some scale,” Formlabs writes. “The thinnest part of the model should be at least 1.5 mm, and around 15 mm at the thickest. If features are too thin, the metal part will be too fragile. If features are too thick, the casting won’t develop a smooth surface due to shrinkage. Small features under 1.5 mm are fine.”

In a sacrificial shell, the detailed model is on the inside of a thin mold.
Most models are not designed to be moldable, but you can make almost any metal object with a shell mold that’s designed to be broken off later. When preparing the mold design, you can either use a sacrificial mold or a pull-apart mold. If you go with the first option, make a shell using editing software, like Maya or Blender, or in Meshmixer; you can also make a shell mold from an STL. Make sure that light can reach the mold’s interior for the post-curing process – Formlabs split their mold in half to ensure easier post-curing, then glued and clamped it together again before pouring the pewter in.
“For larger models (2 – 10 cm in tall), making a uniform shell will save a lot of resin, print time, and money. If you are making a shell, it should be uniformly 3 mm thick to withstand the shrinkage and expansion forces from the molten pewter,” Formlabs writes. “For small models (1 – 2 cm tall), designing a uniform thickness shell may not be worth the effort. Simply subtracting your model from a rectangular volume can save design time.”

Two-sided mold printed without supports on the inside, in PreForm and as printed.
A conventionally designed two-sided pull-apart mold can be reused, but it does limit your design. However, no matter which type of mold you go with, you definitely need to remember to add in air vents, because when metal flows down, the air bubbles up. By making sure there are enough air vents, you’ll improve how well your model fills with pewter, so when your model is oriented in the way it will be filled, add vents where there are isolated high points in the model.
In PreForm, try to orient your model so it doesn’t need internal supports – you can simply point the cavity up for a two-sided, pull-apart mold. If you have a shell, you’ll need to search for an optimal orientation.

Point the cavity of your pull-part mold upwards in PreForm.
According to Formlabs, “Splitting the shell in half for gluing later is very helpful if you are having trouble finding an orientation that doesn’t require unremovable supports, and also enables uniform post-curing for the interior of the mold.”
Then 3D print the model using High Temp Resin, which must be fully post-cured for it to hit the required thermal properties – you’ll see your print transition to orange as it cures. You can use Form Cure, heat, or even a UV nail spa, though this last option takes several hours. You’ll need to make sure all of the parts are washed and fully dried before you use them, as moisture will reduce the surface quality of the casting by causing air bubbles. Formlabs suggests dusting your mold’s cavity with graphite powder lubricant, which helps it release more easily.
You have to be very careful that none of your skin is exposed when casting pewter, in case it splashes; also, be sure that you’re casting outdoors, or in a well-ventilated space. Fix your mold in a clamp or a vise, or even partially embed it in a bucket of sand, so long as the air vents aren’t blocked. Formlabs used Alloy R98 from Rotometals, though there are many different pewter alloys available, and melted its pewter ingot on a frying pan, used only for this specific purpose, on a portable stove outside.

-
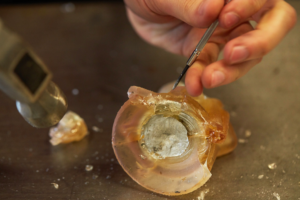
- Use gentle taps to break apart your sacrificial mold.

Make sure the pewter is at the right temperature before pouring. You can test this with a piece of dry wood – if the wood starts to smoke, then the pewter is too hot and you should not pour yet. The pewter will form an oxide layer on top of the puddle as it melts, which you should scrape off with a spoon before slowly pouring the pewter into the mold with one continuous pour. Once the part has completely cooled, you can demold the part; if you used a sacrificial shell mold, you can use a small screwdriver to carefully chisel the shell away from the model.
 Ta-da – now you have your own pewter figurine! The soft alloy can be polished or buffed by hand, or using a rotary tool for a high gloss finish. You can also electroplate it using precious metals, or plate it with nickel to achieve high mechanical strength. Discuss in the Pewter Molds forum at 3DPB.com.
Subscribe to Our Email Newsletter
Stay up-to-date on all the latest news from the 3D printing industry and receive information and offers from third party vendors.
You May Also Like
Polls of the Week: Are 3D Printed Guns a Threat and Should We Regulate Them?
One of the most controversial topics in the 3D printing industry, hands-down, is guns. It’s been a major point of contention for years, and people typically have very strong opinions...
3D Printing News Briefs, April 3, 2024: Kickstarter FDM 3D Printer, Artificial Eyes, & More
In 3D Printing News Briefs today, we’re talking about an FDM 3D printer on Kickstarter, advancements in artificial eye creation, and 3D printed solenoids for electromagnets. Then we’ll move on...
Daring AM: The Global Crackdown on 3D Printed Firearms Continues
In the last few years, a surge in police raids uncovering 3D printed guns has led to concerns about their growing association with criminal gangs. Although typically seen as inferior...
Daring AM: Canada Tackles Increase of 3D Printed Gun Arrests and Sentences
Recent incidents in Canada have brought to light the arrest of individuals for possessing illegal 3D printed firearms, among other charges. These incidents, which resulted in multiple arrests, serve as...