Artist Uses Sharpie Markers to 3D Print in Color, Creates Warp/Weft Prototype


Tom Burtonwood
Many of us embrace new technologies like 3D printing and are enthusiastically ready to jump on board full throttle. It’s tempting to throw everything traditional out the window as progress drives us with us a seemingly infinite influx of sleek new machines and resulting innovations, steeped in contagious brilliance.
Although the conversation and predictions regarding 3D printing often point toward extremes in transformation, with traditional, blue-collar manufacturing jobs about to be sent into apparent obscurity, what many have settled into is a comfortable mix of old and new–allowing a mix of tools to complement one another. While we stubbornly want to race forward, often the designs of the future still just rely on getting the job done with all the proven tools at hand. And for the modern artist, it’s often still just a matter of experimenting with all available tools, without prejudice, to reach a certain aesthetic.
For Tom Burtonwood, 3D printing in color in a rather alternative manner was a process he tackled in a first project, Plotting Curves, and then came back to with a more focused effort just recently. In adding color to his 3D prints, he takes the artisan’s approach–combining one of the world’s most progressive technologies with what started out as simple, nearly manual coloring of filament to obtain hues in his 3D models. It all comes down to one of the most ubiquitous tools we all love to find a use for, as they come in so many colors and are just fun to use, gliding and rolling under our fingertips as they exude copious amounts of ink: the Sharpie.
Filament colorizer
As it stands today, we could spend a vast amount of hours expounding on all the new color filaments available, along with 3D printers that allow for multi-color printing, featuring multiple extruders, new mechanisms so that the printing process is not halted to change colors, and more. 3D printing in color is becoming a continually integrated process, and most have already had it planted in their brains that the only way to have a model come out of the 3D printer with color is to insert pre-colored filament into the machine to begin with.
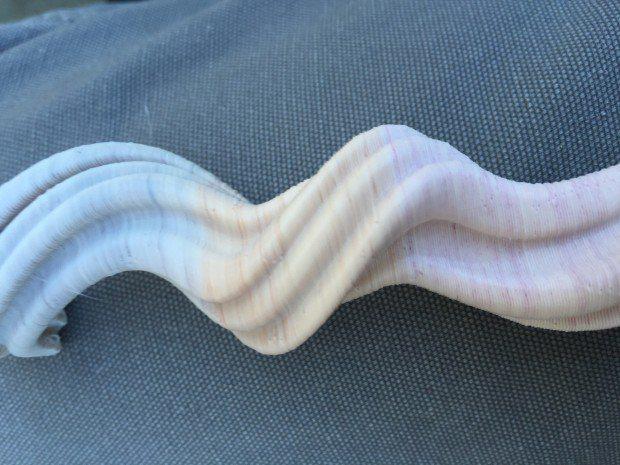
Burtonwood, in his first project relating to the subject, Plotting Curves (exhibited next week at The Compound Gallery in Oakland, CA), wanted color in his filament–so, quite simply, he worked at coloring the material himself to achieve the desired effect. He didn’t have to develop any new chemicals or send his concepts off to a research and development team; he just grabbed a stack of Sharpies from the local store and began using them with a rudimentary device to ‘colorize’ large portions of the filament he was using, and in the end producing mild, pretty pastel hues on beautiful 3D prints that resembled those of coral you might find in a tropical paradise.
 While that’s simple enough, what’s more interesting and important about the concept is the ink being applied during 3D printing, rather than in pre-packaged form. It’s a process that goes back to the most simple methods of printing. Deriving inspiration from Thingiverse user ramai’s ‘Filament Colorizer‘ published in 2013, Burtonwood began using the color to show off the texture of the 3D models. The filament colorizer is a very simple device that colors the filament with the Sharpie ink, allowing the user to color the filament from four sides, and producing very light, subtle hues.
“Sometimes I would color in a few feet of filament at a time, other times I would shade in as much of the roll as I could access at a given time with multiple colors overlapping and bleeding into each other,” said Burtonwood in regards to his projects. “The results from these interventions were very successful with high contrast banding of colors highlighting the striations found in the layered plastic.”
Upon completing Plotting Curves, Burtonwood began considering the use of the Sharpie mechanism further, and at that point did become a mini R&D department as he developed a device he refers to as the ‘Warp/Weft’ prototype. The intention of this further evolved Sharpie-exuding device is to expand on his desire to control the colorization more precisely, and perhaps even become more detailed with shapes and patterns. While enjoying his residency at the Maker Media Lab, Burtonwood began to study the ways he could manipulate the movement of the pens and produce different types of colorization in his 3D prints.
“After all, isn’t the horizontal movement of the extruder similar to the shuttle in weaving, each layer of plastic analogous to the woof (weft)?” asked Burtonwood. “Could the warp be unlocked by controlling the frequency of marks on a given portion of filament?”
First working prototype
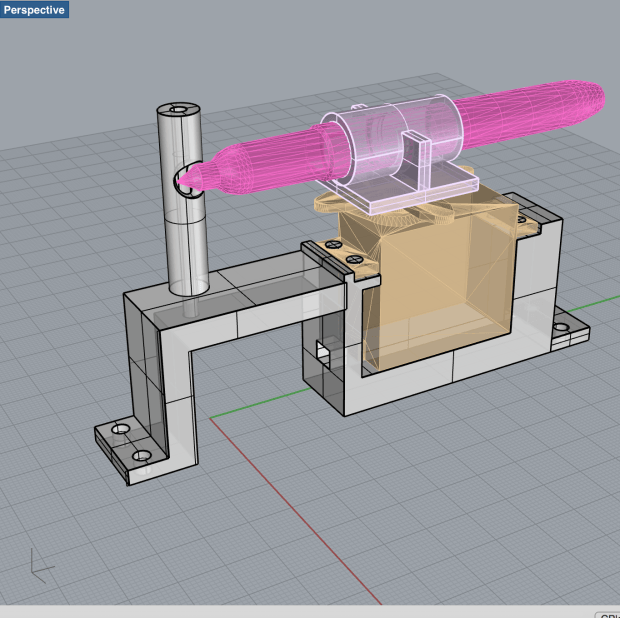
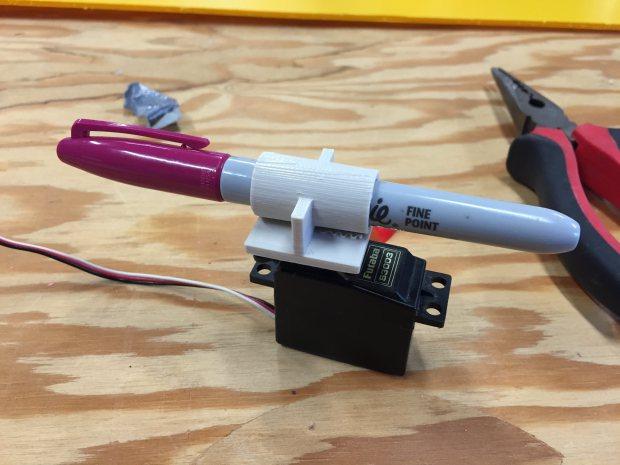
In exploring how to make the pens move in the desired manner, Burtonwood dismissed the use of Arduino activated solenoids due to heat issues and focused instead on employing servos. After some experimentation, he settled on a mechanism that used a standard servo to move in a horizontal motion from ten to zero degrees, with a delay of one second.
Borrowing again from Thingiverse as he worked on completing his prototype in Rhino, Burtonwood used two files from Thingiverse as he worked to modify and scale his 3D printing project: “Futaba S3004” by txoof and “Sharpie Fine Point” by beardicus.
“Amazingly, both the .stl files were spot on and all my connections worked first time–this never happens,” said Burtonwood. “However, I did need to make some alterations with a soldering iron to the filament guide in order to get the tip of the marker to connect with the plastic properly. It’s not the prettiest mod but it got the job done at lot faster than printing a new piece entirely.”
 While Burtonwood has created an innovative microcontroller, reaching his goal of being able to draw on the 3D model is still a work in progress as colorization with the Sharpies is challenging due to the ‘bleed’ process which causes the colors to become washed out, along with complications caused by friction. A logical idea would be to increase the amount of ink, which means increasing the amount of pens.
“I need to print some standard objects, cylinders etc, and increase the number of servo mounted pens to 3 or 4 for stronger color,” said Burtonwood. “Then, I’ll start working on the programming more — trying to dial it in and get some clearer results.”
“For now, this is a win. It is a step in the right direction and is a micro controller project I can sink my teeth into.”
Files for the STLs, CAD and Arduino are posted Thingiverse. Is this a design you are interested in experiment with for use in 3D printing with color? Discuss in the Sharpies to 3D Print in Color forum thread over at 3DPB.com.
[Credit: Makezine]
Subscribe to Our Email Newsletter
Stay up-to-date on all the latest news from the 3D printing industry and receive information and offers from third party vendors.
Print Services
Upload your 3D Models and get them printed quickly and efficiently.


You May Also Like
The Market and Industry Potential of Multi-Material 3D and 4D Printing in Additive Electronics
Additive manufacturing leverages computer-based software to create components for products by depositing either dielectric or conductive materials, layer by layer, into different geometric shapes. Since its birth in the 1980s,...
3DPOD 262: Bio-inspired Design for AM with Dhruv Bhate, Arizona State University
Dhruv Bhate is an associate professor at Arizona State University. There, he looks at structures, materials, and design. Previously, he worked at PADT as well as in the semiconductor and...
3DPOD 261: Tooling and Cooling for AM with Jason Murphy, NXC MFG
Jason Murphy´s NXC MFG (Next Chapter Manufacturing) is not a generalist service; instead, the company specializes in making tooling. Using LPBF and binder jet, the company produces some of the...
3DPOD 260: John Hart on VulcanForms, MIT, Desktop Metal and More
John Hart is a Professor at MIT; he´s also the director of the Laboratory for Manufacturing and Productivity as well as the director of the Center for Advanced Production Technologies....