Use Legos to Make Your Own 3D Printer Using Nema 17 Stepper Motors

3D printing and toys often immediately brings to mind the quintessential plastic product often replicated, and often enjoyed by children all over the world on a daily basis: the Lego. Not just for kids, you may be well aware that the uses for these colorful blocks extends far beyond child’s play.
And while there has been a number of other Lego 3D printers on the market, from the build-your-own arena where one 3D printer we reported on previously is actually made from Legos specifically for, of course, the noble task of only printing Legos, to the more homespun DIY 3D printer experiments that are fairly easy to assemble, there’s certainly room on the block for a new design.
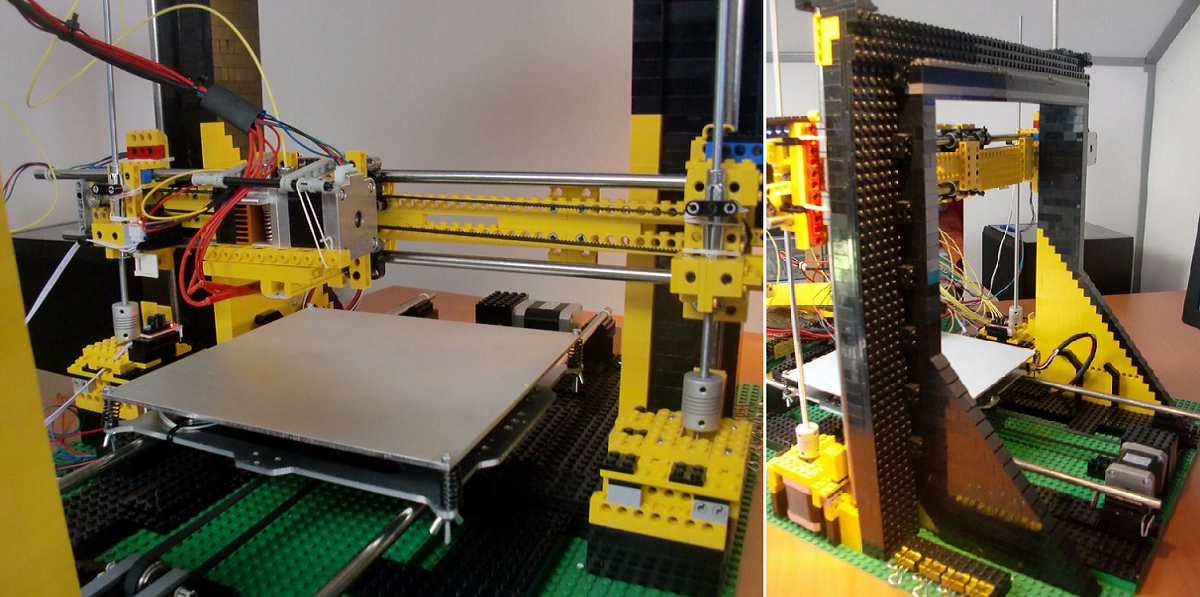
 Definitely not a toy itself, the LEGO 3d printer can actually pump out some credible 3D models for you. Built on the premise of a Prusa i3 rework printer, this machine is paired with Nema 17 stepper motors. It’s built with the ubiquitous plastic squares that leave children delighted–and parents in pain, infamously shouting expletives as they step on them in the dark of night. While most Lego printers employ servos, this build design worked very well with stepper motors.
From Instructables member, Gosse Adema, we’re able to follow assembly of this X, Y and Z axis machine featuring a default Lego brick of 4 by 2 studs at 32 x 16 x 9.6 mm for a solid base. Pointing out that he does not use any Mindstorms products from LEGO, and employs the stepper motors rather than servos, Gosse Adema says this is not a 100 percent Lego machine.
For software, he enjoyed using Marlin for the Atmega 2560 and Pronterface on a laptop to control the machine. It features a heated print bed that reaches temperatures of 110 degrees Celsius.
As for materials, here is a basic list of what you are looking at. (Adema also recommends using m3 x 15 bolts for connecting the steppers to the LEGO.)
Mechanical Parts and rods
- Smooth rod 8mm (3 x 100 cm)
- Threaded rod m5 (1 x of 100 cm)
- LM8UU linear bearing (11 x)
- Ball bearing 608 (2x)
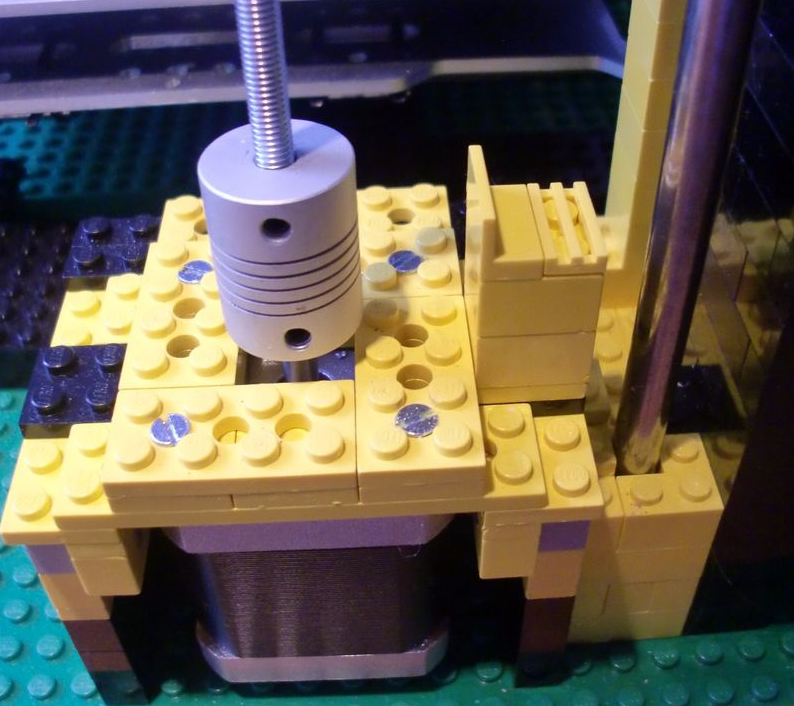
- Flexible coupling 5×5 (2x)
- Nema 17 stepper (4x)
- GT2 Pulley (2x)
- GT2 Belt (200 cm)
Heated bed
- Y-carrier frame (1x, or use LEGO for only PLA printing)
- Heatbed (1x)
- Glass Plate (1x)
- Binder clip (1x)
- Thermistor 100K (1x)
Electronics
- Ramps (1x)
- Atmega 2560 (1x)
- Stepstick (4x)
- Endstop (3x)
- Power supply (1x)
- Ramps wiring kit (1x)
- Extruder with Nema stepper (1x)
Once you’ve built the base, you will want to:
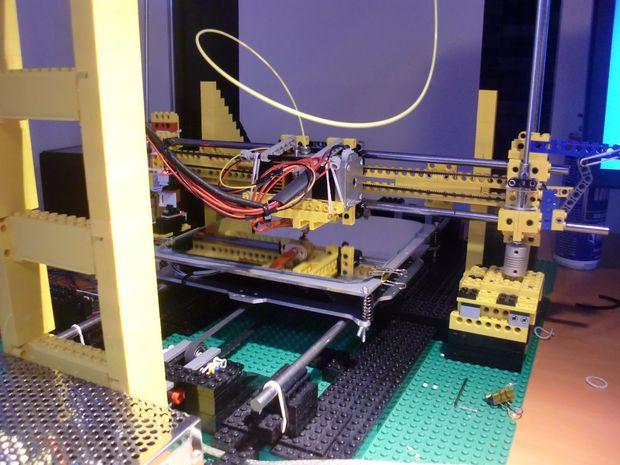
- Complete the Y Axis with the motor and belt – the Y-carriage places the LM8UU bearing with a distance of 170mm, giving 21.25 studs. Use the technic bricks at the back of the machine to place the motor.
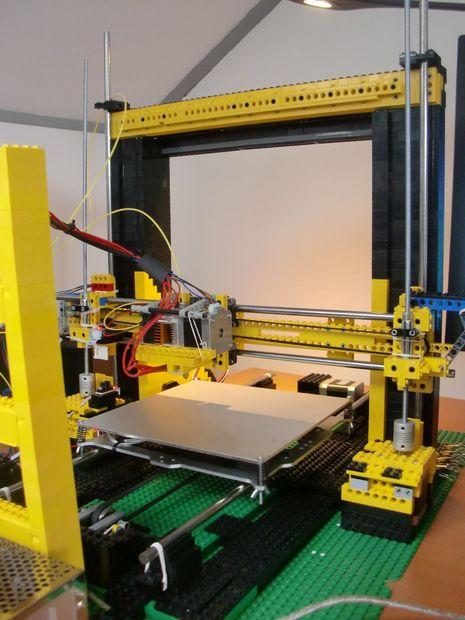
- Start building the frame and assembling the Z Axis with the motor and threaded rod. This is where you get to put some of your Lego-building expertise to work. “Build a sturdy L-frame of 36 blocks high,” states Adema. “This determines how high you can print, but do not build too high. The higher, the more unstable the frame. Use a Lego technic brick each 5th brick and use plates for getting a rigid frame. Connect both sides at the top of the frame.”
- The Nema steppers are attached with 2×4 and 2×8 plates that have holes.
- Complete the X Axis with the motor – instructions must be carefully attended to for this section, as Adema warns it is the most difficult step, and he includes images for each step as you complete the X-axis with the motor, extruder-carriage and belt–beginning with right side and then finishing with the left.
- Install extruder carriage and belt – because of the 3D printer’s size, Adema chose to use a Geeetech assembled MK8 extruder, with a default 0.3 mm nozzle that uses 1.75 mm filament. Once installed, he recommends using tie wraps for secure attachment.
- Install endstops – there are three, to include one for each axis. All endstops are connected to technical bricks with m3 x 15 mm bolts, and nuts.
For the electronics, see step 7 where Adema refers you to several different resources like RepRap www.reprap.org for assembly. Once electronics are ready, it’s time for testing of:
- Steppers
- Endstops
- Heating bed
- Extruder
Adema notes that you’ll also want to make a note of the fact that before installing the Marlin software to the printer, you will need to make changes to the printer and the configuration which should then allow you to proceed.
“My first print had some problems with the amount of filament but everything worked,” stated Adema. “The main problem was the difference in filament settings and extruder nozzle. This was caused by the Pronterface settings.”
He did have to adjust settings due to the filament and nozzle size. For calibration, Adema once again sends you to RepRap, but as an addendum gives you special instructions on PID-tuning. See here for the special commands required.
“Although the printer needs to be further calibrated everything is working properly,” said Adema. “I probably need to alter the filament settings.”
“By ensuring that all axes move smoothly, no steps are skipped by the stepper motors. This was one of the problems during the first print,” says Adema, stating that he plans to keep working on his 3D printing skills, as well as updating his Instructable for the LEGO 3d printer.
Is this a 3D printer you are interested in building? Have you incorporated Legos into any of your 3D printing activities or builds? Discuss in the Lego 3D Printer forum over at 3DPB.com.
Subscribe to Our Email Newsletter
Stay up-to-date on all the latest news from the 3D printing industry and receive information and offers from third party vendors.
Print Services
Upload your 3D Models and get them printed quickly and efficiently.


You May Also Like
Reinventing Reindustrialization: Why NAVWAR Project Manager Spencer Koroly Invented a Made-in-America 3D Printer
It has become virtually impossible to regularly follow additive manufacturing (AM) industry news and not stumble across the term “defense industrial base” (DIB), a concept encompassing all the many diverse...
Inside The Barnes Global Advisors’ Vision for a Stronger AM Ecosystem
As additive manufacturing (AM) continues to revolutionize the industrial landscape, Pittsburgh-based consultancy The Barnes Global Advisors (TBGA) is helping shape what that future looks like. As the largest independent AM...
Ruggedized: How USMC Innovation Officer Matt Pine Navigates 3D Printing in the Military
Disclaimer: Matt Pine’s views are not the views of the Department of Defense nor the U.S. Marine Corps Throughout this decade thus far, the military’s adoption of additive manufacturing (AM)...
U.S. Congress Calls Out 3D Printing in Proposal for Commercial Reserve Manufacturing Network
Last week, the U.S. House of Representatives’ Appropriations Committee moved the FY 2026 defense bill forward to the House floor. Included in the legislation is a $131 million proposal for...