Using Artificial Intelligence to Measure 3D Printed Materials
The aerospace, automotive and medical industries in particular are abandoning traditional stylus-based contact methods for controlling their processes and performing dimensional quality control on their products, and are instead choosing to use non-contact optical 3D measurement techniques. Different measurement systems work better with different types of materials, and in a paper entitled “Artificial intelligence-enhanced multi-material form measurement for additive materials,” a group of researchers used an artificial intelligence approach to “recognise the material of a measured object and to fuse the measurements taken from three optical form measurement techniques to improve system performance compared to using each technique individually.”
Non-contact optical measurement has several benefits: it is non-destructive, has improved speed, increases the area of acquisition per measurement cycle and reduces cost.
“For non-contact optical camera-based techniques especially, the ability to leverage the benefits of readily available AI-based image recognition algorithms to enhance the measurement even further provides an additional benefit over stylus-based contact techniques,” the researchers state. “Non-contact optical techniques, however, are not a panacea, and for some measurement scenarios, contact stylus-based techniques still need to be used, as optical techniques suffer from lower accuracy, material sensitivity and much higher requirements for data handling and storage.”
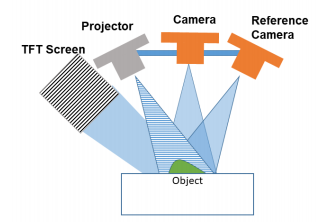
In the study, the researchers performed data function by using a common reference camera to employ three different camera-based measurement techniques:
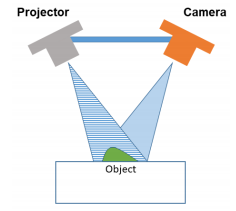
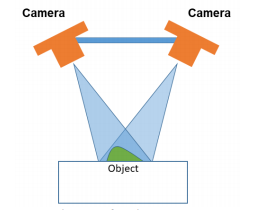 Fringe projection: a structured light technique that uses a projector and a camera to create a 3D point cloud of a scene observed by a camera either by triangulation or phase-stepping. It is used mainly for measuring diffusely reflecting objects.
- Deflectometry: a structured light technique similar to fringe projection but instead of projecting the fringe pattern, it is displayed on a TFT screen. It works best for reflective objects, as a bundle of rays from each pixel will reflect from the object into the camera via direct reflection.
- Photogrammetry: a technique that creates a 3D point cloud by taking advantage of unique surface features that exist in two or more images of the object taken from different points of view. Multiple camera views are used in order to reconstruct the 3D surface of an object by searching for pixel correspondences in the images taken.
Combining the three techniques allows 3D surface point clouds to be taken for reflective and diffuse objects that are featureless or have multiple features on their surface. To combine the data from all three techniques, the researchers used the same reference camera for all three systems and a spatial-temporal data collection scheme to collect data from different parts of the image at different times. The collection scheme had two parts: an image segmentation strategy and a temporal synchronization strategy.
The image segmentation strategy employed deep learning through a segmentation network or SegNet, and was trained to identify different materials in an image of the scene taken by the reference camera. The temporal synchronization scheme cycled all three measurement subsystems in the time domain by activating the required modules used by each technique at the appropriate time and taking measurements of the scene.
“As all three point clouds are taken by the same reference camera, they are automatically placed in the same frame of reference,” the researchers state. “The partial 3D data can, therefore, be automatically fused together to form an optimised 3D point cloud of the scene containing all three objects. This temporal synchronisation strategy allows for both optimised data fusion, minimisation of measurement data and reduction of noise, as each measurement technique works best for a specific material.”
A few challenges occurred during the image segmentation strategy, mainly related to spurious reflections and ambient light changes.
“In particular, reflections from other objects, reflections from ambient light sources and the significant change in lighting create errors in the segmentation of the images by labelling a large proportion of pixels erroneously,” the researchers explain. “Future work will include controlling the lighting and reflections used when creating the images by shielding the samples from ambient lighting as well as training the network by including more illumination conditions in order to improve robustness and finally customizing the selection of network parameters to enable more accurate segmentation of the images.”
Authors of the paper include P. Stavroulakis, O. Davies, G. Tzimiropoulos, and R. K. Leach.
Discuss this and other 3D printing topics at 3DPrintBoard.com or share your thoughts below.
Subscribe to Our Email Newsletter
Stay up-to-date on all the latest news from the 3D printing industry and receive information and offers from third party vendors.
Print Services
Upload your 3D Models and get them printed quickly and efficiently.
You May Also Like
OVERLEAF 3D Prints Cryogenic Tank For Aviation Liquid Hydrogen
Spanish technology center Aimen has 3D printed a cryogenic tank meant to store liquid hydrogen for use as aviation fuel. This test tank was made as a part of OVERLEAF,...
Low-cost “Suzy” Polymer Powder 3D Printer is Faster and Cheaper than Past Models
Polish laser powder bed fusion (LPBF) firm Sinterit has released a follow-up to its predecessors, Lisa and Nils, called Suzy, a $19,490 printer equipped with a 30W fiber diode laser....
OPPO Find N5: World’s Thinnest Foldable Smartphone Hinges on 3D Printed Hinges
OPPO has unveiled its latest foldable smartphone, the Find N5, demonstrating a significant step forward in the ongoing push for slimmer, more durable foldable devices. With a folded thickness of...
ADDMAN Adds Continuous Composites Technology for Hypersonics and UAV Applications
ADDMAN Group and Continuous Composites are teaming up to reshape how aerospace and defense sectors create parts for hypersonic vehicles and unmanned aerial vehicles (UAVs). Through this partnership, the two...


