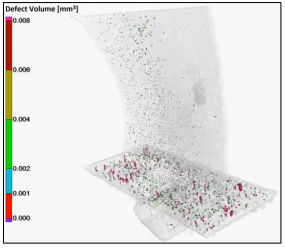
 Many things can go wrong with an additively manufactured part, and those things are not always visible. Particularly in powder-based 3D printing, there are several things that can happen during the print that cause issues such as cracking and voids, which may be inside the part and invisible to the eye. There are ways, however, of discovering these defects without having to break apart the part and look inside. In a new paper entitled “The Role of Computed Tomography in Additive Manufacturing,” which you can access here, a group of researchers argue that computed tomography, or CT scanning, is the most effective way of performing quality checks on 3D printed parts.
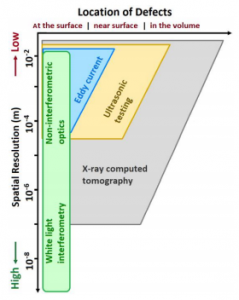
Complex parts are especially challenging to inspect for quality purposes, as they can contain internal channels or structures that are prone to voids or inclusions, which are unmelted particles or powder residues. These flaws are difficult for traditional non-destructive testing, or NDT, techniques to fully assess. These techniques include ultrasonic, infrared, eddy current, radiographic inspection, and light-based technologies. Optical methods of defect detection can only detect flaws at the surface or through a surface opening.
“Eddy-current testing and ultrasonic techniques can detect defects within the volume if they are not located very deep inside the testing sample, but the one drawback is the limited spatial resolution of detection, which is in the millimeter range or some fraction of millimeters in the most optimal situations and for even more limited depths into the surface,” the researchers explain.
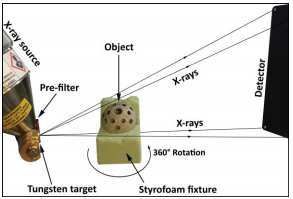 The best method for nondestructive inspection of complex geometries inside a part, they argue, is X-ray CT, which has a resolution from millimeter to micrometer ranges, and even sub-micron levels in some cases. In fact, they continue, in many cases it is the only viable option. It can detect cracks, porosity, dimensional deviations from CAD models, and powder residues or inclusions.
“In general, tactile CMMs (coordinate measuring machines) or optical measuring instruments like laser scanners are limited to the measurement of the external surface of an AM part and can provide additional measurements for partial qualification of CT measurements,” the researchers add. “In addition, tactile CMMs can produce compressive stresses and friction during sliding that could produce wear at the surface. In contrast, X-ray CT eliminates the above difficulties because it is a non-contact technique that can access internal features.”
The importance of qualification for additively manufactured parts cannot be overstated. If a part is being used for an aerospace application, for example, it’s absolutely critical that that part is perfect, with no hidden flaws. There are many methods for checking the quality of parts, but most of them come up short in terms of detecting flaws that are hidden deep inside a part. The paper goes on to highlight a case study in which X-ray CT was able to detect minute deviations in dimension from the CAD model to the final part, as well as material inclusions in the internal cavities.
It can be challenging to use CT technology with metal parts, as metal parts can scatter X-rays, disrupting CT reconstructions and producing unwanted artifacts in the data. The solution, the researchers say, is to use a 2D fan beam of X-rays and a linear detector, which can reduce the scattering. Overall, they conclude, CT technology is an effective method of non-destructive testing.
Authors of the paper include Herminso Villaraga-Gómez, Christopher M. Peitsch, Andrew Ramsey and Stuart T. Smith.
Discuss this and other 3D printing topics at 3DPrintBoard.com or share your thoughts below.
Subscribe to Our Email Newsletter
Stay up-to-date on all the latest news from the 3D printing industry and receive information and offers from third party vendors.
You May Also Like
Aurora™ Mainboard: Dyze Design Brings Real-Time Precision and Automation to Industrial 3D Printing
Dyze Design, Montreal-headquartered component manufacturer, continues to push boundaries in 3D printing innovation with the introduction of the Aurora™, a state-of-the-art motion I/O controller designed for professional and industrial-grade 3d...
Quebec Man Admits to Hate Speech and 3D Printed Gun Scheme
A Quebec man has admitted to promoting antisemitic hate speech while trying to manufacture guns with 3D printers. On December 13, 2024, 38-year-old Pascal Tribout pleaded guilty to multiple charges,...
Zhejiang’s Strategic Push in Advanced Manufacturing: 2027 Vision
On December 3, 2024, the Zhejiang Provincial Department of Economics and Informatization unveiled an implementation plan aimed at high-quality development in the industrial machinery sector by 2027. This initiative spans...
3D Printing News Briefs, December 14, 2024: Multimaterial SLA, Fusion Energy, & More
We’re starting with a new 3D printer in today’s 3D Printing News Briefs, and then moving to fusion energy and a facility for catalyst shaping based on 3D printing. Then...


