
Learn to Use SketchUp 3D Modeling Software in 17 Easy Steps


![]() If you’ve been learning about 3D printing and admiring so many of the fascinating new innovations that designers of all expertise and age ranges are creating today, 3D modeling may be piquing your curiosity, and on your list of interesting things to check out. This may be a new skill you want to put at the top of your list for delving into, however, as it will expand your world of creativity substantially, setting you up for the next step into 3D printing.
If you’ve been learning about 3D printing and admiring so many of the fascinating new innovations that designers of all expertise and age ranges are creating today, 3D modeling may be piquing your curiosity, and on your list of interesting things to check out. This may be a new skill you want to put at the top of your list for delving into, however, as it will expand your world of creativity substantially, setting you up for the next step into 3D printing.
i.materialise believes that so strongly that recently they released a beginner’s guide, offering “How to Create Your First 3D Model in SketchUp.’ This is the perfect time to pick up a list of tips that send you on your way—in a non-intimidating fashion—as you start to master this software used for prototypes, models, functional parts and more. SketchUp is famous for ease in use and little in the way of a learning curve. SketchUp expert Mich Judelag of All3DP put together this tutorial which takes you through the initial points of 3D modeling, helping you to design your first 3D model.
![]() You can look forward to learning how to translate 2D shapes into 3D and then manipulate them in a diverse number of ways—from moving and pushing to scaling and copying. Seventeen steps follow for sending you on your way to excellence in design.
You can look forward to learning how to translate 2D shapes into 3D and then manipulate them in a diverse number of ways—from moving and pushing to scaling and copying. Seventeen steps follow for sending you on your way to excellence in design.
Step One
You’ll need to decide which level of SketchUp you wish to download, and then do so. Assuming you are shooting for the novice range, you’ll want the beginning software, which is free; however, should you want to go the more advanced route from here, you can download SketchUp Pro instead, enjoying more latitude in actions, like scaling and exporting and importing from CAD.
Step Two
Select your workspace from the opening window, starting with Simple Template – Meters.
“Click on the template and then on the ‘Start using SketchUp’ button on the lower right side of the window,” says Judelag. “I recommend you to check the box on the lower left side that says ‘Always show on startup,’ as this will enable you to select any template every time you open the application.”
Step Three
This is a great place to check out the tools you are going to be working with, as you see a list of toolbars, choosing ‘Large Toolset,’ for a versatile supply of tools to get you going on your first 3D model (be sure here to uncheck the other toolbars).
Step Four
You’ll see the red, green, and blue axes which allow you not only to see your model from different directions, but also to use ‘snapping’ for alignment. At this point, you can start creating 2D shapes.
Step Five
Here, you’ll want to start practicing drawing the fundamentals like lines, rectangles, and circles. See the full tutorial for outlined instructions on working with each of these, but for the most part it’s a very intuitive exercise that begins with clicking on the icon of your choice.
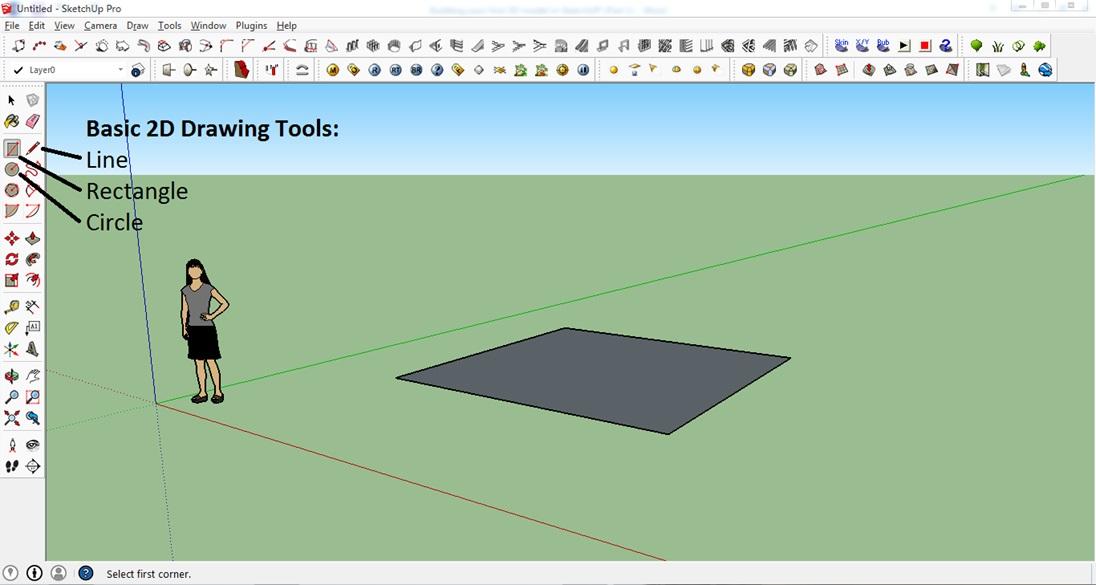
SketchUp drawing tools
Step Six
Learn how to use Pan and Orbit for basic movements. Pan is as easy as clicking on the proper icon, clicking to set the origin, and then holding the mouse button and dragging.
“This will allow you to move your view,” says Judelag.
For Orbit, click on the icon and then clicking anywhere, you can hold, drag, and rotate the entire view. If you’d like, you can also do this with the mouse wheel.
Step Seven
It’s very important to make sure you are familiar with Edit > Undo, as well as Alt + Backspace, which also reverse a step. Remember to save your work with File > Save or Ctrl + S.
Step Eight
Here you can begin making 3D models by zooming in and highlighting the plane of a shape.
“When you see the plane highlighted (i.e., when the plane shows a dotted texture on it), click on it and simply drag it upwards,” advises Judelag. “Click the left mouse button again to set the height of your cylinder, cube or cuboid. Or type the height after the first click.”
At that point, your 2D shape has been converted—and you have your first 3D object!
Step Nine
This tool allows you to check dimension by simply choosing the appropriate icon. You can also use both the tape measure and protractor tools here (found in the lower right corner), and it’s recommended that you spend some time experimenting with how these work as they can be very helpful to you as you progress.
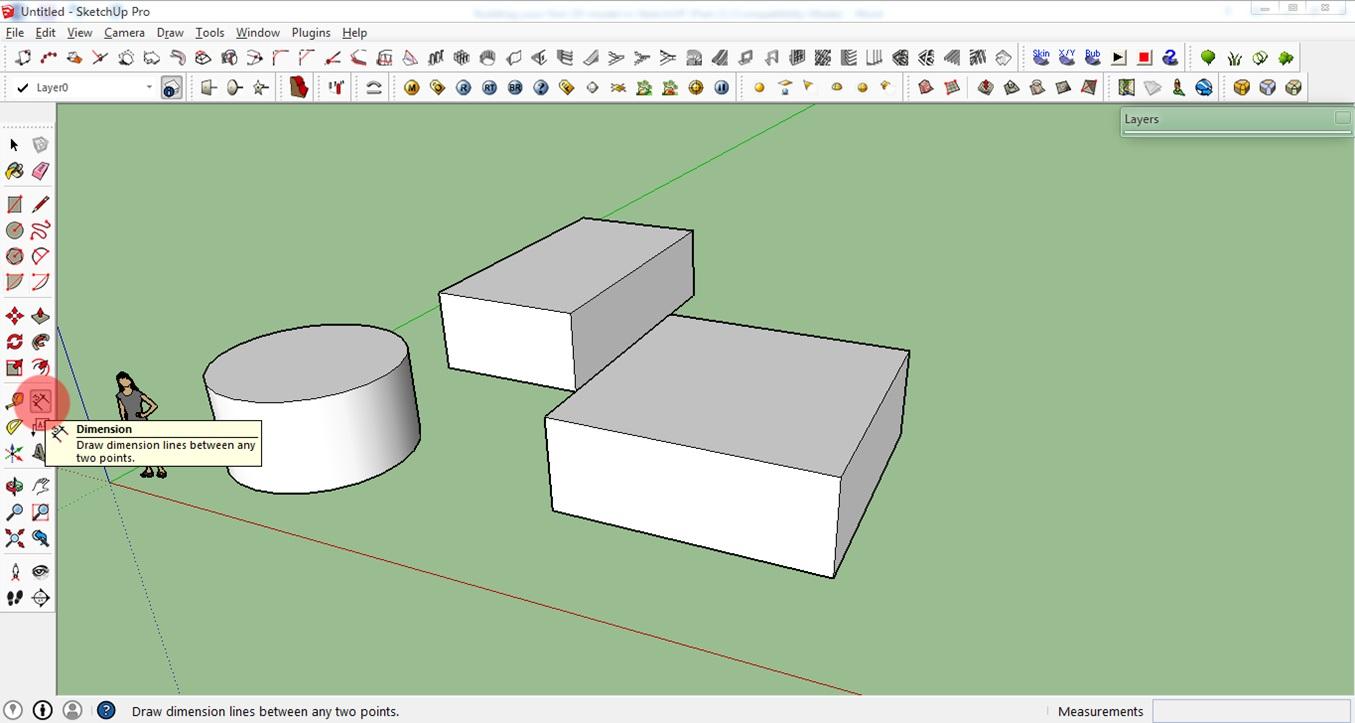
SketchUp dimension tools
Step Ten
Moving objects is very easy in that you just need to select the object (with the select tool) and then encompass it with a ‘selection net.’ Click the move tool, click on the object, and drag.
Step Eleven
This is another very easy exercise, which you should be comfortable with if you know your way around a computer already. Just select the object, and then press Ctrl. Once you left-click, you can past the copied model where you’d like it to go.
Step Twelve
If you need to erase lines or planes, click on your eraser tool, and then click on the areas that need to be erased. (You can also select a line with the Select tool and then hit the delete button).
Step Thirteen
In using the 2D text tool, you will be able to both figure out the base areas of a plane and place labels. The 3D text tool will actually allow for text that is integrated into the design.
“As always, it makes sense to simply play around with these two tools,” says Judelag.
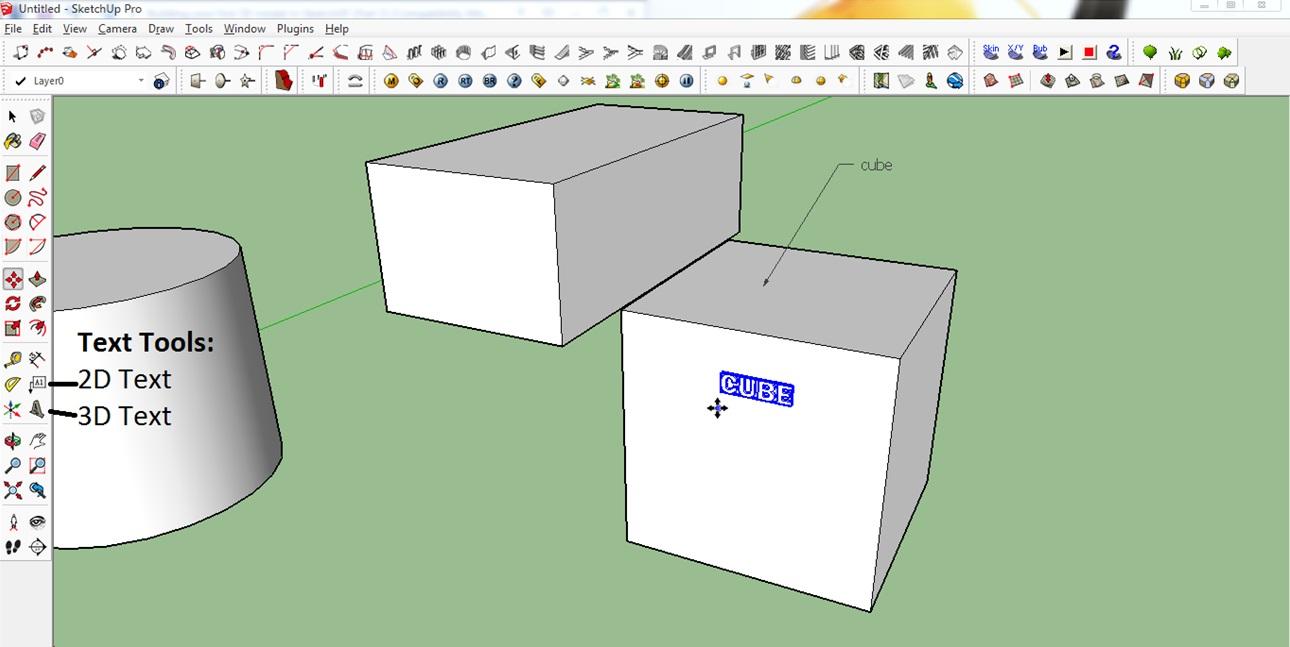
SketchUp text tools
Step Fourteen
If you are ready to say goodbye to part of your model and need to use the cutting tool, it’s as easy as using the Push/Pull tool, clicking on the shape and then ‘pushing’ down to make the cut, finalized with a click. See the tutorial for more expanded instructions.
Step Fifteen
The arc tool, once again, you should find to be easy and fun to work with, but definitely try working with it a little ahead of time. Here you can draw a curve:
“After selecting the tool, click on one of the corner points of a cube. Then click somewhere on one of its top axes and draw an arc. Sounds complicated? It’s easy once you try it!” says Judelag.
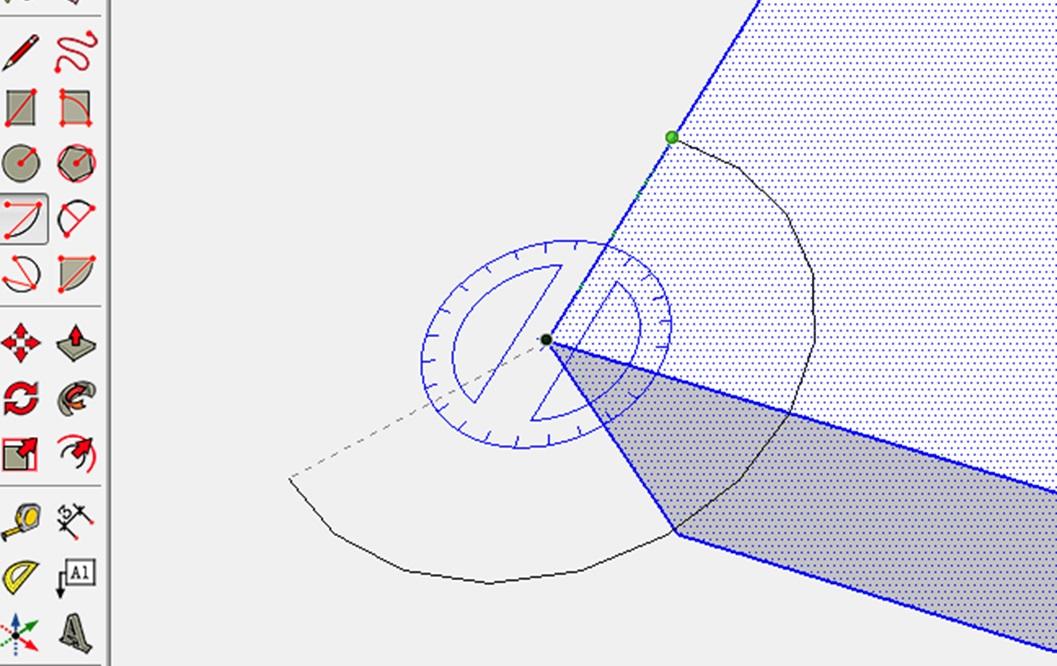
The SketchUp arc tool
Step Sixteen
Here, you embark on scaling your model by choosing the tool, and then selecting from the varying scaling points. The green dots help you manipulate the shape in both scaling and stretching.
“If you want to scale our model up or down while maintaining the ratio and proportion of our rectangular box (this is called uniform scaling) you need to click on one of the 8 corner points of the rectangular box,” says Judelag. “You will see the value of your scaling in the lower right corner of the window. A value of 0.50 means you will be scaling your model down to 50%.”
Step Seventeen
You’ve probably heard that orientation of your model is very important. Here, the rotating tool will help you if your model is facing the incorrect way. All you need to do after selecting the tool is to click on the top of the shape to ‘set your axis,’ and then move your cursor so that it is going toward either the green or red axis, creating a baseline. At that point, you can rotate your model. You can also just enter a value for the angle numerically.
After going through all these steps and seeing how simple SketchUp really is, you probably understand why so many designers are gung ho about using it. If you’d like to go ahead and 3D print your model but aren’t quite sure about how to proceed, check out the next tutorial in this series, which offers an easy introduction. Discuss your thoughts on this in the Sketchup 3D Software Tutorial forum over at 3DPB.com.
Subscribe to Our Email Newsletter
Stay up-to-date on all the latest news from the 3D printing industry and receive information and offers from third party vendors.
Print Services
Upload your 3D Models and get them printed quickly and efficiently.


You May Also Like
The Drone Industry is Showing Where 3D Printing Delivers Real Value, AM Research Report Finds
The rapid rise of drones is creating one of the biggest opportunities for additive manufacturing (AM). Whether they’re used on battlefields, inspecting bridges or crops, or delivering supplies, drones need...
3D Printing News Briefs, June 27, 2026: Nanoscale 3D Printing, Defense Readiness, & More
We’re starting with a story about a grant for advanced nanoscale 3D printing in this weekend’s 3D Printing News Briefs, and then on to metal additive manufacturing (AM) for defense...
US Army Awards Continuous Composites 3D Printed Missile Component Contract
Despite the very loud, indignant claims from American defense officials that the US hasn’t depleted a significant portion of its munitions stockpiles, the US has depleted a significant portion of...
Rheinmetall Uses Ducting Made with Minifactory for Challenger 3 Tanks
Rheinmetall UK is using Minifactory Material Extusion as the primary production method for tank ducting on the Challenger 3 Main Battle Tank program. The Challenger 3 is the UK’s formidable...


