For the Active Photographer: Make Adafruit’s Wearable Raspberry Pi Camera in 3D Printed Case

![]() Most of us are well aware that life here on Earth is short so we have to make the most of our valuable time. It can be easy to get caught up in the daily grind indoors, but there are many who make it a priority to soak up the most of every minute, active in outdoor fun and often extreme sports that offer an added bonus when you can catch it all on film. This has become a popular thing to do, and we’ve seen 3D printing enthusiasts making their own devices to help memorialize those fast-paced dramatic activities like skateboarding, skiing, and surfing with a variety of mounts and gizmos, and all very creative—to say the least!
Most of us are well aware that life here on Earth is short so we have to make the most of our valuable time. It can be easy to get caught up in the daily grind indoors, but there are many who make it a priority to soak up the most of every minute, active in outdoor fun and often extreme sports that offer an added bonus when you can catch it all on film. This has become a popular thing to do, and we’ve seen 3D printing enthusiasts making their own devices to help memorialize those fast-paced dramatic activities like skateboarding, skiing, and surfing with a variety of mounts and gizmos, and all very creative—to say the least!
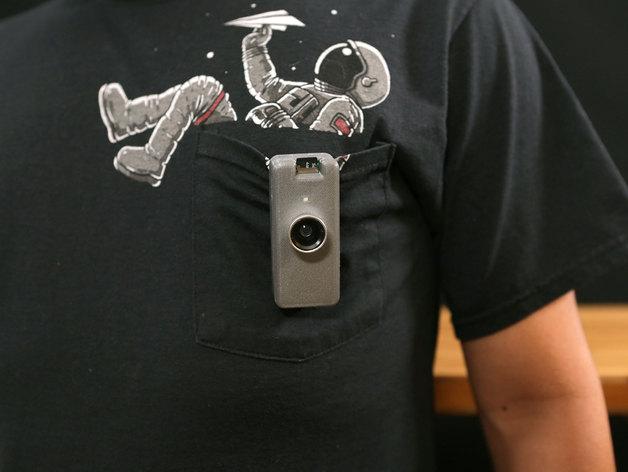
But if you are interested in going the easier route with an easier style that doesn’t require a mount, check out the latest from Adafruit. Here, with little expense you can make yourself a small wearable device that fits snugly into a 3D printed case. It then clips on to your clothing or pack, a lanyard—or can even be set on a tripod—and is a great project for anyone interested in time-lapse photography or just making a log of daily activities.
 With the Wearable Raspberry Pi Camera v2, you can snap a picture every couple of minutes due to a custom shell script, and it’s all saved on an SD card so that you can edit later, making a simple presentation or even a timelapse animation. The Adafruit team, with contributions from Phillip Burgess and the Ruiz Brothers, designed this to work with a simple case, running on a PowerBoost 500C and 500mAh lipo battery. Numerous configurations are possible, depending on your requirements.
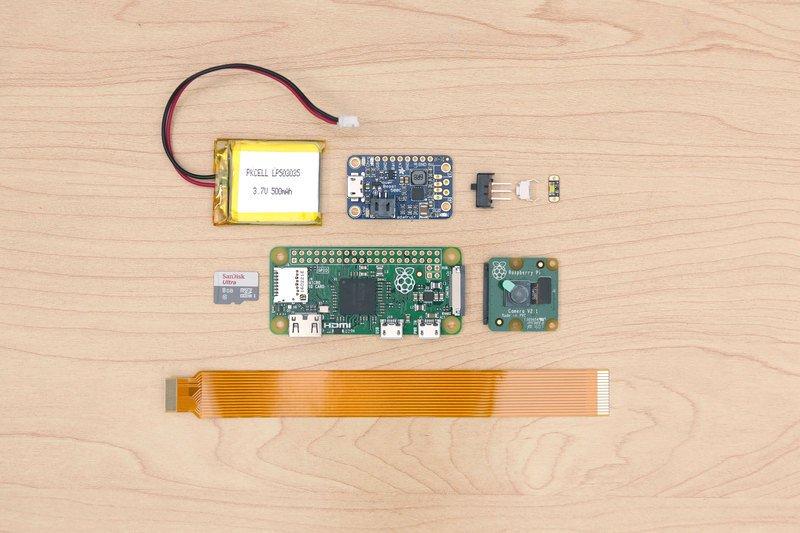
Here is the list of basic items needed for the project, as laid out on Adafruit:
- Raspberry Pi Model Zero version 1.3 (with camera connector)
- Raspberry Pi Camera (any version — 8 megapixel v2 or original 5 MP — even infrared if you like)
- Raspberry Pi Zero 1.3 Camera Cable
- 4GB or larger micro SD card
- PowerBoost 500 Charger (not the PowerBoost 500 Basic; must be the 500C!)
- 500 mAh Lithium-Ion Polymer Battery
- 6mm Slim Tactile Pushbutton
- Breadboard-Friendly SPDT Slide Switch
- LED sequin, any color
- Soldering iron, wire and related paraphernalia
- 3D printer and filament
- Craft glue such as E6000 or super glue
“You may need some additional parts depending on the installation procedure used–perhaps a USB flash card reader, or a second Raspberry Pi during setup, etc.,” states the Adafruit team. “Read through the whole guide and check your parts stash before making any purchasing decisions.”
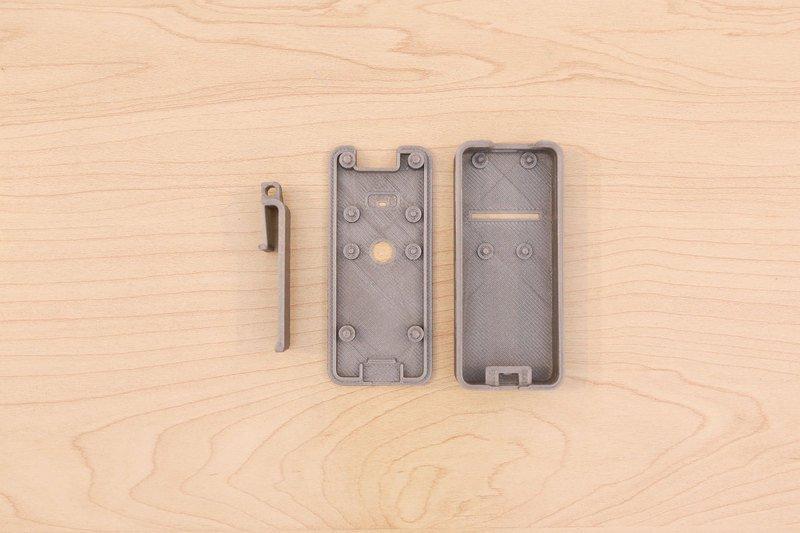
It’s best to start with the 3D printing portion first, and you can find the design files on Thingiverse, YouMagine, or Fusion 360. You should be able to make this on the smallest of printers, using 20% infill, and no supports. PLA is recommended, but if you are using ABS, the Adafruit team suggests trying an increase in scale of about 2%. To hold the separate parts together, all you will need is a bit of craft or super glue.
 For software, you can take the easy way out and just use the ready-made SD card or tweak it out however you’d like, with some help from Adafruit. They offer a download for a ready-made image that can be burned to a micro SD card or will boot on any Raspberry Pi model with a camera. Using the default setting, your Raspberry Pi camera is able to capture a 1280×720 pixel JPEG image every 15 seconds (stored in the ‘timelapse’ folder). If that doesn’t quite work for you, just put the SD card in your computer and edit the file, as shown here. And if 2.5 gigabytes of captured images isn’t quite enough, or if you are using a larger card, check out the guide Resizing the Raspberry Pi Boot Partition or follow the Adafruit directions for taking the long way around.
See the Adafruit tutorial for step-by-step instructions on wiring and connecting the LED, button, and PowerBoost. Once that is complete, just a few more simple connections are required:
- PowerBoost 500C output connects to 5V and GND.
- LED sequin + connects to GPIO5, – to GND.
- Halt button connects to GPIO21 and GND.
“If required, the LED and button pins can be changed; this is explained on the “Using It” page,” states the Adafruit team. “Maybe you find it easier to route the wires to a different spot, or are building a camera with custom features.”
 Upon assembling the parts after wiring is operational, you’ll need to install the following, checking the tutorial for details:
- The 6mm slim button
- PowerBoost 500C
- 500mAh lip battery
- LED Sequin
- Pi camera
- Raspberry Pi
- Slide switch
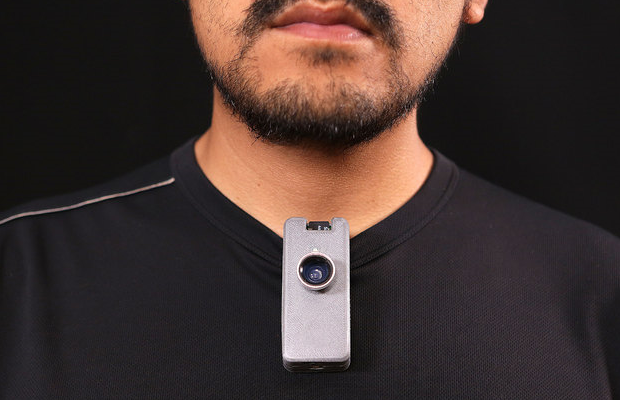 Finally, if you’d like your camera to function as a wearable device, a clip is provided in the design and all you have to do is press its connector into a small slit on the back of the case, gluing it snugly. If you’re interested in an additional lens for an expanded viewing angle, that’s an option too, depending on what kind you would like to add. The Adafruit team purchased a 0.68X wide angle lens from Amazon, normally used for smartphones, and it is easy to both attach and take off.
Using your new camera is as easy or as complex as you want to make the process, depending on your knowledge level and requirements. You already have the software ready to go, and it works completely on its own. With everything programmed, wired, and assembled, it’s time to power on, boot up—and you are ready to start taking pictures!
 When snapping shots, the cameras status LED will turn on. When you’re ready to turn off, just press the halt button for at least two seconds and watch the status LED go from on to off, which means you can then hit the power switch.
You can then remove the SD card and begin working with the images on your computer if you so wish, finding them in the ‘timelapse’ folder as explained earlier. All of your images will be in sequential order. If you have further questions, want to change the settings, or troubleshoot further, see the Adafruit tutorial here. There you can also find ways to extend the run time of the camera, expand SD card limitations, merge stills into videos and .gifs, and more. Is this a project you might make? Let’s talk about it over in the Wearable Camera with 3D Printed Case Forum at 3DPB.com.
Subscribe to Our Email Newsletter
Stay up-to-date on all the latest news from the 3D printing industry and receive information and offers from third party vendors.
Print Services
Upload your 3D Models and get them printed quickly and efficiently.


You May Also Like
Making Space: Stratasys Global Director of Aerospace & Defense Conrad Smith Discusses the Space Supply Chain Council
Of all the many verticals that have been significant additive manufacturing (AM) adopters, few have been more deeply influenced by the incorporation of AM into their workflows than the space...
EOS in India: AM’s Rising Star
EOS is doubling down on India. With a growing base of aerospace startups, new government policies, and a massive engineering workforce, India is quickly becoming one of the most important...
PostProcess CEO on Why the “Dirty Little Secret” of 3D Printing Can’t Be Ignored Anymore
If you’ve ever peeked behind the scenes of a 3D printing lab, you might have caught a glimpse of the post-processing room; maybe it’s messy, maybe hidden behind a mysterious...
Stratasys & Automation Intelligence Open North American Tooling Center in Flint
Stratasys has opened the North American Stratasys Tooling Center (NASTC) in Flint, Michigan, together with automation integrator and software firm Automation Intelligence. Stratasys wants the new center to help reduce...