MatterHackers’ Anatomy of a 3D Printer: Keeping all the Parts Straight

![]() While the results of 3D printing can be magnificent from your desktop practically right out of the box, it’s not exactly difficult to understand how the process works when you open your mind and delve into the subject just a bit—and especially if you are mechanically inclined. This is the genius behind the technology of course, as well. It seems amazingly simple—you have this basic looking black box which heats up plastic filament, melts it, and extrudes it into the shape you want, sometimes after 45 minutes—and sometimes after 45 hours. Piece of cake, right? (And you can ice that cake of yours too, with the appropriate extruder!)
While the results of 3D printing can be magnificent from your desktop practically right out of the box, it’s not exactly difficult to understand how the process works when you open your mind and delve into the subject just a bit—and especially if you are mechanically inclined. This is the genius behind the technology of course, as well. It seems amazingly simple—you have this basic looking black box which heats up plastic filament, melts it, and extrudes it into the shape you want, sometimes after 45 minutes—and sometimes after 45 hours. Piece of cake, right? (And you can ice that cake of yours too, with the appropriate extruder!)
An overall idea of what you are doing is great, but questions arise quickly in 3D printing, even as most of the parts seem to be working right in front of you. If you are thinking about purchasing a 3D printer, taking a class, or just getting started with a new machine, you’ll be able to muddle along pretty well with just a basic knowledge—but if you actually comprehend how all the parts work and what they are called, the experience will be exponentially more fun—and satisfying. While many before you may have thought this was a good idea too and hoped to get a mini-education on 3D printer hardware, they might have been left with a bewilderingly scarce amount of information to be found in one place. You can pick up a smidgen of detailed info here and a smattering there, and read a lot of broad-based information about how magical features are going to change your life, but where to see the nuts and bolts laid out before you? MatterHackers decided to do us all a favor and make a simple guide, ‘Anatomy of a 3D Printer.’
 In regards to their mini-manual, we think you’ll find it entertaining even if you aren’t planning to kick into high gear with 3D printing. The visuals are awesome, and the definitions are concise; for instance, in just a couple of paragraphs, you come away with what the print bed is, what it does, and how you should be operating to make sure models don’t stick (note: BuildTak film). What’s going to happen if you purchase or happen to be working with a machine that does not have a heated print bed? Answer: challenges and limitations.
As for the extruder, once again it’s boiled down to nothing but a ‘fancy glue gun.’ The truth is the truth, however, and that definition certainly gives you a very basic visual on what’s happening—and how simple the part itself really is. MatterHackers quickly gets into the nitty gritty though. Here are some things you may have not have known to think about: will you be using a direct drive or a Bowden extruder? Respectively, this means you are either using a direct drive printer where the hot and cold end are connected, with the filament traveling directly though the cold area and into the hot end—or the two ends are separated, as in the Bowden extruder. There, the process is a bit less streamlined, in that the cold end and the hot end are far enough apart that the filament must be pushed through a long tube. This also, as the Matterhackers team points out though, means that the printer has less room to move around.
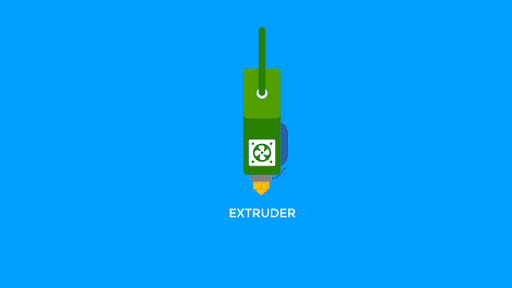 And following are a couple of gears which will really help you understand some minute details as well:
- The hobbed gear is responsible for grabbing onto and ‘biting’ the filament, pushing it through the hot end.
- The idler gear, spring loaded, is responsible for pushing the filament into the hobbed gear—and you may be able to adjust its tension so that the pressure on the filament is just right.
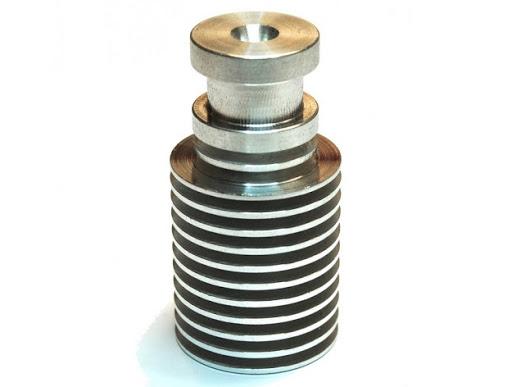
The heat sink
Heat, of course, is a major part of 3D printing, and variations in machines and features can have a definite effect on your outcome. MatterHackers definitely recommends a metal hot end, as well as the use of a heat sink, in order to prevent heat creep and jamming. The hot end fan should also be running whenever the hot end itself is heated. And a note on fans: there is also a layer cooling fan responsible for cooling each layer as it is put down, allowing the model to form and keep its shape.
While the visual and description of the nozzle are simple and straightforward, it’s important to note that this is a part you will be well-familiar with during printing, as it’s often the site of clogging. Any number of methods can be used to unclog these tiny parts, from the atomic method, to an acetone soak, to actually, yes, using a blow torch—and we don’t always have an excuse to go wielding one of those, so you may just be looking forward to a clog.
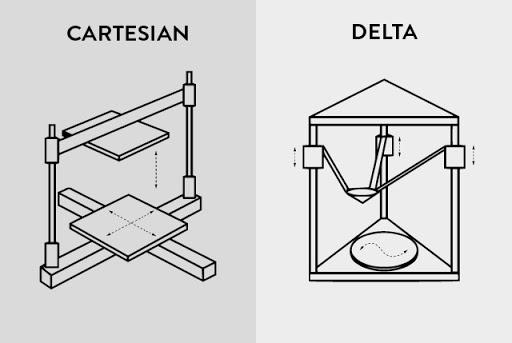
Where the MatterHackers information really does you a favor, however, is in explaining how the motion control and X,Y, Z axes work—and the differences between Cartesian and Delta.
If you are wondering what a good example—and an awesome selling point for the Cartesian design—is, take a look at the LulzBot Mini. Named for the coordinates system developed by René Descartes and other great ‘thinkers’ of the 17th century, the Cartesian title is relevant to the 3D printing process in that these particular machines move one or two motors along each of the X, Y, and Z axes. With this design, you’ll note a build area that’s rectangular in shape, with a cube-shaped printer.
While the Delta printer also moves in the Cartesian coordinates system, it is constructed with three arms which meet in the middle, suspending the extruder above the build area. All three arms work on their own to ‘move the nozzle with triangulation.’ If you are looking for a Delta-style printer, MatterHackers suggests taking a gander at the SeeMeCNC Rostock MAX V2.
 The frame, while offering the basic aesthetics for the machine, is truly responsible for holding the machine together. Most are made of aluminum or plastic—and you will find that often manufacturers are proud to say that numerous parts themselves have been 3D printed. MatterHackers reminds you that the more rigid a frame—the greater precision you will experience from the printer. Many 3D printers also come with side enclosures for safety—and while many just completely ignore them (or even make their own out of cardboard), they do protect you from all the heat and moving parts.
Bed leveling is another important feature, and it’s wonderful if this is an automatic feature. You will find that some 3D printers do not offer automatic bed-leveling though, and in that case you become the expert in calibrating.
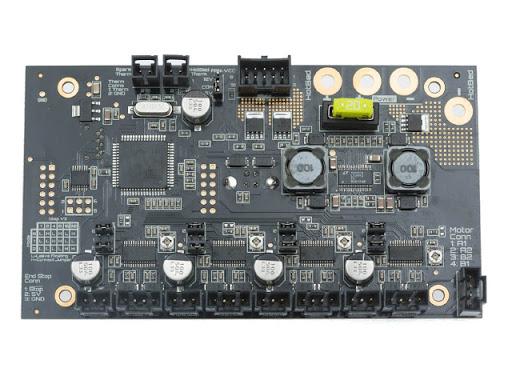
The motherboard
Once you have an understanding of those topics, it’s important to take a look also at the:
- Threaded rods/leadscrews: used on the Z axis, these parts rotate and force the nuts up and down.
- Belts: put simply, these parts are responsible for moving things, and with regards to your 3D printer, the X and Y motors will general have sprockets driving the belts, with tension adjustors.
- Stepper motors: these are components which are discussed often, and especially among DIY’ers. Rotating in phases, they offer greater precision in comparison to traditional DC motors. You will find that most 3D printers on the market use NEMA 17 type motors with 200 increments (steps) per revolution.
- Stepper drivers: these are the chips that run the stepper motors and also control the amount of current. The more power you have, the stronger the motor is—but hotter, also.
- The motherboard: this is the brains of the operation, and allows your 3D models to be loaded and executed. A tiny microcontroller runs the motors, reads sensors, and communicates with your PC too. Your 3D printer may also have a slot ready for an SD card which allows you to load G-code files, meaning you don’t need to be tethered to the PC at all.
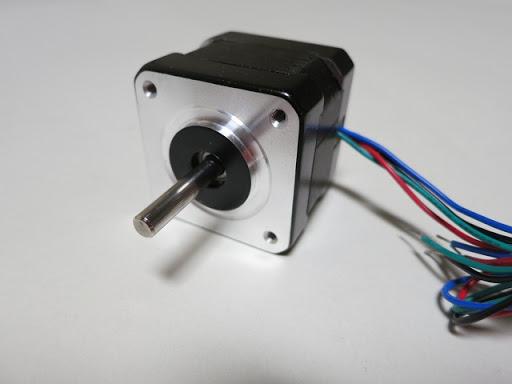
Stepper motor
I certainly learned something here, and I hope you did too! MatterHackers always seems to have something interesting going on, from offering their software and partnering in projects like creating wind turbines in areas like Nicaragua to offering great promotions (as they are one of the leading sellers of 3D printers, as well as offering a vast supply of filaments) and releasing many new products, as well as latest updates to their 3D printer controller, MatterControl.
While ‘Anatomy of a 3D Printer’ might seem just a simple blog, its truly offers a simple but full dissection of the FFF or FDM 3D printer—and if you are a budding 3D printing enthusiast (or even a budding expert!), this may indeed be excellent reference information you want to keep handy for quite a while. Discuss in the Anatomy of a 3D Printer forum over at 3DPB.com.
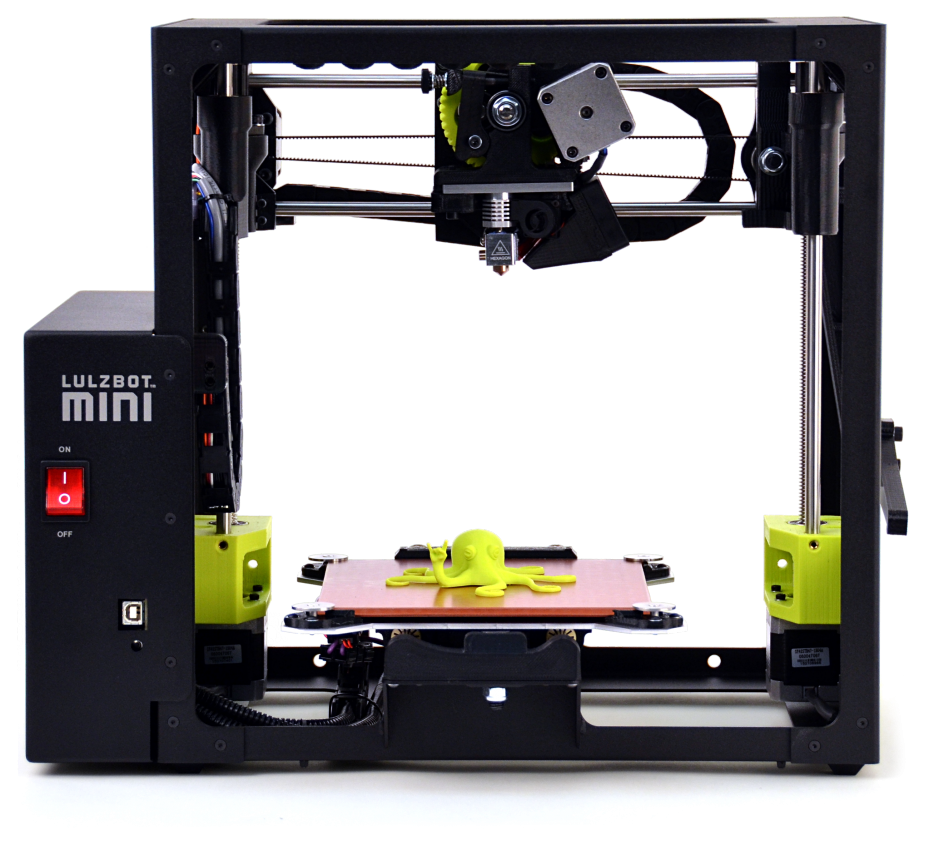
The LulzBot Mini is a perfect example of a Cartesian style 3D printer.
Subscribe to Our Email Newsletter
Stay up-to-date on all the latest news from the 3D printing industry and receive information and offers from third party vendors.
Print Services
Upload your 3D Models and get them printed quickly and efficiently.


You May Also Like
Divergent & GA-ASI: How Connecting at AMUG Led to an Important Industry Partnership
As I mentioned in my AMUG 2026 overview, I had a lot of delays traveling to Reno, Nevada to attend the conference. So unfortunately, I missed “From Hypercars to Defense...
BLT Touts 100,000 Copper Parts Made
With the significant volume of copper used in electronics, semiconductors, aerospace, defense, and beyond, copper additive has had immense promise from the early days of copper 3D printing at Beamit...
TCT Asia 2026: Empowering Asia · Connecting the World
TCT Asia, now in its 12th year, is more than just a 3D printing exhibition — it embodies its original concept: Time Compression Technology, a vision of making the entire...
Pete Pharma Deal with Atrium24 Signals Path for Broader 3D Printed Drug Commercialization
While I would guess we’re still probably at least several years away from 3D printed drugs being a commonplace reality, the growing number of companies with proprietary additive manufacturing (AM)...