Using Wax to Give Your 3D Prints a Smooth, Waterproof Finish

The more we get to know 3D printing, the more we realize that we don’t know all that much about it. In all fairness, that’s because new 3D printers–from basic home machines to super sophisticated industrial ones–are hitting the market every day. Add to that the vast array of materials with which you can print, new techniques for printing, and peripheral technology like scanning and 3D modeling, and it feels like there’s a mountain of information that’s almost impossible to scale.

Chances are good, however, that the information you’ll find most helpful for your 3D printing purposes is readily accessible somewhere online. One such resource is Instructables, where makers and tinkerers and inventors post their projects, which often involve 3D printing. One recent post by Instructables contributor, “Jubal117” or “Jub,” who lives in Fairview, Michigan (in the Lansing area), provides an easy and affordable solution for making your 3D printed objects watertight.
Jub was recently inspired by a MakerBot Thingiverse contest called “Make it Float” to test whether or not a 3D printed object could be watertight. He did some tests and concluded that 3D-printed parts can be designed to repel water and float but not all parts are equal. That is, “parts printed with ‘standard’ settings,” explained Jub, “and with an optimized print time in mind, do not commonly have this ability [to repel water and thereby float].” While it’s 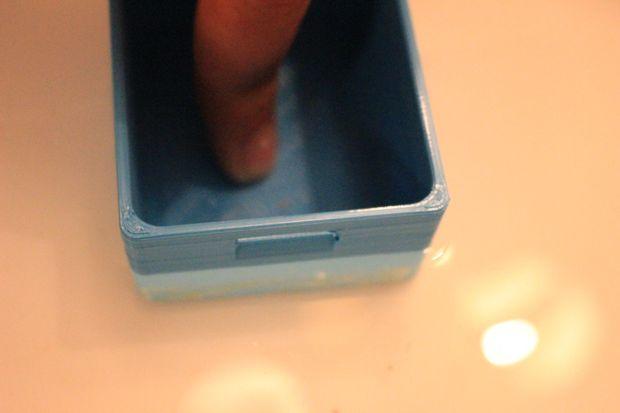 true that most of the plastic parts are actually relatively buoyant, as Jub discovered, they tend to float in the water rather than on top of it. Therefore, he decided to look for other solutions to this problem.
While it’s not likely a problem in most instances, if you’re designing, say, a toy for the bath, then you’ll probably want the thing to float. Further, there are plenty of other reasons why you might want a 3D printed object to be waterproof, so Jub’s Instructables posting should be added to your library of “How To” resources for 3D printing.
Jub decided to look for the simplest and most affordable solutions and that’s why he settled on wax, which is readily available to most people either in a local store or online. That’s not to say, however, that wax is the only material with which you can waterproof your 3D printed parts. “There are many other types of coatings that will do the same thing, and possibly do them better. Coating material is commonplace in most every industry,” he elaborated.
Let’s just assume that you’re interested in using Jub’s wax approach to waterproofing, though. He recommends asking yourself some questions about your 3D printed 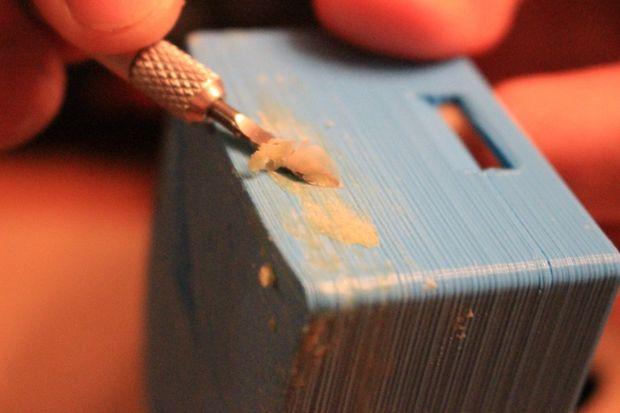 objects’ interaction with liquid. The first question you’ll need to ask is, “Does my print interact with liquid on a regular basis [and], if yes, then where does it interact?” Once you figure this out, you’ll apply the wax to that specific spot (or spots). If the entire object/all the parts are vulnerable, then you’ll really just be applying wax to the entire thing.
Before you begin following Jub’s recommended step-by-step process, you’ll need to gather some tools and supplies. It probably goes without saying that you’ll need the 3D printed part or object. You’ll need wax and you can choose beeswax or paraffin or even crayons if you want the wax to be colored. Have a brush handy to clean the part and apply the wax. You can use a heat gun or a double boiler to melt the wax. Finally, be sure to have a knife or razor handy along with some gloves.
First, clean the print, making sure that it’s free of dust and any other residue. Melt the wax and keep it warm while you’re brushing it on the 3D printed objects. Let the wax cool and, after that step is complete, remove the excess wax. Note that you really don’t need a great deal of wax to make an object watertight. Unless you’ve assembled something large from many 3D printed parts, you won’t likely need much more than ¼ of a cup or less. You can always melt more wax if you don’t have quite enough.
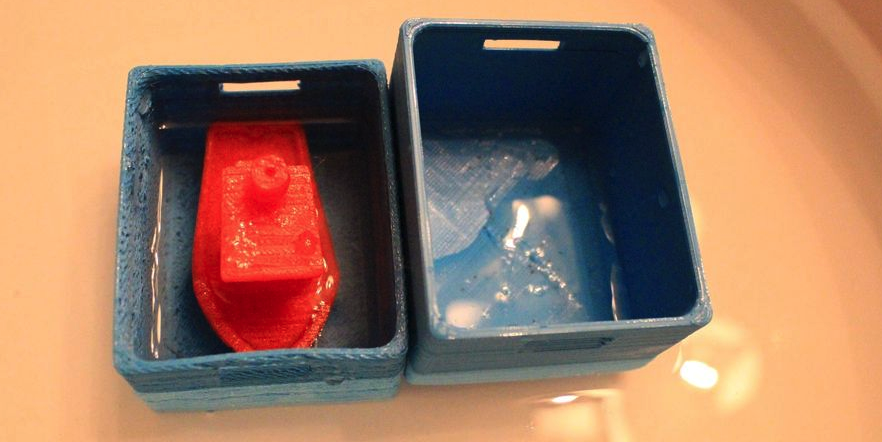
Once you’ve waxed your 3D printed parts, you can check them for leaks by dipping them in a container of water. It’ll be pretty clear to you if the wax coating is successful in making your object watertight. If the thing sinks, melt some more wax.
Now that your 3D printed object is sufficiently watertight, you can do a bit of cleanup. Using a knife or razor, carefully remove the excess wax and smooth out any fingerprints or bumps and that’s it. In addition to being watertight, your object will have a nice finish.
Subscribe to Our Email Newsletter
Stay up-to-date on all the latest news from the 3D printing industry and receive information and offers from third party vendors.
Print Services
Upload your 3D Models and get them printed quickly and efficiently.


You May Also Like
Johns Hopkins University Researchers Develop HyFAM Technology
Two scientists from Johns Hopkins University, Nathan C. Brown and Jochen Mueller, have developed a hybrid manufacturing technology they call HyFam, or Hybrid Formative Additive Manufacturing. Their work on this technology...
3D Printing G-Code Gets an Upgrade: T-Code
Good old G-Code still manages many 3D printers, great and small. Just like the STL, it’s a standard that enables collaboration while also holding the additive manufacturing (AM) industry back....
AM Rewind: The Biggest News and Trends of 2024
After a sluggish 2023, driven by persistent inflation and geopolitical tensions, 2024 has seen some recovery. Economic growth climbed from about 2.8 percent in 2023 to a modest 3.2 percent...
Metal Wire 3D Printer OEM ValCUN Announces Plans for 2025 Expansion
ValCUN, a Belgian original equipment manufacturer (OEM) of wire-based metal additive manufacturing (AM) hardware, has announced that the company has entered the next phase of its growth trajectory, making key...