
Designer Converts a Vintage Tool Box into a Working 3D Printer


![]() Case modding is a pretty well known and popular pastime for computer gamers, makers and enthusiasts. So much so that these days most gaming conventions feature contests where modders lug along their computers when they attend and compete for prizes and accolades. There are rarely any rules to modding a computer, other than be as creative as possible. Typically modded cases are for computer towers, but I’ve seen makers mod cases for gaming tables, stereos and even entire entertainment systems. And now, in what I hope is the beginning of a new trend, a case mod for a 3D printer.
Case modding is a pretty well known and popular pastime for computer gamers, makers and enthusiasts. So much so that these days most gaming conventions feature contests where modders lug along their computers when they attend and compete for prizes and accolades. There are rarely any rules to modding a computer, other than be as creative as possible. Typically modded cases are for computer towers, but I’ve seen makers mod cases for gaming tables, stereos and even entire entertainment systems. And now, in what I hope is the beginning of a new trend, a case mod for a 3D printer.
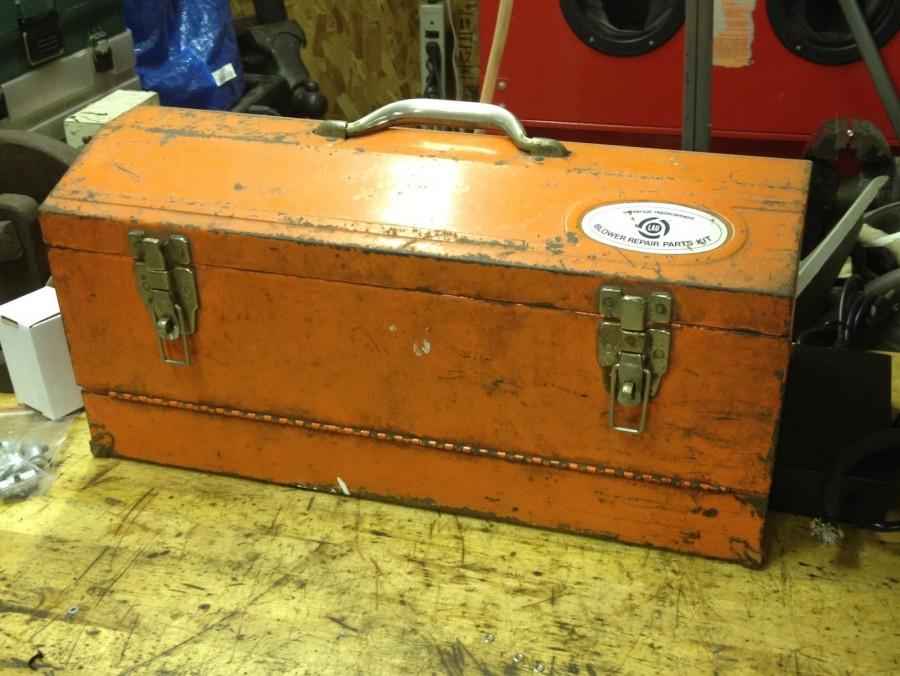 Florida miniature robotics and bearing supplier Boca Bearings had their own custom 3D printer designed and built to fit inside of an old beat up Huot toolbox. Not only does the top of the toolbox open, the old “Blower Repair Kit” has a front panel that drops down, making a perfect platform for a 6 inch x 9 inch printing bed that can move along the X and Y axes. When the printer isn’t it use, the toolbox can easily be folded up and carried around, without anyone knowing that the box contains a robot capable of printing plastic Yoda heads on the go.
In order to make sure that all of the required parts would fit inside of the box, and determine the best way for the printer to work, Chad from Boca Bearings started by using some appropriately sized scrap parts to create a basic, non-functional mock-up of the printer. That may sound like a lot of work, but Chad had to make sure that he would end up with a functional printer so he didn’t waste parts, or ruin a cool vintage toolbox. The entire build was documented in four detailed entries on Boca Bearings’ blog, where Chad walks through each step of the fabrication process, which included powdercoating a frame, 3D printing parts and even repurposing a shower track to move the hot end along the Z axis.
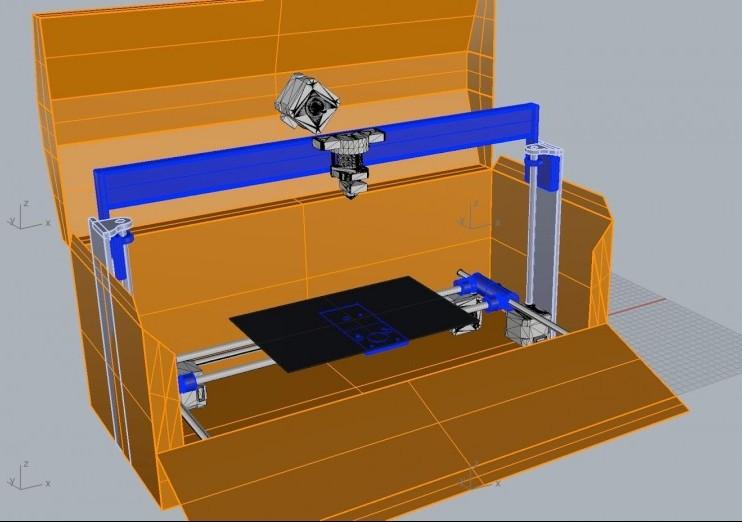
Once Chad had a mock-up that seemed to allow for the full range of movement, he turned to Rhino3D to design a more exact build plan for the printer. By using a 3D model to keep track of the measurements and allowances, he was able to try various configurations and layout options, which helped him refine the design until it was just right. This made the fabrication process considerably smoother and made it easier to build the X & Y axis frame, 3D print the plastic components on his shop’s MakerBot 2x and construct the custom made printing bed with little need for revision.
CAD mock-up of the toolbox 3D printer
“For the bed I used two pieces of aluminum. The top sheet will be the print bed and will be supported by four springs that are attached to a piece of aluminum below that. I used my 1930’s Delta bandsaw to cut them out and my early Hamilton and Delta drill presses for the mounts. To make sure all the holes lined up, I used a divider to mark the holes at an equal distance. I then taped both sheets together and drilled them at the same time. After the bottom platform is drilled, I use the drill press to assist in manually tapping the holes,” Chad explained in his build log.
Because Chad was using a vintage tool box that had decades of dings, scratches and dents, he wanted to preserve the character of the finish as much as possible. So when he needed to modify or alter the toolbox, he covered it in painter’s tape around the areas where he was grinding down parts. He also used strategically placed welding leathers to prevent stray sparks and metal dust from damaging the box while welding the frame in place.

The completed toolbox 3D printer in action
Once Chad completed the main fabrication, he simply needed to complete some of the minor detail work, wire up the printer parts, test print and complete the final calibrations. Luckily Chad works for Boca Bearings, so he had access to all sorts of small machine parts and wiring supplies which would keep everything in place. He also installed a 3D printer power supply from Lulzbot, and cut a small hole in the side of the toolbox so the power cord could remain plugged in even if the box was closed up.
Take a look at video completed 3D printer in action:
And here is a video of the X, Y and Z axis movements:
The completed toolbox 3D printer works exactly how Chad envisioned it working, and while it doesn’t produce the most detailed prints that we’ve seen, they aren’t bad for a custom made machine. Plus, Chad is continuing to adjust the printer and tighten up some belts and pulleys, which is improving the print quality. You can read about the entire build process over on Boca Bearings’ blog, and even watch an entire series of design videos over on Chad’s YouTube page. Let us know what you think of this cool build over in our Vintage Tool Box 3D Printer forum thread at 3DPB.com.
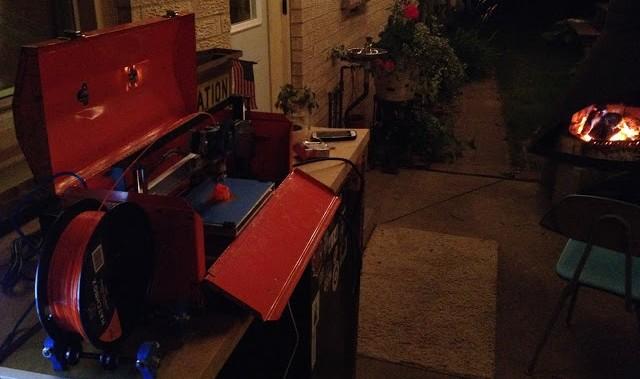
Chad treats his new toolbox 3D printer to a relaxing summer cookout
Subscribe to Our Email Newsletter
Stay up-to-date on all the latest news from the 3D printing industry and receive information and offers from third party vendors.
Print Services
Upload your 3D Models and get them printed quickly and efficiently.


You May Also Like
Conexeu Sciences Wishes to Make a Regenerative Breast Matrix Solution (and sell shares)
Conexeu Sciences wants to commercialize a regenerative breast matrix solution. For years, Australian firm BellaSeno and Lattice Medical have been working on similar solutions. In 2018, Lattice came out with...
3D Printing News Briefs, August 23, 2025: Facial Implants, Tibial Fractures, Lamps, & More
It’s all about medical in this weekend’s 3D Printing News Briefs. BellaSeno established a clinical advisory board. MedCad is donating 3D printed facial implants to war-injured Ukrainians, and researchers in...
BellaSeno’s 3D Printed Breast Implants Keep Shape with 87% Fat Volume, Avoids Silicone Risks
At a medical conference in Austin this week, a new kind of breast implant took center stage. It is not made from silicone but from a 3D printed, fully resorbable...
BellaSeno Completes Two Clinical Trials on 3D Printed Resorbable Breast Implants
German firm BellaSeno, which is focused on 3D-printed resorbable breast implants for both augmentation and lumpectomy, has completed two clinical trials for resorbable breast implants. These trials represent the first-ever...


