
Safety Suggestions for 3D-Printing COVID-19 Medical Parts at Home


In this post, we’re going to delve deeper into the procedures that you could use for making face shields, spare parts and medical parts for COVID-19. Please note that this article is well-meaning advice given to aid you in a time of need and in no means medical advice. We are not implying that the materials or processes or suggestions listed or linked to are fit for purpose or indeed that they should be used to make a medical device or ancillary product; only that of all of the printable materials and methods these at least could be used more effectively than other materials. GMP still is the only way to do this properly, but for the home, we’re going to give you these tips. Please check the relevant certifications and approvals for your material. Use the information in this article at your own risk but please do not risk someone else’s life through optimism or overconfidence.
There is this palpable feeling in the maker community and in 3D Printing companies that to do nothing at all would be the greatest sin. On the whole, that may be the case, but specifically, when making a product used in medicine, failure to observe safety requirements, standards, and best practices could mean that people who otherwise would live long lives could die because of your 3D printed product. It may seem that “a mask is better than none at all” but if that mask infects seven more people because it can’t be cleaned properly it could, in fact, be a far worse outcome than no mask at all. Ethically for me, this advice is like telling a friend who will drive drunk to wear a seatbelt. But, I admire all of the hard work that makers and 3D printing companies worldwide are putting in, I admire your gumption and I am proud of all of the people wanting to use 3D printing to make a better world.
Desktop FDM Recommendations
Repeatability Issues Related to file handling
With desktop FDM printers we have some specific software-related concerns that need to be addressed. Opening a file in a CAD system could change a file. A different slicer or a different version of the same slicing software will get you a different part. Typically values for filament temperatures and speeds have huge effects on part quality and things such as layer adhesion. There is a huge range of different temperatures and print speeds used for the same materials but different vendors. Different colors of filament from the same vendor have a different optimal temperature. Differences in settings between machines will mean that you or I will get a different part. Those random settings you inputted in Cura the first time you booted it up and that one time you played with retraction and left it at some value will have a huge influence on the part outcome. Check to make sure that your slicer values and machine settings are all normal before beginning. Check to make sure that you are printing the right version of the right file. This may seem silly, but we’ve already seen dozens of different versions of files proliferate and one would be NIH checked but the others would not be.
Issues related to material handling
Humidity, airflow, and ambient temperatures really have an effect on your parts. Do not use rolls of filament opened weeks ago for critical parts. Use only new rolls of filament. As you know has significant effects on PLA and wreaks havoc in hours on PA. For best results pre-dry problematic filaments to make sure that they are low on moisture. Moisture and dust on filament have effects on the parts also. We want to altogether avoid having any dust or particles enter and lodge in between layers. If your printer is not yet enclosed then this would be the perfect time to Lack yourself an enclosure of some kind. This will be safer and give you better print results. 3D printers work best on the floor where they are most stable and vibration-free. You should promptly discard cardboard, outside packaging and plastic bags. You should disinfect rolls, filament, and relevant printer surfaces.
Process Limitations
FDM lays down layers in an organized but not completely coherent way. There are often gaps in-between layers. Lack of proper layer adhesion is a process limitation. Also in many parts, gaps in between layers could be a place for bacteria and other nasties to hide. Hairs, dust, skin cells and many more materials could also be lodged in between layers or partially in between them. Foreign matter could also find its way into infill and be present inside the part. It will inherently be difficult to clean 3D printed parts when compared to smoother molded parts. Please don’t use any fancy lattice structures in your parts because they could take an easy to clean part and make it impossible to clean. You should not be adding your logos as embossed or debossed into a part’s surface for this reason, your desire to market yourself has now made this part harder to clean. In some cases, further design complexity and design freedom can lead to parts which are very difficult to clean. This is also one reason why I’m partial to autoclaving as a sterilization process because of its ability to get into a lot of nooks and crannies. Avoid creating nooks, crannies, occlusions, complex holes and small gaps in your designs. Print for optimal layer adhesion. You should find out how the people you’re giving this part to plan to clean it and make sure that the cleaning material doesn’t adversely affect your material.
Surfaces
Soap and other disinfectants can be used to kill COVID-19. Please be aware that COVID-19 may “live” months, weeks, days or hours on surfaces depending on those surfaces. The two most relevant papers here are a New England Journal of Medicine and a Lancet paper. COVID’s surface stability means that it lasts on polymers and steel for a week and on glass for three days. COVID-19 can persist for a week on surgical masks as well so be sure to use a new one, washed one (if possible with your type of mask) or a shield.

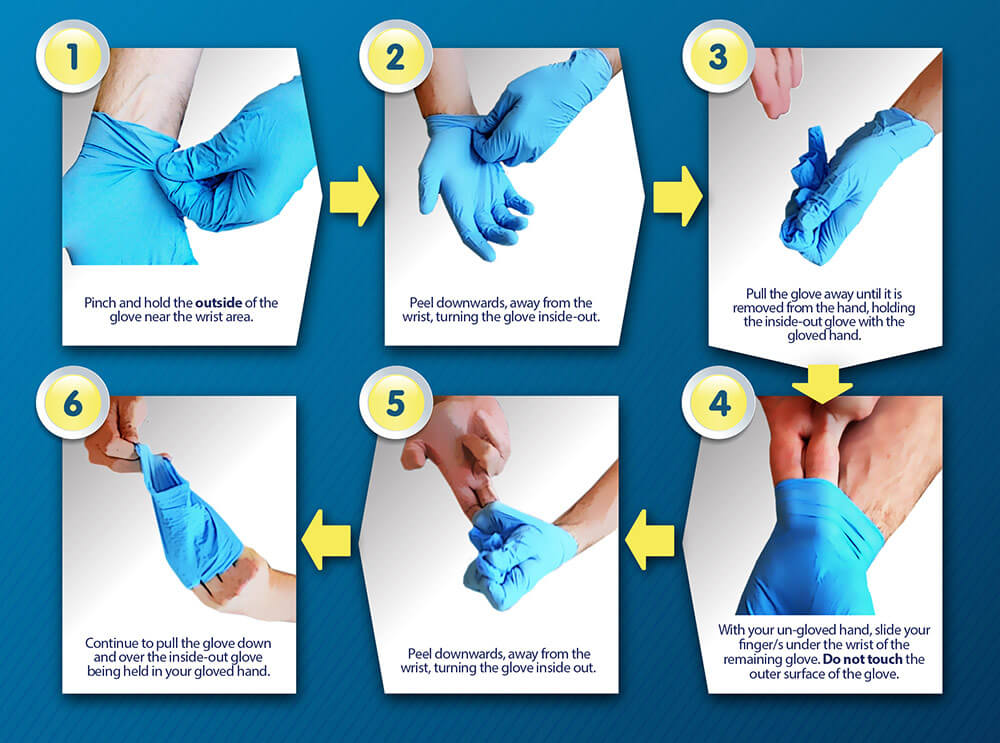
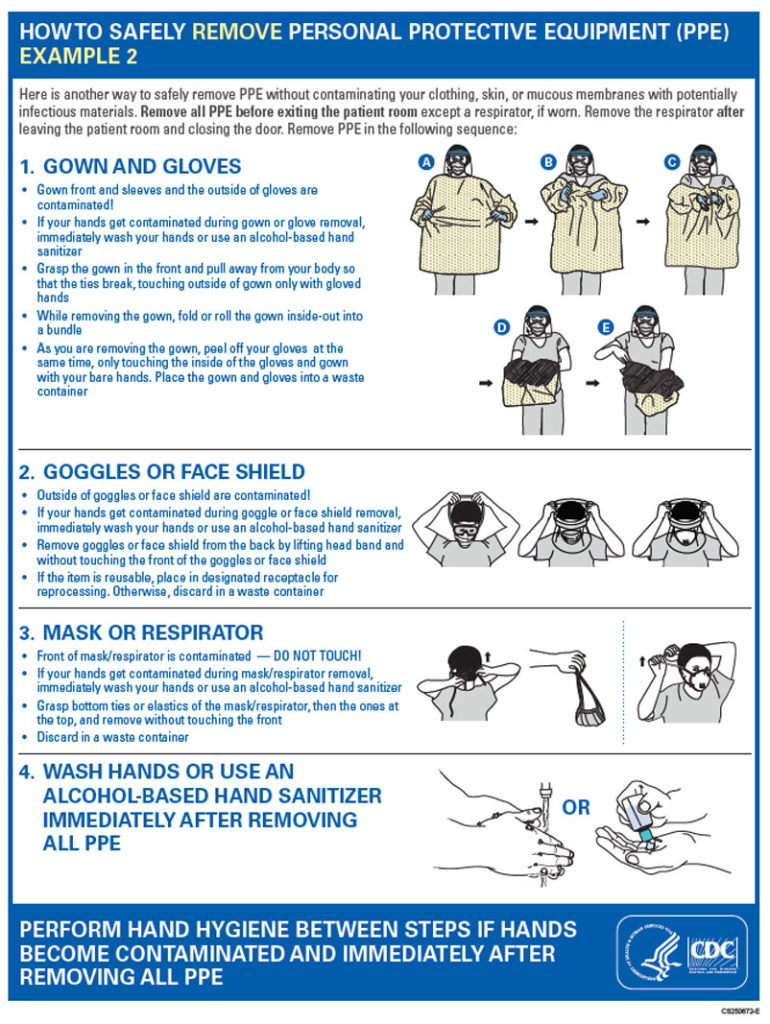
Our primary concern is that your well-meaning effort would disseminate one infection in your home to the face shields of 100 medical workers or all of your colleagues. Maybe you’ve played the “floor is lava” game growing up? With COVID the safe bet is, everything is lava. Also just for safety’s sake assume that you have the virus and act as paranoid as this would make you. Wash hands a minimum four times a day. Wash your hands any time you enter the print room. Here is a video showing you how to properly remove surgical gloves. This CDC guide on glove removal is handy. Here is a video on how to properly remove your mask. Here is a simple video on how to store your mask. This protocol explains how you could, with much care, use vaporized hydrogen peroxide to clean masks. Here is a video on how to properly wash your hands. Washing your hands is the thing do, hand sanitizer is a stopgap measure for when a tap and soap are not available. This purple paint demonstration is very helpful. Put your PPE on in the correct way and right order.
Always wear gloves for your COVID project but only in the print room and only for the task at hand. Do not leave the room with those gloves, don’t go to the toilet with them. Do not pick up your phone with them or open the front door or grab a Coke. Use a completely new pair of gloves when taking out finished parts from the printer and packing them. Wear a face shield.
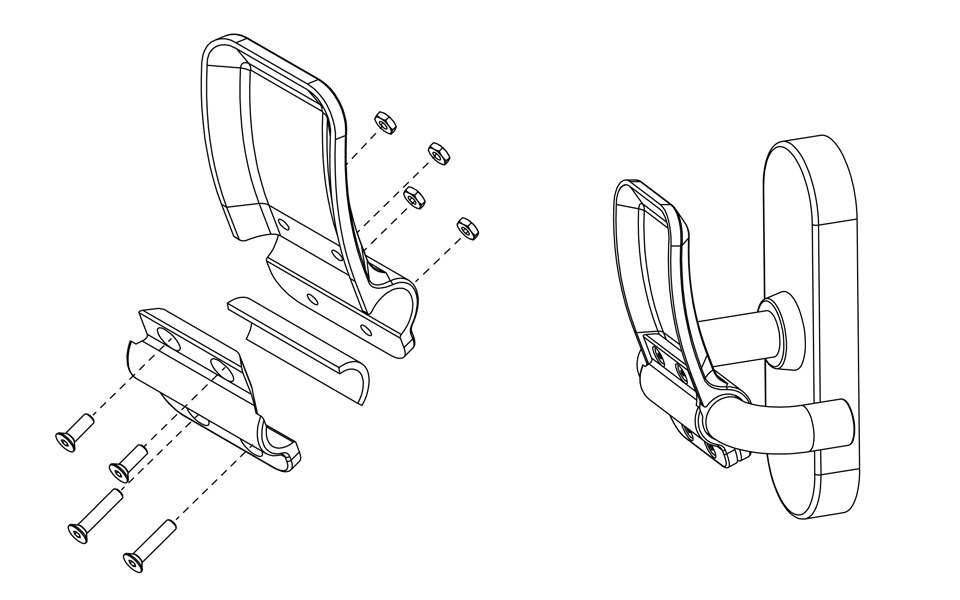
Do not eat in the room which you’re printing in and do not let others or pets in if possible. Wear a set of clothes and shoes that are clean and have just been washed. Wear your “I’m printing now shoes” only in the print room. Have bins for gloves and discarded materials next to the door. They also should act as physical reminders to remove gloves, discard cardboard etc. Attach some kind of door opening device to the door, this could be as simple as taping a pen to it so you can open it without using your hands or you can print the Materialise door opener or similar. Vacuum the entire room extensively, twice at least. Dust the entire room. Ventilate well.
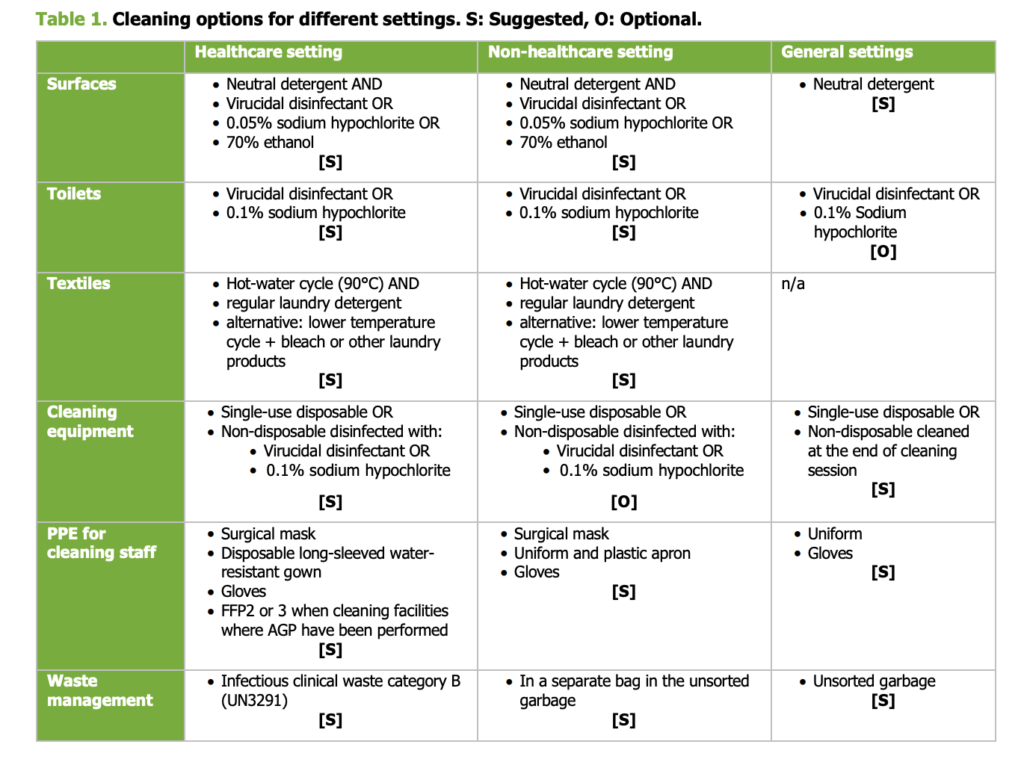
Any and all surfaces in, on and around the printer should be disinfected. Disinfected is not a synonym for cleaned or touched briefly by a rag. First you clean something then you disinfect it. With key things you can then after also sterilize them. This Australian guide can be used to clean the room and direct surroundings of your printer. A very good EU guideline for cleaning spaces can be found here. A good CDC guideline for the same can be found here and a more detailed document can be found here. These are the NYC business disinfectant guidelines. Not everything that you may think is a disinfectant actually is. This is an NYC list of EPA listed disinfectants. When at all possible adhere to healthcare setting guidelines. Please read these documents before beginning this project. You should plan ahead where finished parts will be put and clean those surfaces. If you are not going to read these documents, please don’t make medical stuff at home. When not in use, filament rolls should be enclosed in airtight containers. Tools used to remove prints or cut filament should be sterilized and disinfected. Not a typo.
Printer itself
You should use completely new nozzles for your COVID-19 project. Depending on your printer a new head could be preferable. Nanofilled materials, carbon black, metal-filled materials, glass fiber and carbon fiber will all leave behind traces that you do not want present in your parts, inside print heads and nozzles. Many additives in low cost and quality materials lack approvals. Even premium materials often have undisclosed additives. All previous materials will to some extent leave traces inside nozzles. Clean your feeder wheels specifically and remove any loose metal shavings and polymer parts there. Vacuum and clean out the inside of your printer including materials below the build platform and materials such as hairspray residue that will have built up across the side walls of your printer and on top of the surfaces of steppers and motion stages. Calibrate your printer and try to do any and all operations after disinfecting and cleaning notable surfaces without touching the printer. Make sure that the printer is level and minimize any airflows in or across it. Do long term maintenance operations such as straightening rods, lubricating axels and other surfaces, replacing common consumables before you get started.
Update software and make sure any connector cables SD cards etc. are also clean and ready. Imagine yourself doing the entire workflow from setting up a print to packing a part. Can you reduce the number of operations or number of times that you touch something? Update all software as well and do not forget to extensively clean printer control surfaces, knobs and, buttons. Extensively disinfect and clean your laptop. Use one device to control the printer. Try avoid using your cell phone in the print room or better yet, don’t bring it inside. Disinfect your cell phone regularly. Make sure that loose residues of materials such as WD-40, lubricants and bed adhesives are not about where they should be. Try print direct on glass or other surfaces without Pritt or try BuildTak or equivalent. Clean your sink, taps and things such as a rack to store build plates, the side table to store filament, any tools you may have forgotten. Leave the room, enter again and try to set up a print, be completely mindful of every surface you need to touch. Were and are they clean? Survey the room once again. Clean and disinfect relevant surfaces including all light fixtures.
Good luck out there.
This is a living document and will be updated. Do you have tips, suggestions and best practices? Email joris (at) 3dprint.com.
Subscribe to Our Email Newsletter
Stay up-to-date on all the latest news from the 3D printing industry and receive information and offers from third party vendors.
Print Services
Upload your 3D Models and get them printed quickly and efficiently.


You May Also Like
The Drone Economy Needed a Scalable Manufacturing Backbone. ADDMAN Built One
When ADDMAN closed its acquisition of Forecast 3D in January 2026, the headlines focused on fleet size and Southern California footprint. Six months later, those metrics feel almost beside the...
The Drone Industry is Showing Where 3D Printing Delivers Real Value, AM Research Report Finds
The rapid rise of drones is creating one of the biggest opportunities for additive manufacturing (AM). Whether they’re used on battlefields, inspecting bridges or crops, or delivering supplies, drones need...
The Longevity Economy Needs a Factory
Longevity has become one of the biggest stories in healthcare. Every week seems to add a new announcement about an anti-aging therapy, an AI-powered drug discovery platform, or a startup...
The SLS Market: Game of Trucks
This is truly an exciting moment in the SLS market. With HP‘s release of the 1200 and Formlabs‘ release of the X1, we can see the SLS market heating up....


