Photoshop Introduces Direct 3D Printing Through Creative Cloud to i.materialise

For people used to creating 3D models in Photoshop, there’s some good news here. Photoshop Creative Cloud has announced the availability of a new feature that will allow users to directly convert their 3D Photoshop files into a printable object through i.materialise. If you are used to uploading your models through i.materialise’s 3D Print Lab, then the process for printing will feel very familiar.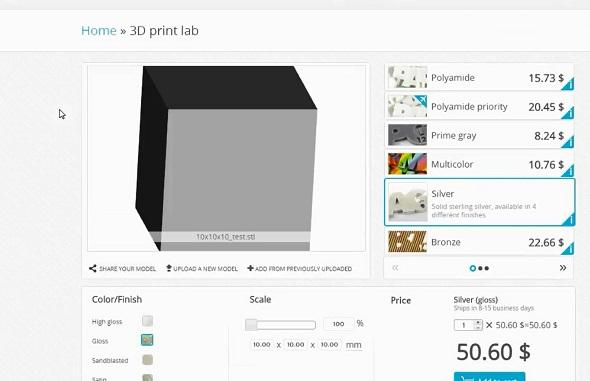
The first step in the process is to download the printer profile provided on the Photoshop website. Once that’s done, and it’s exactly as easy as you think it will be, you simply go to the dropdown menu for 3D, choose “3D Print Settings” and select “i.materialise.” After selecting the printer at i.materialise, you can choose among printer options for the materials that are 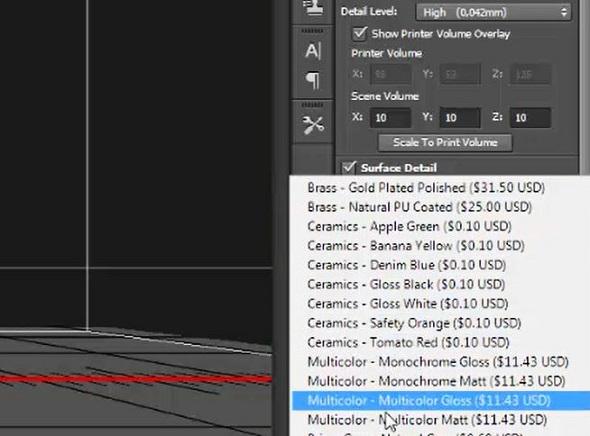 available for printing directly from Photoshop. Currently, the available materials are brass, silver, ceramics, multicolor, and prime grey with the complete range of colors and finishes that are always available for all print input sources with i.materialise.
Printing directly from Photoshop doesn’t mean that you will be sacrificing the helpful price estimator that is available to i.materialise’s 3D Print Lab. It’s still available by clicking the “estimate price” option available at the end of the list of materials. Then, as if by magic, Photoshop will repair your model’s mesh automatically thereby creating a solid piece that is ready for print. After it completes that operation, the estimated price will appear for each of the materials and finish options.
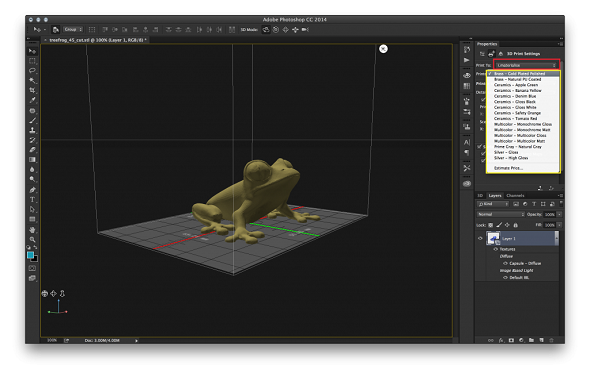
After making your final decisions regarding materials and finish for your 3D creation, you click on the button marked “upload.” This will present you with a preview of your soon-to-be-printed object. It also provides you with a summary of the 3D printing preferences you have selected as a way of giving you another checkpoint before finalizing your print. Once you are satisfied that your creation is ready to be brought to life, you choose “export” from the bottom of the preview screen and save your object as an STL file.
If you feel your attention beginning to wander, never fear, the process is almost complete. After you have created the STL file, a dialog box will appear on your screen asking you to complete the ordering process by going to the i.materialise upload page. Once you click through to that page, your settings will all already be in place in their 3D Print Lab, simply upload the STL and presto, change-o (and credit card-o) your design moves from screen to printing platform to you. Discuss this recent integration in the Photoshop & i.materilise forum thread on 3DPB.com.
Subscribe to Our Email Newsletter
Stay up-to-date on all the latest news from the 3D printing industry and receive information and offers from third party vendors.
You May Also Like
Gorilla Sports GE’s First 3D Printed Titanium Cast
How do you help a gorilla with a broken arm? Sounds like the start of a bad joke a zookeeper might tell, but it’s an actual dilemma recently faced by...
Nylon 3D Printed Parts Made More Functional with Coatings & Colors
Parts 3D printed from polyamide (PA, Nylon) 12 using powder bed fusion (PBF) are a mainstay in the additive manufacturing (AM) industry. While post-finishing processes have improved the porosity of...
$25M to Back Sintavia’s Largest Expansion of Metal 3D Printing Capacity Since 2019
Sintavia, the digital manufacturing company specializing in mission-critical parts for strategic sectors, announced a $25 million investment to increase its production capacity, the largest expansion to its operations since 2019....
Velo3D Initiates Public Offering in a Bid to Strengthen Financial Foundations and Drive Future Growth
Velo3D (NYSE: VLD) has been among a number of publicly traded 3D printing firms that have attempted to weather the current macroeconomic climate. After posting a challenging financial report for 2023,...