
Dexterity Problems? Lace Your Shoes with 3D Printed Magnetic Closures Thanks to the Ruiz Brothers


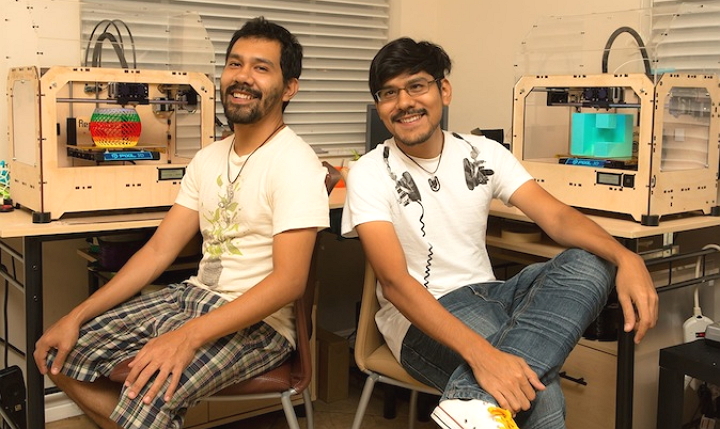
The Ruiz Brothers
Noe and Pedro Ruiz, or as they’re collectively known at Adafruit, the Ruiz Brothers, never disappoint when putting together their weird, wonderful, and innovative 3D printing and electronics projects. Starting out selling their own 3D printed products on Etsy, and growing to include a Shapeways shop, a YouTube channel with 3D printing video tutorials, and their West Palm Beach design studio, Pixil 3D, the brothers also publish their projects on Adafruit, and are passionate about technology and 3D printing. You can also find them hanging out at 3D printing meet ups near their home studio to present demos and share their work, which includes 3D printing not only this Daft Punk helmet with working LED lights, but also a custom wireless charger for your Apple Watch.
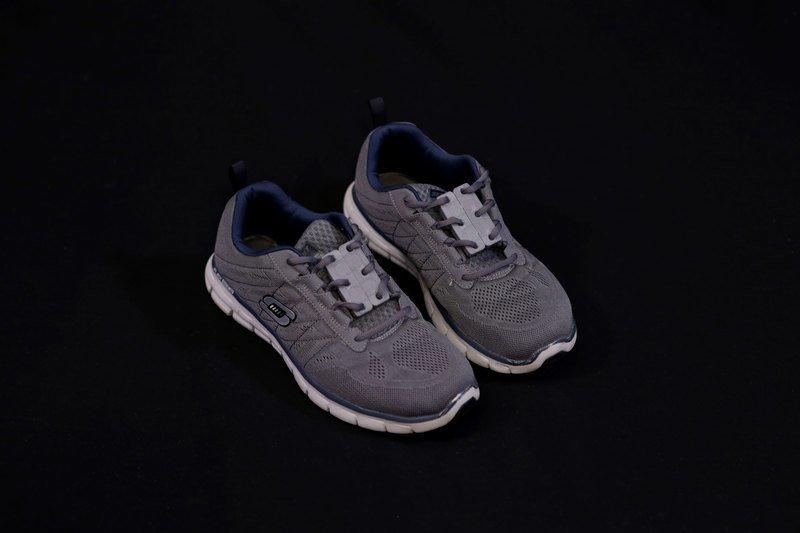
 For their latest fascinating project, they’ve published a step-by-step tutorial on Adafruit for 3D printing, assembling, and finishing your own magnetic shoelace closures. If you’ve got issues with dexterity, or just really don’t feel like looping, swooping, and pulling your shoelaces like Adam Sandler taught us in the movie Big Daddy, this is definitely a project you’ll want to get started on. The design is easy to customize so it can fit your particular shoe size, and the neodymium magnets press fit inside the parts and are strong enough to keep your laces together while walking or running. You can 3D print the parts yourselves, or have a 3D printing service like 3D Hubs do it for you.
 You’ll need a 3D printer, filaments, digital calipers, and high-strength rare earth magnets, all of which can be purchased on the Adafruit website. Pick your favorite: the 3D printed parts can be downloaded from Autodesk 360 (including with user parameters), Thingiverse, Youmagine, or Pinshape. The Ruiz Brothers said that they 3D printed the closures on a Printrbot Play, a Sigma BCN3D, and a Deltaprintr Go, and none of them required any support material; however, depending on the 3D printer that you use, you may need to adjust the slice settings.
- Nozzle: 0.4 mm
- Extrusion Multiplier: 1.0
- Extrusion Width: 0.48 mm
- Layer Height: 0.2 mm
- Nozzle Temperature: 220°C
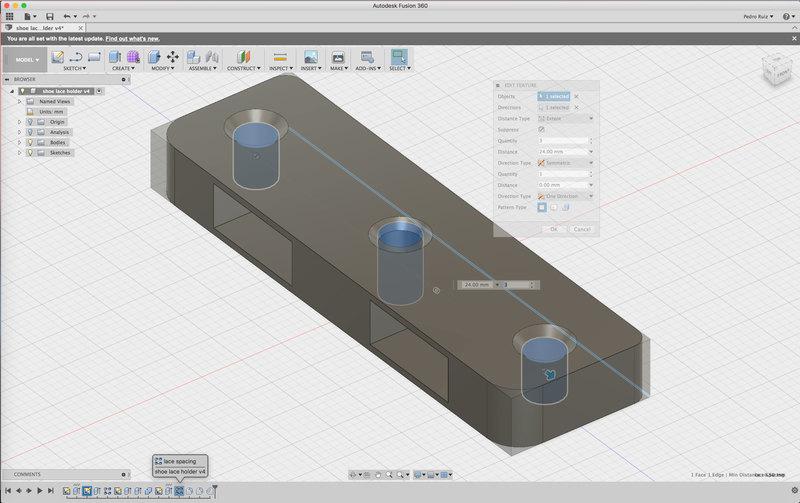 The shoelace closures are designed in Fusion 360. You can download different formats to use in your preferred modeling program, or modify their existing design by adjusting the size of the closure itself, the hole spacing for the shoelaces, and the magnet size.
The Ruiz brothers said, “Magnets can have small variations in size and thickness, so we’ll need to make sure the tolerances are pretty tight. Carefully measure each magnet and then update the height of the closure cavity.”
In Fusion 360, the pattern feature controls how far apart the shoelace holes and magnets are from each other, so you’ll want to measure and adjust those values based on the size of your shoe’s tongue and the spacing between your shoelace holes. The default closure length should work on most shoes, but if necessary, you can update the design files in order to totally customize the closures.
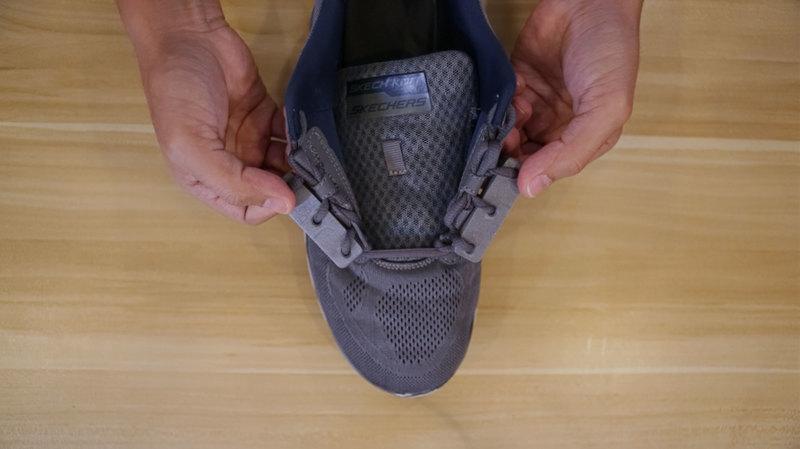
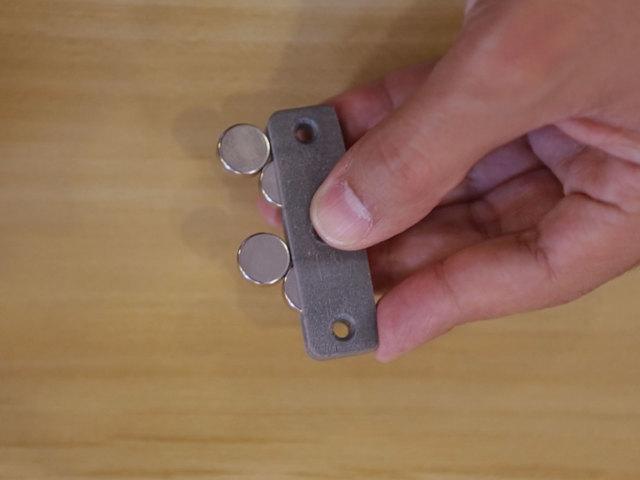 The first step in the assembly process is fitting the magnets inside the shoelace closures. Put the magnets facing each other, so that the different polarities attract and don’t repel, then press them into each side of the closures. You’ll want to be sure it’s a tight fit so the magnets won’t pull each other out of the cavities, so test the strength by pulling the closures apart a couple of times. If you need, adjust the design, or use adhesives to hold the magnets in place.
Now you’re ready to add the 3D printed shoelace closures to the actual shoes! You’ll need to untie them first, but be sure to leave the laces on the last row of holes. Then you can thread the laces through each hole in the closure, and back through the shoelace holes, all the way from the bottom of your shoe to the top of it. Be sure to leave some slack so the laces aren’t too tight, and maybe test out how tight the closures are by putting on your shoes, so you know the magnets can still reach each other.
 Loop any excess shoelaces through the inside of the shoe, and tie a knot to hold it in place. Then do it all again for the other closure, and both closures on the second shoe. Adjust as necessary, and try them on again.
The Ruiz Brothers gave their magnetic shoelace closures the ultimate test – walking around a couple of Disney World parks! They were happy to report that they did not run into any problems with the magnets detaching. The closures quickly snap together when you put on your shoes, and easily come off at the end of a long day, simple as can be. The Ruiz Brothers say that “this is a great project idea for anyone who’s looking to get into designing for 3D printing.” Check out their tutorial video to see the whole process:
Discuss in the Magnetic Shoelace forum at 3DPB.com.
[Source/Images: Adafruit]
Subscribe to Our Email Newsletter
Stay up-to-date on all the latest news from the 3D printing industry and receive information and offers from third party vendors.
Print Services
Upload your 3D Models and get them printed quickly and efficiently.


You May Also Like
The Drone Industry is Showing Where 3D Printing Delivers Real Value, AM Research Report Finds
The rapid rise of drones is creating one of the biggest opportunities for additive manufacturing (AM). Whether they’re used on battlefields, inspecting bridges or crops, or delivering supplies, drones need...
3D Printing News Briefs, June 27, 2026: Nanoscale 3D Printing, Defense Readiness, & More
We’re starting with a story about a grant for advanced nanoscale 3D printing in this weekend’s 3D Printing News Briefs, and then on to metal additive manufacturing (AM) for defense...
US Army Awards Continuous Composites 3D Printed Missile Component Contract
Despite the very loud, indignant claims from American defense officials that the US hasn’t depleted a significant portion of its munitions stockpiles, the US has depleted a significant portion of...
Rheinmetall Uses Ducting Made with Minifactory for Challenger 3 Tanks
Rheinmetall UK is using Minifactory Material Extusion as the primary production method for tank ducting on the Challenger 3 Main Battle Tank program. The Challenger 3 is the UK’s formidable...


