Naval Team Creates Functional 3D Printed Part for Use in Fleet


 It’s pretty exciting to start off a Monday morning with an email from the Navy explaining that they have 3D printed one of the first functional parts to be used in their fleet. With the team of AT1 Pecota, AT2 Thyberg, and AT3 Cosselman responsible for creating a retainer for a gun hoist adapter (also known more technically as the Retainer P/N 74D750088-1001 for Gun Hoist Adapter P/N 74D750088-1005 to Support Equipment Bulletin (SEB) NR 1170), they spent a busy few days in innovation with some of the more progressive technology the Navy enjoys today at the Fleet Readiness Center in Patuxent River, Maryland.
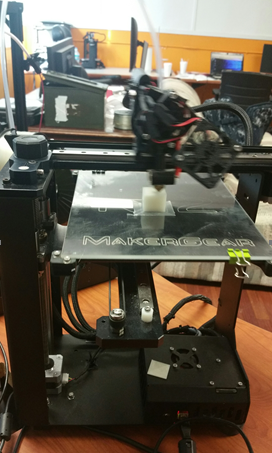
As the designers put their MakerGear 3D printer to the test, making their new part was not exactly easy from the start; in fact, they went through a couple of fails at the printer before achieving the desired results. On August 29th, they began assessing whether or not the printers at hand would be able to print what they needed, along with testing and evaluating materials to decide on the best settings.
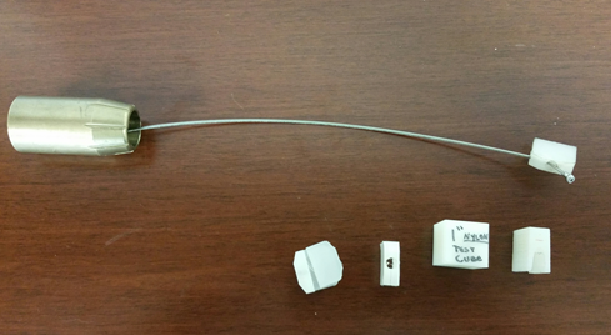
The retainer had to be digitally designed and then the team was responsible for orientation of the print as well as establishing what the post processing requirements would be. This was, as you would imagine, an extremely organized operation, and it’s really quite fascinating to see not only how they proceeded as a team, but how they learned along the way as well. Every detail, from calibration time (one hour and 35 minutes) to the testing of a small 3D printed cube (measuring exactly one inch) was documented as the team worked their way to printing what would turn out to be a highly functional part made with nylon filament.
 The test cube showed some adhesion issues as they began printing on the MakerGear at 235°C for the hotend and 85°C for the bed. It failed to print, so the team kept experimenting until they discovered they could solve the issues with an adjustment of the brim settings and an increase in the surface area for the initial layer of the 3D print. Their print failed again, however, this time in post inspection.
“The legs were too brittle and broke during evaluation,” stated the team in their documentation of the project.
The naval designers were able to figure out the problem as they pinpointed strength in the X, Y axis, with a weakness in the Z axis causing issue. On August 30th, notes showed that the team experimented with a total of six different orientations during nearly seven hours of printing.
“Multiple orientations failed, all in the Z axis,” stated the notes. “It was determined that the material layer height needed to be lowered to increase the material’s overall layer adhesion. The model was re-printed in the two best orientations discovered in the previous prints. Print time 2 hours and 15 minutes.”
The next day, upon reducing the layer height and again refining the orientation, the team began resolving strength issues with their print. As they continued with testing, the MakerGear jammed, and the designers showed their mettle in 3D printer maintenance, taking the printhead apart, removing damaged filament, and then re-threading the materials for use.
They went on to create samples which were then passed to others for inspection and double checking. They also 3D printed extra stock for future use, as well as testing. A master 3D printing binder was created as well so that the documentation on this project could be studied in terms of settings, printer setup, and what failures occurred and why.
As AT1(AW) Michael A. Pecota shared with 3DPrint.com, what they took away from the project was the need to continue logging printer settings and material requirements in order to speed up the beginning phases of projects. They’ve discovered that they now have a better sense for budgeting time in both 3D modeling and testing—and the more senior team members have been able to bring junior team members up to speed in not only 3D modeling but also learning how to share files, and they now have a comprehensive understanding of how to operate a 3D printer. Discuss further over in the Navy 3D Prints Part for Fleet forum at 3DPB.com.
[Source/Images: Mid-Atlantic Fleet Readiness Center, Maryland]
Subscribe to Our Email Newsletter
Stay up-to-date on all the latest news from the 3D printing industry and receive information and offers from third party vendors.
Print Services
Upload your 3D Models and get them printed quickly and efficiently.


You May Also Like
Product Market Fit: Nikon Advanced Manufacturing CEO Hamid Zarringhalam on How Defense Demand is Pushing Metal AM to Scale
After years in which the additive manufacturing (AM) industry gained a reputation for its hype outpacing its performance, an interesting development has emerged recently. In certain market segments, at least,...
Beyond Thermoplastics: Why JuggerBot Is Betting on Hybrid AM
For years, thermoplastics have been the workhorse of additive manufacturing (AM). They are pretty easy to process, available, and compatible with many of today’s industrial 3D printers. From prototypes to...
Beehive Industries Invests $70M in Ohio to Support Its Advanced Manufacturing Buildup for Propulsion
Beehive Industries and the state of Ohio have each been killing it in the metal 3D printing game. Naturally then, it was only logical for Beehive and Ohio to combine...
IperionX Raises $50 Million to Expand U.S. Titanium Production
IperionX has raised about $50 million through a public offering to speed up the commercial rollout of its U.S. titanium manufacturing business. The company sold 2.275 million shares at $21.98...