
PowerDoodler Activity Idea: 3Doodle a V-Twin Engine With Moving Parts


 There are so many things that have already been made using the magical 3Doodler pen, and many of those things have been covered here. From time to time, for those who are having a difficult time coming up with their own ideas, 3Doodler will post a “PowerDoodler Activity,” which takes readers through all the steps required to successfully create something with a 3Doodler pen. I have covered several of these projects — such as Tiffany Candle Holders and an Ocarina Pendant — and we are fortunate to have an instructional for another cool and challenging project. This one comes courtesy of Samson Wong. This resident PowerDoodler extraordinaire gives us a V-Twin Engine that moves!
To 3Doodle a V-Twin Engine you will need to gather some materials together, including: your 3Doodler pen, PLA plastic of any color, a DoodlePad, scissors, masking tape, and something shaped like a tube (such as the 3Doodler 100-strand plastic tubes). Oh yeah! You’ll also need to get your hands on one of these V-Twin Engine stencils, since that is the item that this particular PowerDoodler Activity revolves around.
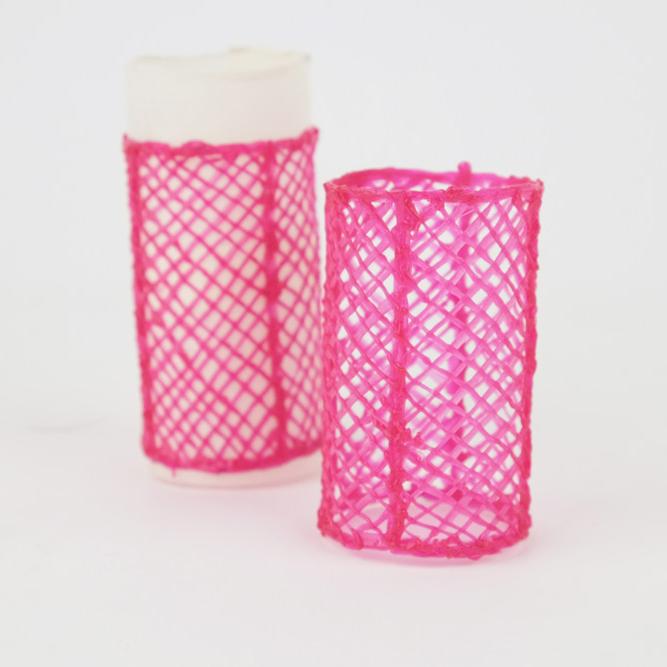 The first step involves the tube, any tube, so long as its wall is 1mm thick, and it has approximately a 40mm diameter. Make sure it’s empty then take your scissors and cut it into two smaller pieces, leaving one side open. Next, cover the outside of your tube with masking tape, and then begin Doodling on the tape. Repeat this until you end up with a pair of Doodled tubes.
For the engine pistons, you need to take the same tube piece, cut shorter. This time you’ll be putting masking tape on the inside of the tube, then: “Carefully Doodle around the interior of the tube, using the opening you cut in the side of the tube to help peel the Doodle out when you are finished. Do this twice too!” When you are done make sure that the pistons you just made fit securely inside your other larger tubes.
For the next step you’ll need that DoodlePad as you Doodle the rest of the engine parts, including two round piston parts, a crank shaft, and casing. Next is a step that is a bit more difficult than previous steps. You need an unused strand of plastic, cut into three pieces: two large pieces that are the same length and one shorter piece that fits in the middle of the other two pieces. Then “Doodle each longer strand piece into place, resting it in the middle hole of the paddle-shaped pieces you’ve made on the stencil.” Both paddles and longer strands should be aligned. Likewise, the smaller strand segment will connect the paddles together so long as you “thread it through one end of each of the two remaining stencil shapes.” The goal here is for these to swing around like clock hands!
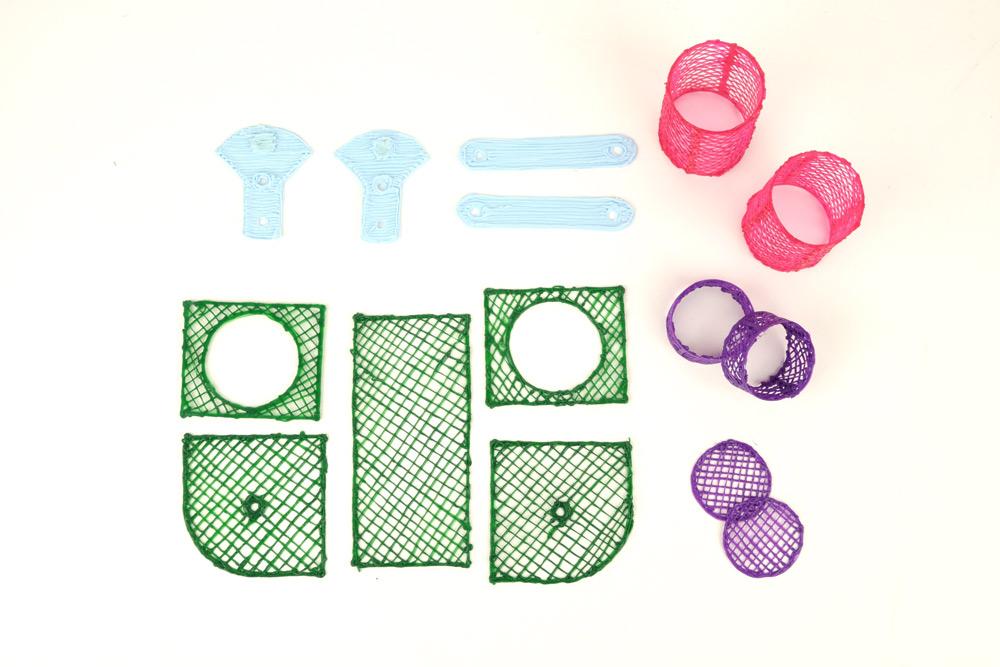
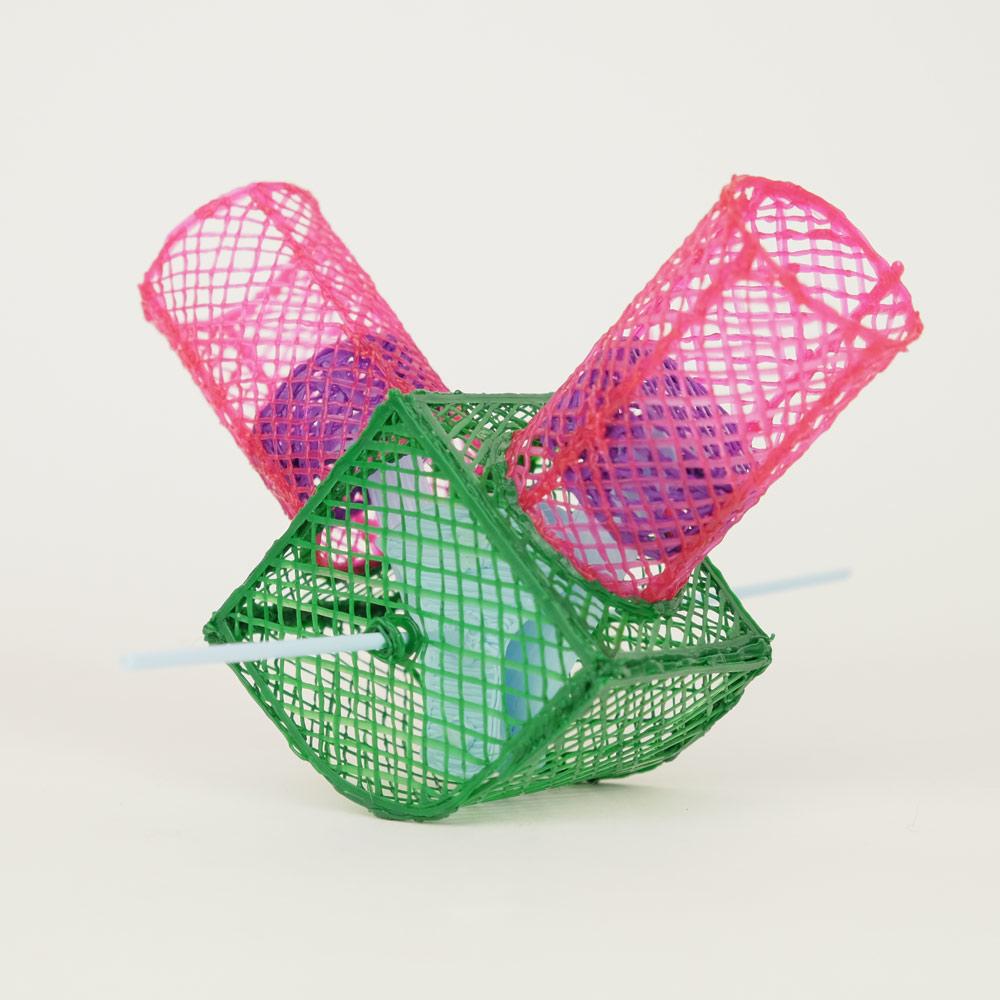
Nearing the end of our project, we still have two more very important steps. In Step 6, you are bringing the pistons and the crank shaft together, and it is best for you to check out exactly how this is done in the PowerDoodle Activity instructions. In Step 7, to make sure everything stays together here, Doodle each cylinder to each crank case panel and one of the shaft panels. Then put your pistons and crank shaft into place. Once everything seems to fit, you will Doodle the case’s opposite side into its correct place, along with the curved bottom part.
Once you’ve made sure that all parts are fitted and then Doodled together, you should have a Doodle Engine that’s ready to go! Samson Wong leaves one final challenge here: he wants you to consider taking this to the next level by making a single cylinder alternative — with a 3Doodler pen, of course! What do you think of these ideas? Discuss in the 3Doodler 3D Printing forum over at 3DPB.com.

Subscribe to Our Email Newsletter
Stay up-to-date on all the latest news from the 3D printing industry and receive information and offers from third party vendors.
Print Services
Upload your 3D Models and get them printed quickly and efficiently.


You May Also Like
How the World’s Most Advanced Tech Companies Are Using 3D Printing
3D printing has been around for decades. For most of that time, it was a prototyping tool. Engineers used it to check if a design looked right before spending money...
The New Dental Lab: “Three Technicians Can Handle a Hundred Arches,” Says Digital Dentistry Expert Josh Jakson
Josh Jakson’s path into digital dentistry started long before he had a job title. He grew up around it. His father, a Polish immigrant, started the family’s dental laboratory in...
Why Beam Control Could Redefine the Future of EB-PBF
In Part 1, Ulf Lindhe examined how advances in beam control, point melting strategies, and process monitoring are changing the way engineers think about electron beam powder bed fusion (EB-PBF)....
Additive Manufacturing at a Crossroads
Additive manufacturing is at a crossroads. Simultaneously, we find ourselves between certain very different modalities, applications, and industries. Rather than being able to explore them all, companies will now have...


