
DIY Lock Cracker: 3D Print Your Own Device to Open Any Master Lock


 While we aren’t advocating breaking and entering for any nefarious agendas, the reality is that being able to crack your own lock sure does help when you’ve padlocked up some valuable items–whether it’s a storage shed full of valuable tools or even your old bike on the corner–and walked away for a while, doing as we all have: forgetting the combination. This is definitely a common problem–and one that keeps locksmiths in business. While those valuable little numbers may have been left and lost on a tiny scrap of paper somewhere, if you have your own C-C-C-C Combo Breaker, it’s as easy as doing some ‘applied hacking.’

Samy Kamkar
In less than thirty seconds, with this genius design by Samy Kamkar, you’ll be able to crack open any Master combination lock, taking care of business for forgotten storage lockers, devices made a little too secure by yourself, and everything in between. Employing Arduino software and a new technique that should have you in business after eight attempts or fewer, Kamkar gives a concise plan for future hacking of locks, and that’s all completely above board, of c-c-c-c-ourse!
For the special technique on learning how to actually crack the lock in just eight takes, you will want to go back to school with Kamkar for what is basically Combination Lock Cracking 101. Kamkar does expect you to have that downpat before you proceed here, since you will need a knowledge of how to navigate the shackle, feeling resistance, as well as calculating it until you have the combo cracked. It’s frighteningly simple, but you’ll be greatly relieved when you have that temporarily enigmatic lock readily undone.
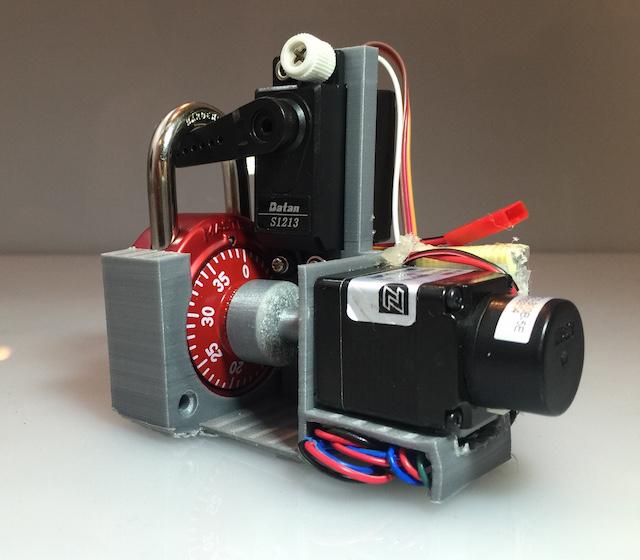
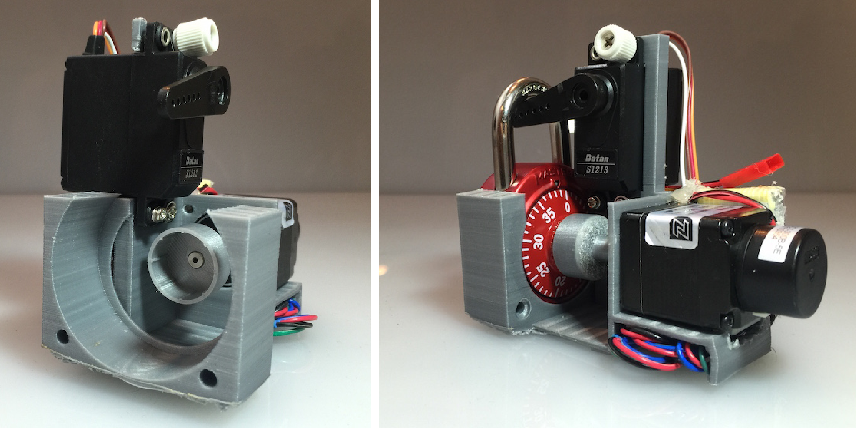
This DIY battery-operated gizmo by the king of Master lock cracking is simple enough in that it works off software supplied by Kamkar at GitHub, coupled with an Arduino Nano as the brains of the outfit along with an inexpensive, smaller pancake stepper motor, meant for compact precision. For the driver, he used an Easy Driver that’s simple to control.
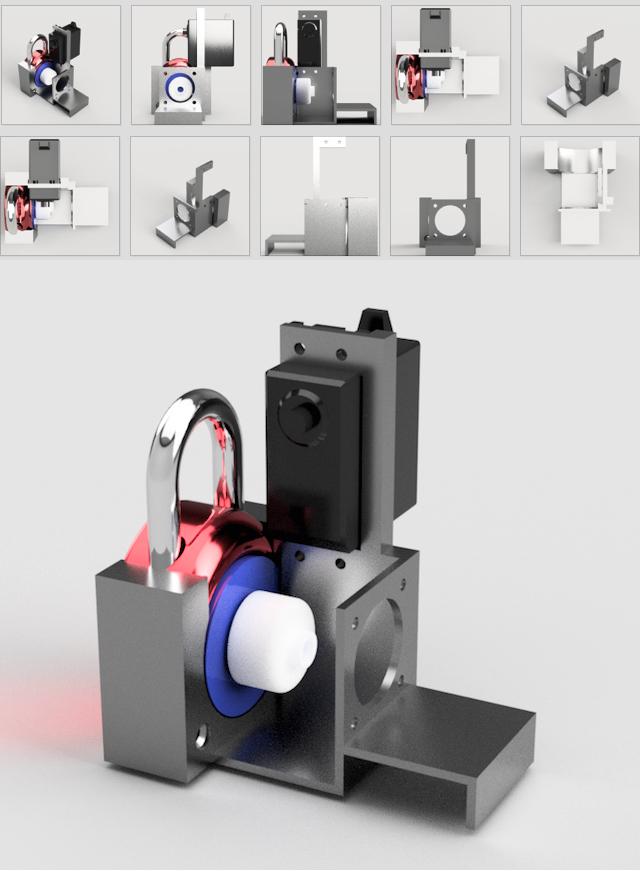
 Before you get started, think about how you’ll plan on 3D printing the part of the device that will grab on to the combination lock’s dial, if you don’t have equipment at home. The 3D model requires only basic digital design and Kamkar recommends downloading free CAD software if you don’t currently have any.
Kamkar recommends measuring, as per his video, for the lock and dial. He then used Autodesk 360 to draw the shaft to the appropriate thickness, and patterning it correctly. Once it’s all set for printing, you’ll need to print the 3D model and then get ready to hook it up to the electronics. It’s really quite amazing how the device hooks right on to the lock in question, using Kamkar’s software and a little ‘brute force’ to get the lock open.
Hardware required:
- Arduino Nano – a 5-volt microcontroller works as your central intelligence for the lock cracking device
- Allegro A4988 – this is a smaller Easy Driver used for precision, with capability to drive a stepper motor up to 30V at 750mA
- Stepper motor – either simple or double shaft stepper motor, depending on whether you are going for beginner or advanced level (if you are going with advanced, you will also need the HKT22 Optical Rotary Encoder to go with it)
- Analog Feedback Servo – necessary for torque to lift the shackle, including an additional wire for analog feedback to detect opening of shackle
- L7805 Voltage Regulator – this goes with the analog feedback servo, and you’ll want an external voltage regulator for sending ‘enough juice’ to the servo, and to avoid damaging your Arduino.
- 500mAh 3S Lipo Battery – very effective, and at 500mAh will last from 30 to 120 minutes without recharge
- LiPo Charger – this one is not absolutely necessary, but helpful if you need to recharge the battery, and need a charger supporting 3-cell LiPos.
- Arctic Alumina Thermal Adhesive – good thermal adhesive for attaching the heatsink to the stepper motor driver.
- Digital Calipers – needed to measure the lock for cracking
- Breadboard and Wires – helpful tools, but optional
Software can be obtained in totality here at github.
Are you interested in 3D printing and assembling this DIY lock cracker? Discuss in the 3D Printed Lock Cracking Device forum thread over at 3DPB.com. Check out Kamkar’s video, below, detailing the Combo Breaker, as well as more images.
Subscribe to Our Email Newsletter
Stay up-to-date on all the latest news from the 3D printing industry and receive information and offers from third party vendors.
Print Services
Upload your 3D Models and get them printed quickly and efficiently.


You May Also Like
How One Artist Is Using 3D Printing to Tell Stories About the Ocean
Artist Kimberly Callas sees something different when she looks at a 3D printer. Where others see a machine for making parts, she sees a way to tell stories about the...
Bambu Lab Wants Home 3D Printing to Feel Less Like a Workshop with PLA Pure
As desktop 3D printers become increasingly common in homes, Bambu Lab is focusing attention on something beyond print speed and hardware features. This week, the company launched a new filament,...
AM Asia Watch: China Exported 2.46 Million 3D Printers in Four Months
China’s consumer 3D printer industry seems to be reaching a new level of global dominance. According to Chinese state media outlet China Global Television Network (CGTN), China exported 2.46 million...
Bambu Launches A2L: What the New Printer Reveals About Its Strategy
Bambu Lab continues its relentless march for 3D printing domination with the launch of the A2L. The 330 × 320 × 325 mm printer will have a nozzle temperature of...


