Build Your Own Ultrasonic Acetone Mister For Smoothing Your 3D Prints


 When one sets out at first to begin the journey into 3D printing, it’s all about the equipment, the initial expense, and the potential learning curve regarding digital design, not to mention producing the prints themselves. But like any project that one gets into with enthusiasm, a host of other processes tend to come into play. One that probably doesn’t get discussed quite enough—and can be one of the most fun steps as well—is finishing.
While each element of 3D printing is crucial, finishing is obviously what gets you to the end point of realizing your vision. There may be some models that you leave white and unfinished, which can actually achieve a cool, stark look. Generally though, you probably have a detailed plan for your 3D printed model which might involve painting or just employing a specific type of finishing technique to smooth it out. How do you plan to achieve that? It’s good to have a plan before you start 3D printing so that you don’t reach the end of many hours of work only to find you need to re-work everything.
 Knowing how to finish your 3D print to give it a professional look is very important if you are planning on photographing it, planning to sell it, or just cherish something at home or the office that you want to look nice. For users dwelling in 3D printing and DIY paradise, the method of employing vapor polishing for finishing is nothing new. What is new, however, is an Instructable by Michael Graham, an engineer from Ohio whose TestrBot we covered last month.
Known also as MechEngineerMike, of Engineer Dog, his goal is to offer a better way to finish your project while reducing, if not eliminating, some of the issues with using vapor polish.
Current methods for finishing a 3D print with vapor polish involve home-made and rigged setups that can be hazardous, like:
- Treating the 3D print with hot temperatures, achieved in a crock pot or other device, making use of boiling solvent
- Treating the 3D print with cold temperatures, releasing them in a haphazard manner from a material like paper towels or something similar
- Spraying canned solvent onto print
- Dipping parts into solvent
In an effort to escape fire hazards, unpredictability, fumes, and toxicity, as well as uneven finishes, Michael decided the best method would be pretty logical and simple. One should be able to immerse the 3D print in a transparent container that can be fully closed and get the job done quickly and simply.
“Essentially I want something as convenient as a microwave,” said Michael. “I’m also forgetful, so I don’t want my parts to be destroyed if I forget that I left them in the machine.”
I think Michael probably covers it for most of us, especially the forgetfulness part as we tend to get busy and move on to something else while waiting for another process to be completed.
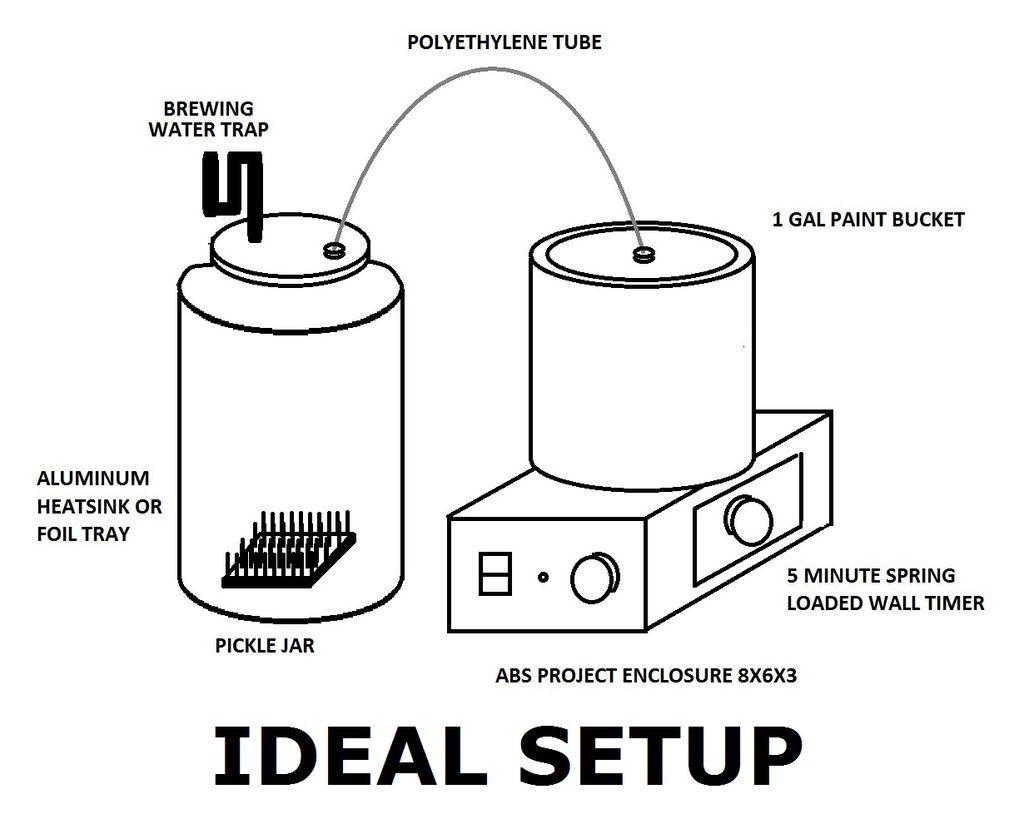
With this in mind, he’s created a new device called the Ultrasonic Misting 3D Vapor Polisher. It’s quite an invention, which relies on controlled mist condensing on the 3D printed model inside a contained finishing unit.
Michael was inspired by the idea of an ultrasonic humidifier, using a piezoelectric transducer to create oscillation and vibration, which causes the mist he was looking for. To control the mist for his purposes of finishing, a potentiometer can be used to manipulate the vibration. An aquarium air flow pump keeps the mist moving, producing an even finish on the 3D print.
“Another cool thing about this design is that the fog creating components are separate from the fog applying components,” says Michael. “This means that you could use a micro controller to do some very precision applications of the fog. As it is, using a simple mechanical timer as shown in the drawing will still give you a ton of control.”
 To handle any fumigation issues, Michael installed a water bubbler for absorbing excess solvents like acetone, which is also the only solvent Michael recommends using.
“Obviously you want to be really careful around solvents. Read the MSDS sheets for any chemicals you use and always wear proper PPE when handling them,” says Michael. “While this machine was designed to allow for use indoors the only solvent I recommend doing this with is acetone. All other solvents should be treated like poison.”
It’s also extremely important to clean the finishing chamber when switching chemicals, as many chemicals are not compatible and could cause a great hazard—even an explosion.
A big fan of acetone, Michael explains that are no restrictions on how much of it we can use, it evaporates quickly, is non-oily, and works well with ABS.
Once you are ready to get started, the basic materials needed to build a chamber like Michael’s include:
- Air Pump & Check Valve: Aqua Culture 1/2 Gallon Betta View with Base (from Walmart)
- 8″ x 6″ x 3″ project box
- Ultrasonic Humidifier
- Airtight glass jar
- Brewing Airlock: Make your own, or check one out here
- Empty Paint Can: One quart or one gallon
- (3 ft) 1/4″ OD polyethylene tubing
- 90 degree threaded quick disconnect fitting for 1/4″ OD tube
- Straight threaded quick disconnect fitting for 1/4″ OD tube
- Optional: 5 Minute Spring Loaded Mechanical Wall Timer
Note: It is crucial your chamber be airtight.
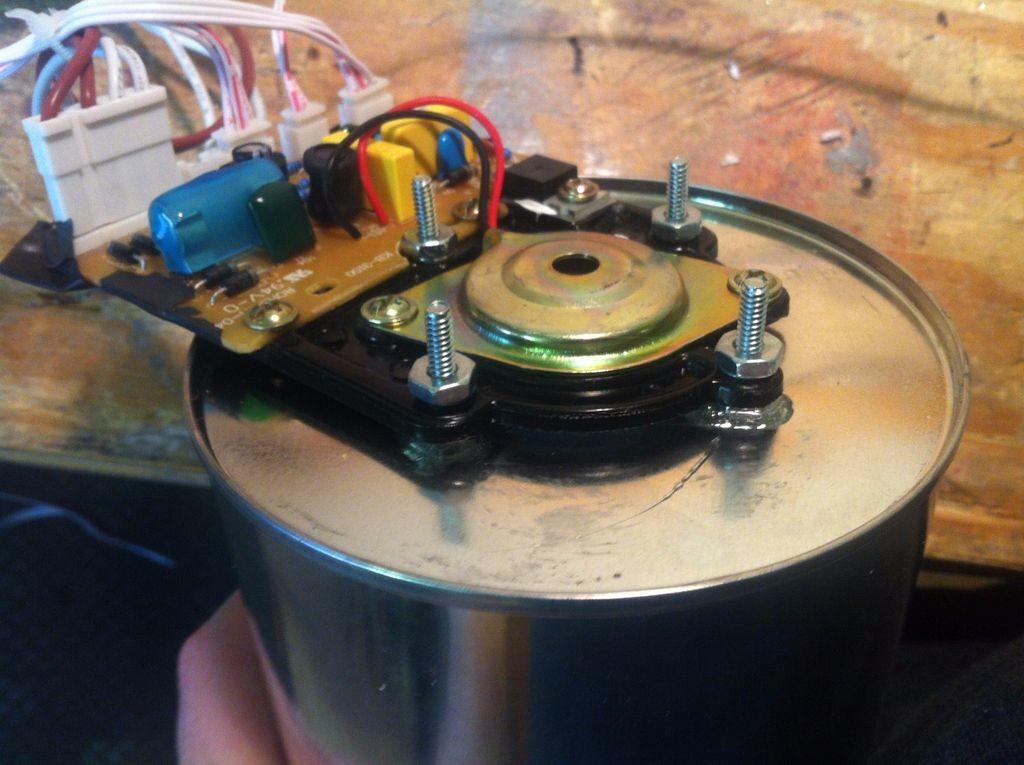
After taking apart the humidifier with a screwdriver, you’ll want to take note of all its parts—which you will be using. The idea now is to zip-tie the float sensor in the ‘up’ position, theoretically fooling the mechanism.
Next, you’ll want to prepare the paint can, which will become your misting chamber. The vibrator will be mounted on the bottom of the paint can after you drill four holes, with one large one for the vibrator, which will then be sealed to avoid any leakage. The other mounting holes should be made as small as possible and then sealed with 2 part epoxy.
The air bubbler tube can also be installed to run up the outside of the paint can so you don’t have to drill another mounting hole. Michael added foam around it to reduce noise and vibration.
Upon building this gizmo and using it to polish his 3D printed parts, Michael began testing them with his TestrBot Universal Test Machine. The TestrBot can be used to perform a variety of tests on 3D printed model, including testing for tension and compression. Michael was surprised to find that finishing the prints with acetone using this method did not strengthen them but, rather, weakened the 3D printed models. Testing several models using the TestrBot, he did conclude that while there was some weakening–most likely due to the acetone causing a chemical change–the bottom line is that the vapor polishing machine should come in handy for many looking to give their print that polished look.
Have you been looking for a better way to finish your 3D prints? Is the vapor polishing chamber something you might be interested in building, or do you use something similar already for your 3D models? Share with us in the 3D Print Vapor Polisher forum thread over at 3DPB.com.
Subscribe to Our Email Newsletter
Stay up-to-date on all the latest news from the 3D printing industry and receive information and offers from third party vendors.
Print Services
Upload your 3D Models and get them printed quickly and efficiently.


You May Also Like
Product Market Fit: Nikon Advanced Manufacturing CEO Hamid Zarringhalam on How Defense Demand is Pushing Metal AM to Scale
After years in which the additive manufacturing (AM) industry gained a reputation for its hype outpacing its performance, an interesting development has emerged recently. In certain market segments, at least,...
Beyond Thermoplastics: Why JuggerBot Is Betting on Hybrid AM
For years, thermoplastics have been the workhorse of additive manufacturing (AM). They are pretty easy to process, available, and compatible with many of today’s industrial 3D printers. From prototypes to...
Beehive Industries Invests $70M in Ohio to Support Its Advanced Manufacturing Buildup for Propulsion
Beehive Industries and the state of Ohio have each been killing it in the metal 3D printing game. Naturally then, it was only logical for Beehive and Ohio to combine...
IperionX Raises $50 Million to Expand U.S. Titanium Production
IperionX has raised about $50 million through a public offering to speed up the commercial rollout of its U.S. titanium manufacturing business. The company sold 2.275 million shares at $21.98...