It’s not over until the FAT

The Factory Acceptance Test (FAT) is where the rubber meets the road, as the customer determines if they are willing to accept the machine from the supplier. A FAT process should not play it safe – it should stress-test the equipment, ensuring acceptable and consistent surface finish, laser alignment and stability for the LPBF process.
3D-printing industry evangelists like to promote the idea that “complexity is free.” But in reality, metal additive manufacturing (AM) is complicated. Furthermore, we are beginning to see metal 3D printing advance to production volume. Faster machines with multiple lasers, working in parallel on factory floors or in multiple factory locations – this is the future of metal AM, but we still have some barriers to overcome.
It is no longer enough to meet specifications on a single system – now suppliers and manufacturers must create conformal platforms that repeat the same performance day-to-day and system-to-system. This is becoming even more of a challenge now that many manufacturers are building multiple-laser machines to boost throughput. But how do these lasers work together? Are they able to print on the same surface or are they quarantined to separate areas? The end result needs to be as close to perfection as possible.
Aggressive stress testing of a printer prior to shipment is essential to ensure that it meets specifications. A Factory Acceptance Test (FAT) prior to release to a customer site is the first step in an AM system’s commercial journey.
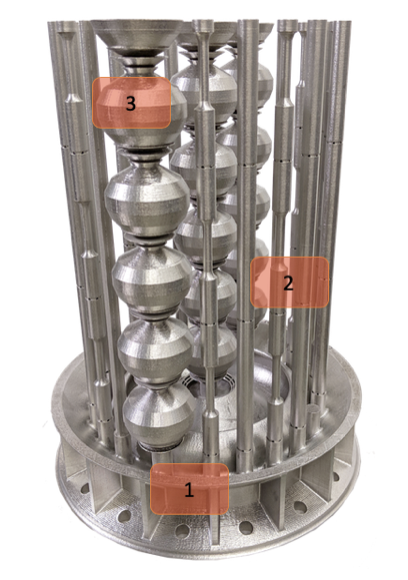
Image 1. Complete FAT Build measures (1) loading, (2) tensile strength and (3) surface roughness/laser overlay. Image courtesy VELO3D
Above is an example of a 3D-printed FAT build of a wide variety of shape geometries manufactured out of INCONEL on a VELO3D Sapphire metal AM machine with dual-lasers. The components almost completely fill the build chamber, which is this case has a diameter of about 12 inches (300 millimeters) and a height of about 16 inches (400 millimeters). Following the build, a series of tests are run to measure the limits of machine performance and to ensure that customers will be able to fully leverage the equipment’s capabilities in even the most extreme applications.
The first feature to notice on the FAT build pictured above is the round portion at the bottom that is intended to be representative of a fairly large, dense part subject to heavy mass loading. To create this piece almost all of the build plate area is lased with the system’s two lasers at full power (2x lasers 1kW). Post-build tests on this part include core quality to ensure good chamber gas flow, accurate overlay between lasers under high thermal loading, and overall system throughput (i.e. is the machine running as fast as it’s supposed to).
The next characteristic of the FAT to be examined is its height. On the perimeter of the build, two types of bars are printed (2). Arrayed all around the build-plate area, these enable the assessment of even-production quality throughout the entire build. Tensile bars (the straight ones) confirm metal quality. Post-build, these are pulled in a tensile tester to determine ultimate strength, yield and elongation. The perimeter also includes net-shape bars (three are stacked on top of each other) that neck in and out. Such geometric variation enables data collection and evaluation in all dimensions (x, y and z) throughout the bar to detect any degradation or deviation and confirm accuracy throughout the build.
The three spherical towers in the center of the FAT, seen in (3) above (and Image 2 below), validate target surface roughness as well. The different surface angles on each sphere require different skin-production processes, which can then be evaluated for stability throughout the entire build. This ensures there are no defects at the challenging shallow-angled points. One of the towers is designated to check dual-laser overlay—both lasers are used to build the same geometry—to verify alignment and stability. Evaluation of the towers ensure a degradation-free surface finish regardless of whether the part is being built with a single or dual laser.

Image 2. Spherical towers printed in the center of the FAT are used to evaluate laser alignment and performance. Image courtesy VELO3D
FAT gives AM-equipment customers the confidence that their first, second or hundredth system will perform to specification across an entire range of applications. But it doesn’t stop there. Follow-up continues with a Site Acceptance Test (SAT) to ensure that the same robust results observed during the FAT can be seen once the AM machine is installed and up and running at the customer’s facility.
Such tight control over system performance ensures that customers can run production parts on multiple systems in their factory and across multiple factories in various locations – all with the same, standardized and qualified recipe.
FAT and SAT testing together ensure that AM systems will be able to print a customer’s most challenging applications upon delivery and enable full-scale production of complex 3D-printed parts. This approach to system delivery ensures that users will be able to apply all their advanced design-engineering capabilities to full-scale production and deliver the most innovative, high-quality parts possible.
To learn more about best practices in multi-laser alignment, come hear Dr. Greg Brown deliver more insights at the Additive Manufacturing Strategies Summit 2020 from Feb 11-12, 2020 in Boston.
By Dr. Gregory Brown, VP of Process Engineering, VELO3D
Subscribe to Our Email Newsletter
Stay up-to-date on all the latest news from the 3D printing industry and receive information and offers from third party vendors.
Print Services
Upload your 3D Models and get them printed quickly and efficiently.
You May Also Like
3D Printing News Briefs, April 11, 2026: Energy Targets, DoW Contracts, Nike Air Max, & More
We’re starting with 3D printing for energy applications in this weekend’s 3D Printing News Briefs, and then moving on to military and defense 3D printing. Finally, Nike Sportswear is focusing...
3D Printing News Briefs, February 7, 2026: Generative AI, USVs, Microgravity, & More
Today’s 3D Printing News Briefs is a bit of a mixed bag. We’re starting with generative AI tools for 3D design from MIT, and then news about USVs. Moving on,...
3D Printing News Briefs, January 24, 2026: Life Sciences, Quality Management Software, & More
We’re starting with business news in today’s 3D Printing News Briefs, as AMGTA announced EOS as a new Principal Member, and the company’s Head of Sustainability as the newest member...
UK Government Partnership to Develop 3D Printed Metal Alloys for Nuclear Fusion
The UK Atomic Energy Authority (UKAEA), a government-funded research organization, has demonstrated a persistent interest in developing metal additive manufacturing (AM) materials for nuclear fusion applications, including multiple phases of...


