
The Do’s and Don’ts of Additive Manufacturing


The best-use cases for 3D printing aren’t always obvious. When designing an object for additive manufacturing, it’s important to keep the limits and benefits of the process in mind. These tips will help any designer get the most out of a 3D printing service.
Tip 1. Don’t Use Existing Designs
Each part should be designed with an intended manufacturing process in mind. Many designers and engineers are surprised to realize that existing part designs are not always cheaper to produce with 3D printing, even at low volumes or as one off’s.
As an example, consider an existing part that has been designed for CNC machining. 100 units of this part need to be produced and the desired material is SS 304L, which is available in 3D printing via DMLS and SLM. When this part is produced with CNC machining, the production cost is $35 per part. But if the manufacturing process is changed to 3D printing, the cost increases to over $70 per unit.
This is because the economies of scale don’t apply to additive manufacturing at the same degree that applies to CNC machining services and injection molding. The most cost-effective production type depends on the application and the number of units to be produced.
Here are some rules of thumb to guide your selection process when it comes to the production of plastic parts:
- Choose 3D printing for less than 100 units
- Choose CNC machining for less than 500 units
- Choose injection molding for more than 500 units
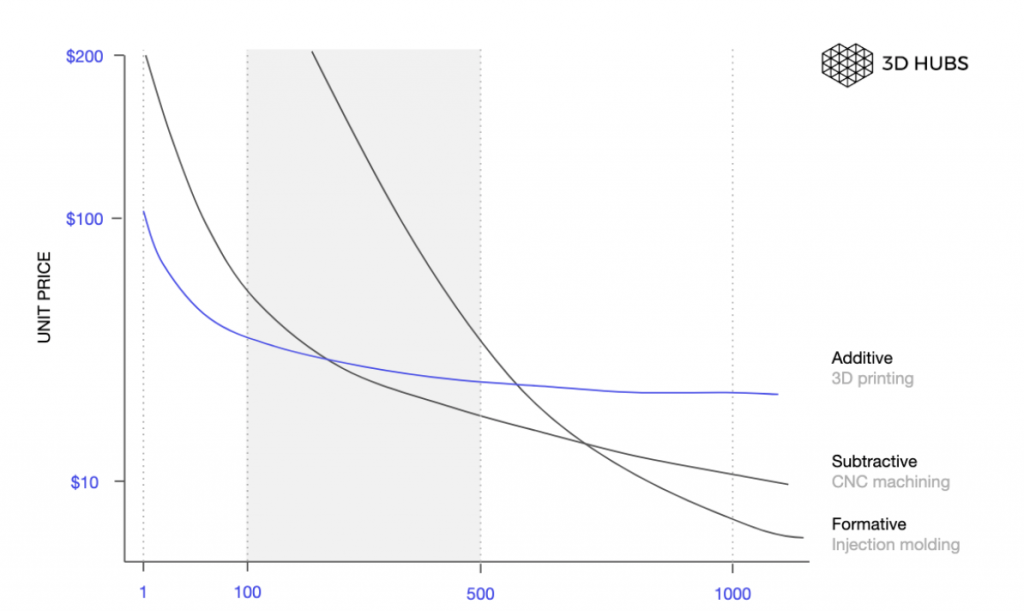
Economies of scale for additive, subtractive and formative technologies for plastics.
Note that there is a gray area between 100-500 units. Any of these three technologies might be economically viable depending on the part geometry, material and application.
Metals are a different story. Even for one-off prototypes or low production runs (< 100 units), parts that have not been designed specifically for 3D printing are always manufactured more cost-effectively using CNC machining. We will see below some examples where it does make sense to use metal 3D printing.
Tip 2. Eliminate Support Structures
All additive manufacturing designers need to follow a simple rule: minimize the need for support structures as much as possible.
3D printing is an additive manufacturing process. Material for each new layer is deposited onto the previous layer, and that material can’t be deposited onto thin air. Support structures are often used to print overhangs and bridges; the structures are later removed during post-processing.
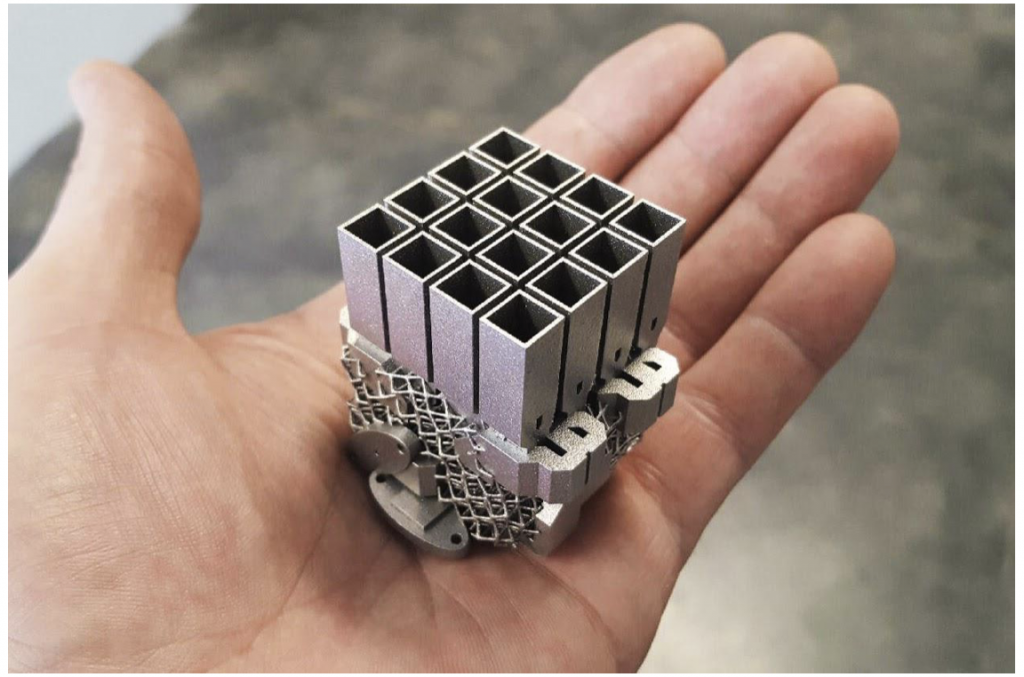
The removal of support structures always adds additional cost and time to production. This is especially true for metal 3D printing, which has extremely high post-production costs.
3D print metal part with support still attached. The build was stopped for demonstration purposes.
There are a few easy ways to reduce the support structures needed for design:
Keep overhangs less than 45 degrees.
- Overhangs with a slight angle don’t usually need support.
Consider the print orientation while designing.
- A top-heavy design might be better-printed upside-down.
Choose a different production method.
- For example, unlike other 3D printing processes, SLS and MJF printing don’t require support structures.
Tip 3. Consider Post-Processing
3D printed parts are almost never ready to use right out of the printer. Powder removal and support removal are necessary forms of post-processing; the object needs to be cleaned and trimmed before use.
Other forms of post-processing can be used for aesthetic and functional applications. Objects made with metal 3D printing can go through thermal treatments, surface finishing, and even additional CNC machining to get the desired result. Plastic 3D printed objects can be dyed, smoothed, or treated for water tightness.
Understand the post-processing options during the initial stages of design. Processing will add additional cost to production, but it can also be an excellent way to produce 3D printed parts for specific applications.
Tip 4. Create Lightweight Structures
Lightweighting is the process of designing a 3D printed object to use as little material as possible. This makes the object significantly easier to print and greatly lowers the production costs.
There are a variety of ways to lightweight design with CAD software. Even small changes will result in significantly cheaper production.
Lattice structures
- Most CAD software can use a semi-automatic process to apply a weight-reducing pattern or increase the surface area of an object. Choose options that do not compromise the functionality of the design.
Topology optimization
- Simulation-driven topology optimization can be used to create strong structures with a minimal amount of material. Intelligent designs will cost less to print and may even have a higher structural integrity.
Assembly consolidation
- Whenever possible, use additive manufacturing to consolidate multiple parts into one unit. This lowers production costs and makes the final assembly easier to complete.
Satellite component with lattice structures and internal cooling channels. The original assembly consisted of 100 different components that were redesigned to one single part. (Source: Optisys LLC)
Tip 5. Increase the Design’s Functionality
3D printing has the unique ability to manufacture products with internal channels. No other manufacturing technology can effectively produce channeled, gridded, or porous structures with the same level of quality. There are several common applications for this design functionality:
Heat exchangers
- A heat exchanger requires two fluids or gasses to pass through an area while remaining separate. 3D printed channels make it easy to design complicated heat exchangers for a variety of applications.
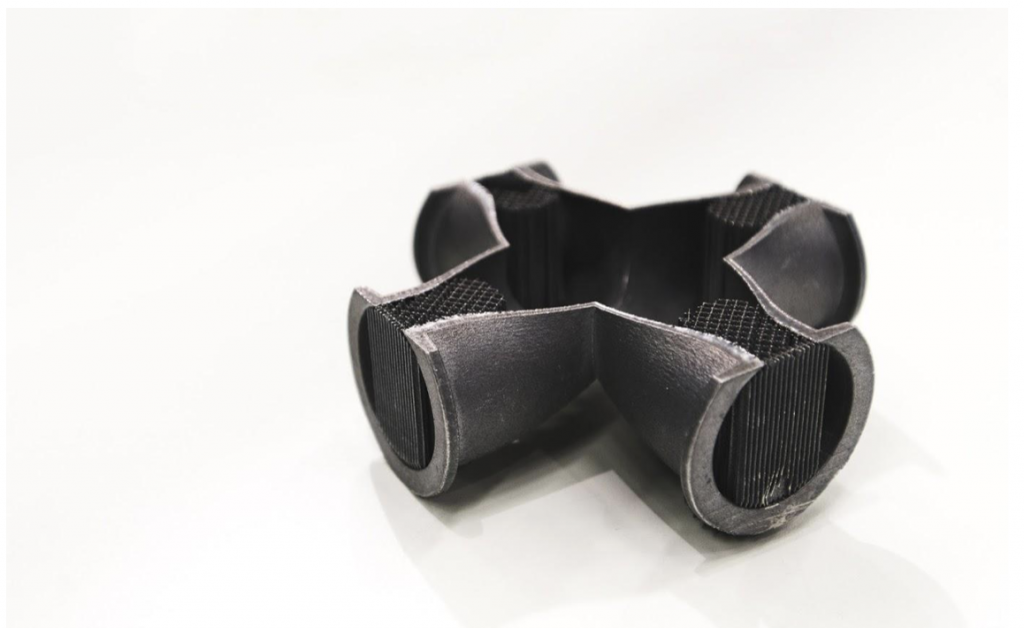
Air ducts
- 3D printed air ducts are typically used in automotive or other industrial applications. Complex surface webbing is used to create variable wall thicknesses; this level of structural design would be almost impossible to create with traditional manufacturing methods.
Organic structures
- From beehive-style stacked hexagons to cellular plant structures, additive manufacturing can mimic almost any complicated natural design. One such design has been used to provide scaffolding to repair spinal injuries.
Adding channels and complicated structures to a 3D printed design do not increase the manufacturing cost. Take advantage of this to design parts that would otherwise be impossible to create.
To take full advantage of the benefits of additive manufacturing, it’s important to design each part with the limits of the process in mind. Minimize the amount of material to be used, and create an object that excels with the chosen production method.
As an additional tool for designers, make use of 3D Hubs’ online 3D printing service. The free Design for Manufacturing analysis will check any CAD file for viability with the chosen manufacturing method.
Subscribe to Our Email Newsletter
Stay up-to-date on all the latest news from the 3D printing industry and receive information and offers from third party vendors.
Print Services
Upload your 3D Models and get them printed quickly and efficiently.


You May Also Like
Phillips Corporation Rebrands Additive Hybrid Division, Now Called Phillips Advanced Manufacturing
Phillips Corporation announced that it will rebrand its Additive Hybrid division to become Phillips Advanced Manufacturing. The focus will now be on advanced manufacturing in the broadest sense. Brian Kristaponis...
Arridex Opens Additive Manufacturing Omnifactory in Lagos for MRO & Spare Parts
Arridex, formerly known as the RusselSmith Group, has been building additive manufacturing competence and capacity in Africa for years. Previously, the company got approval to use a Roboze 3D printed...
DREAMing in Dayton: DREAM Symposium Covers AM, AI, Supply Chain, & More
This month, I attended a manufacturing industry event, like I often do. But instead of getting on a plane to New York City, or driving four hours to Youngstown, I...
ORNL Origami Creates Large Foldable Structures
Oak Ridge National Laboratory (ORNL) is using a hybrid 3D printing method to make foldable panels. At the Department of Energy’s (DOE) Manufacturing Demonstration Facility (MDF) at ORNL, researchers turned...


