Sculpteo’s Best Practices for Designing a 3D Printable Twisty Puzzle/Rubik’s Cube


 Since 1974, the Rubik’s Cube has become the most widely sold toy in the world. A large part of its fascination is due to how challenging it is to solve the puzzle, and we have seen many records set and shattered by people trying to quickly solve the puzzle (including inventing a robot that can do this in under a second). Take this already challenging puzzle and add another layer of challenge: why not design and 3D print your own puzzle? Yes, the pastime of designing, printing, and then obsessively solving and resolving twisty puzzles/Rubik’s Cubes has become popular enough — combining older puzzle forms with newer 3D technologies — that it’s high time we reviewed the best practices for this activity, isn’t it?
While there is the option to use software that will do it all for you, many people like the challenge of designing their own puzzles from scratch. A recent Sculpteo blog post reviews these best puzzle-making practices and explains exactly what is so enticing about this particular kind of challenge. Supposedly, it’s all about making the puzzle twist, a problem that a previous person had when he tried to 3D print the world’s largest Rubik’s Cube. To avoid a similar fate, according to Sculpteo, you’ll need to know a bit about how micro-mechanical systems work:
“Even if you have a very good idea about the different parts the puzzle will contain, the number of mechanical pieces can be very high and cause misalignment, high frictions, and instability in the puzzle. The prototype could be too tight and impossible to turn or too squishy and explode as soon as you try to solve it (the right term is to pop). Beyond puzzles, we’ll try to have a look here into micro-mechanical systems and how to design them.”

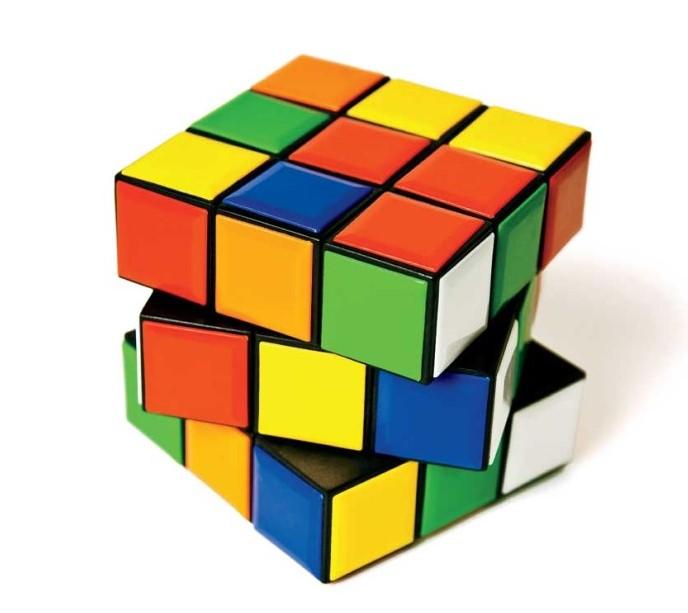
To illustrate these points, Sculpteo features the inner workings of the Rubik’s Cube. First it is cut with a special profile to ensure its different types of parts — 6 centers, 12 edges, and 8 corners — stay together. Mechanically, the puzzle should be slightly modified because some surfaces form an angle below 90°, and this causes jamming between all of the parts. To avoid this, the sketch has to be changed to contain angles over 90°. Now you can make sure that the Cube is printable, with the right hollowing rules and wall thickness.
After changing angles on the Cube sketch and checking it for printability, the next step is to set the mechanical clearance, which can also be tricky because a “tiny change in clearances can totally change your mechanism behavior.” Small clearance requires surfaces that slide together, whereas large clearance has parts that hover and do not require contact. Here, Sculpteo explains more about the significance of a third clearance option that reduces jamming of parts:
“With this clearance, you’ll get a smooth turning puzzle without any polishing required. If you’re planning to use the mechanism very often, if you design a cube for speed solving that you’ll use for all your competition, for instance, a different clearance should be used to anticipate the wear of plastic. Small clearance will be deleted (0mm/in) and large one reduced to 0,4mm / 0,016in. Clearance for jamming parts won’t be changed. If the puzzle seems hard to twist at the beginning, it’ll be smoother and smoother.”
So, the upshot here is that clearance is very important for smooth-functioning puzzles.
Finally, the edges of your design’s parts also need to be filleted for smooth functioning. Sculpteo recommends that “a 2-3mm / 0,08-0,12in fillet is a good value.” For appearance’s sake, you can also add “a 1mm / 0,04in fillet on the visible faces.”
Since you’ve reviewed the inner mechanics and best practices for designing a Rubik’s Cube puzzle of your own, now you only have a few more steps to go. You need to 3D print it, and, of course, solve the darn thing! Discuss in the 3D Printed Rubik’s Cube forum over at 3DPB.com.
Subscribe to Our Email Newsletter
Stay up-to-date on all the latest news from the 3D printing industry and receive information and offers from third party vendors.
Print Services
Upload your 3D Models and get them printed quickly and efficiently.


You May Also Like
3D Printing News Briefs, June 18, 2026: Reseller, Relocation, Metal Space Powder, & More
We’ll start with business news in today’s 3D Printing News Briefs, as XJet appointed a value-added reseller in Germany, BIO INX is expanding its presence in the Italian market, and...
Scientists Use BMF to 3D Print Seal Whiskers That Track Prey Long After It’s Gone
Seals use their whiskers to hunt. Not Navy Seals, although they may in some way also, but this article is about lowercase seals. Not Seal the musician either; as far...
Researchers Combine AI and Bioprinting to Create Tiny Blood Vessel Networks
If 2026 has a theme in bioprinting, it may be blood vessels. Researchers can already print incredibly sophisticated tissues. The harder part is keeping those tissues alive. Without a network...
University of Arkansas Researchers Test Metal 3D Printing in a Mars-Like Atmosphere
If humans eventually establish a long-term presence on Mars, they will face a major manufacturing challenge almost immediately. Tools will break. Parts will wear out. Equipment will need repairs. But...