Make Your Own Centrifuge for Under $5 With a 3D Printing Pen


 We write about many of the continual and stunning innovations 3D printing is having in the areas of science, research, and medicine. From devices to implants that are changing patients’ lives every day, 3D printing technology has already made its mark, and continues to evolve. With all that we see being fabricated for patients themselves, it’s not quite as often that we see actual tools being made in the science and medical arenas. And definitely not with something as simple as a 3D pen.
Maker Techmeology has taken it upon himself to design an entirely 3D printed centrifuge. If you need a device that spins at breakneck speed, this is for you–and you can make it fairly easily. This design was originally created for spinning test tube samples and can achieve an acceleration of about 400 × g using a 18.5 V laptop charger.
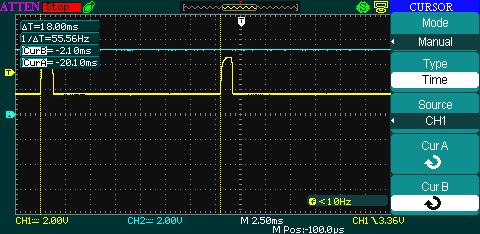
Afterward, you’ll want to measure acceleration and spin pulses.
One of those ingenious DIY designs, this centrifuge also employs numerous other recycled items, with the motor having come from a used appliance. Opening up like an umbrella when in use, the arms meant for holding the test tubes detach.
The centrifuge costs next to nothing to make and is also a great example of the versatility of the 3D printing pen. Techmeology points out that even without using recycled items, you’d be hard pressed to spend $5 on the entire piece.
“The test-tube holder arms are detachable, which means they can be replaced if a larger radius is required, or if a different size of test tube is to be used,” states Techmeology. “Each arm forms a hinge with the rotor frame to allow a swinging-head design. The arms do catch against the frame, which is less of a problem than you’d think–regardless, it could be solved by adding a circular guard.”
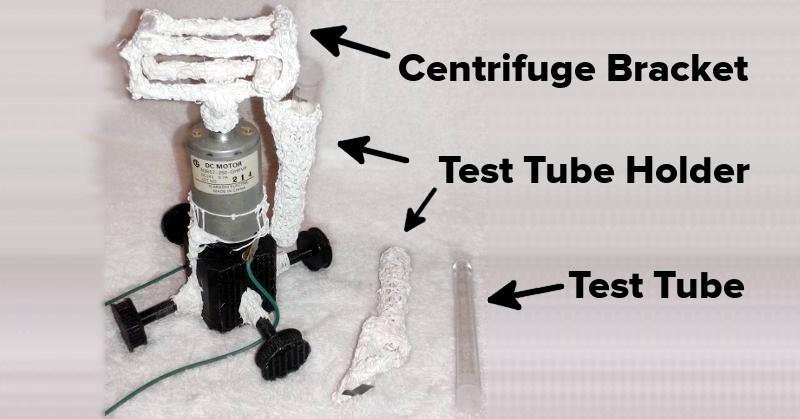 To start, you’ll want to have your 3D printing pen, some test tube holders, and paper towels handy. (This is a broad overview; for detailed instructions, see here.)
- Print the test tube holders, using a paper-wrapped test tube to make a tube form.
- Print the arm and hinge rods, welding accordingly.
- Print the rotor frame and assemble all the associated rods.
- Attach the rotor frame to the motor.
- Make the base, and attach the motor to it.
Once the 3D printed centrifuge is complete, you will of course want to see how successful a contraption you’ve made by measuring acceleration. You can calculate this by figuring out the radius and spin speed and then using the equation found here. While Techmeology pointed out that figuring out the radius is fairly simple, you need a few more tools for spin speed.
“Measuring the spin speed is a little trickier. I used a photo-transistor and infrared LED as a photo-interruptor,” said Techmeology. “The signal from the photo-transistor has to be amplified to be readily measured.”
Basically, while spinning, every time a holder passes the LED and phototransistor, it sends out a pulse that can be measured–and to do that you’ll need an oscilloscope (Techmeology points out that a half-rotation of the centrifuge takes 18 minutes, which equates to 1667 RPM).
There’s definitely a safety warning to be heeded while making a centrifuge, as this designer warns that if were to fail while in use it could send shrapnel flying. So, be careful–and have fun out there…
Will you be trying to 3D print your own centrifuge any time soon? If you do, make sure to let us know in the 3D Printed Centrifuge forum on 3DPB.com.
Subscribe to Our Email Newsletter
Stay up-to-date on all the latest news from the 3D printing industry and receive information and offers from third party vendors.
Print Services
Upload your 3D Models and get them printed quickly and efficiently.












You May Also Like
Creality K3 Opens for Pre-Order at $849, Advancing Multi-Color 3D Printing
Creality has officially opened pre-orders for the Creality K3, its latest flagship K Series 3D printer, starting at $849 in the United States. Recognized as an IFA Innovation Awards 2026...
Prusa Core One L+: A Worthy Upgrade?
Disclosure: The Core One L+ was provided to me by Prusa3d free of charge for the purpose of this review. I have not received any other compensation. All opinions expressed...
Prusa Upgrades Its Lineup with CORE One+ (Gen 2), CORE One L+, and XL+
Prusa Research has updated its high-end desktop 3D printer lineup. The company is offering new and improved versions of the machines it targets at industrial and power users, with the...
Zaha Hadid Architects Print 6M Model with WASP’s Robotic Arm Solutions
Zaha Hadid Architects (ZHA) have successfully used WASP 3D printers to make a 6-meter-tall model of an aircraft control tower. Zaha Hadid Architects’ Tech Lab made the tower in-house for the ZHAviation...