Use Your 3Doodler Pen to Make Vivid, Multi-Colored Lampshades


![]() The 3Doodler has become quite the common ‘pen’ these days. Considering that not too long ago little of the public was aware of 3D printing, if you try to order a 3Doodler around Christmas you will probably see what I did last year–sold out.
The 3Doodler has become quite the common ‘pen’ these days. Considering that not too long ago little of the public was aware of 3D printing, if you try to order a 3Doodler around Christmas you will probably see what I did last year–sold out.
An attractive choice for 3D printing items, the 3Doodler generally costs a fraction of the price and is easily used to construct smaller projects, although we’ve seen it responsible for a wide array of projects from larger works of 3D printed surreal art to a number of different fashion statements including 3Doodled high heels, masks, and apparel.
Now we’re talking fashion for the home–taking this uncommonly useful pen and making a common household item into something dramatic and full of vivid color. Grace Du Prez is the talented artist responsible for coming up with the idea for these 3D printed lampshades that you can make at home with stuff you might just have lying around begging to be used in a creative project. Here’s your list:
- Your 3Doodler – either model
- 3Doodler plastic strands in multiple colors (or just one)
- Hairdryer
- Wooden spoon (or thin cylinder that is the same size as a wooden spoon handle)
- Plain lampshade with a detachable frame
Refer to the 3Doodler instructions page for everything in great detail, but for a general outline of the instructions, here’s what you will need to do.
Start with the fun of making stencils. Use rectangles that are 3″ long and 1/3″ wide. You will need 20-40 of these depending on what size your lampshade’s rim is. The fun begins as you trace the shapes with your 3D printing pen, and then fill them in.
Next, you’ll be using the blowdryer for heating the pieces. Once they are softened, you’ll be wrapping them around the wooden spoon to create the teardrop shapes that will adorn your lampshades.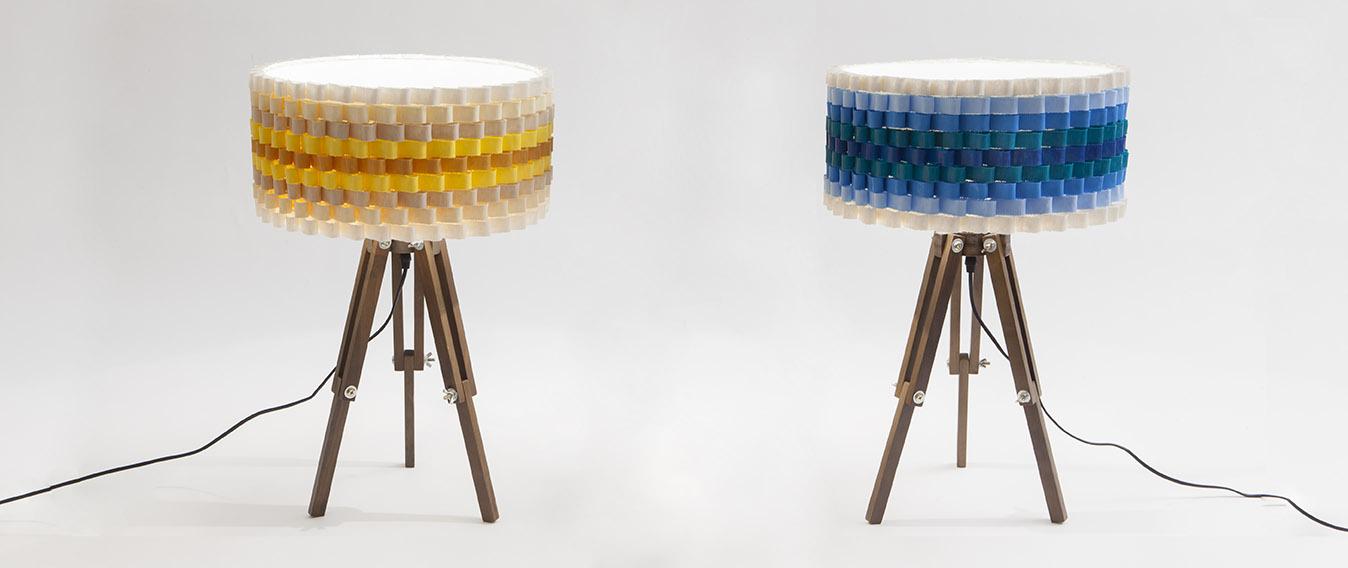
“Continue this process for every rectangle you’ve created. Heat, Curve, Remove. If you find yourself short of teardrops later on you can always add more quickly and easily,” advises the 3Doodler team. “As a side note, you’ll find hairdryers can be handy for all kinds of smoothening, flattening, and curving effects with the 3Doodle.”
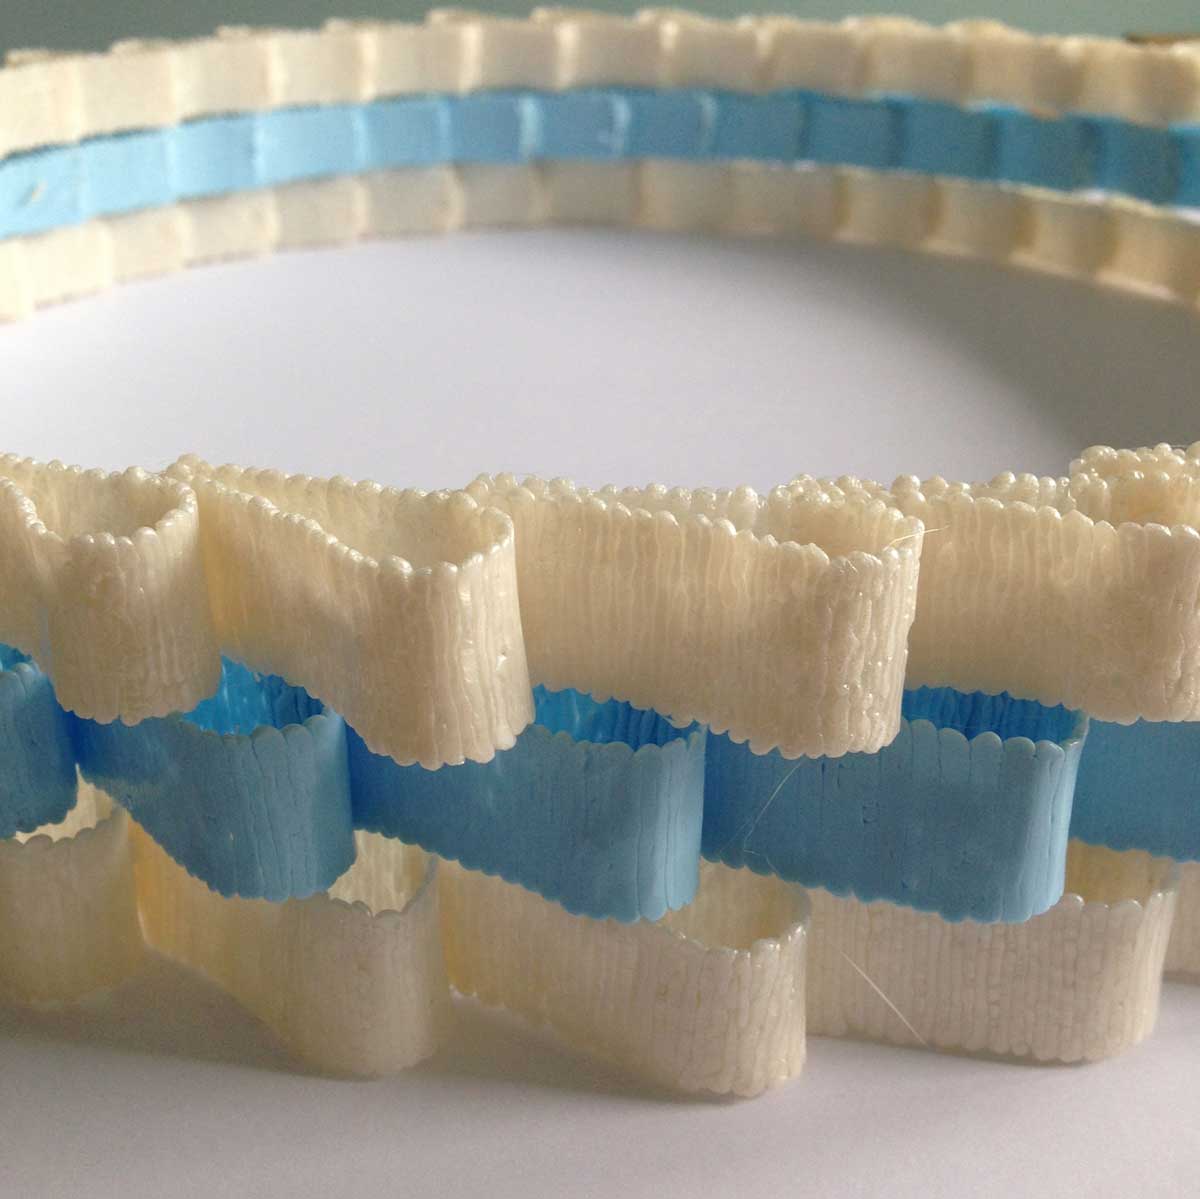 Use the frame of your lampshade to begin building the lamp, joining each teardrop shape that you made previously to the next. Afterward, your color design comes into play as you begin to layer the pieces, alternating rows of color should you so desire.
“PLA plastic sticks well to the fabric, so go ahead and extrude plastic between the lampshade fabric and the first plastic ring to hold everything in place (making sure to touch both with the newly extruded plastic),” advises the 3Doodler team. “Make it nice and secure, as the first ring will carry the weight of the other rings.”
Keep sliding the rings on. They should stay in place snugly, and you should also be able to turn them for the best placement and alignment. Once you get to the top, you are all finished–and onto the matching piece!
Is this a 3D printing project for the home that interests you? Have you made anything similar with your 3Doodler? Discuss in the 3Doodler Lampshades forum thread over at 3DPB.com.

Subscribe to Our Email Newsletter
Stay up-to-date on all the latest news from the 3D printing industry and receive information and offers from third party vendors.
Print Services
Upload your 3D Models and get them printed quickly and efficiently.


You May Also Like
US Army Awards Continuous Composites 3D Printed Missile Component Contract
Despite the very loud, indignant claims from American defense officials that the US hasn’t depleted a significant portion of its munitions stockpiles, the US has depleted a significant portion of...
Rheinmetall Uses Ducting Made with Minifactory for Challenger 3 Tanks
Rheinmetall UK is using Minifactory Material Extusion as the primary production method for tank ducting on the Challenger 3 Main Battle Tank program. The Challenger 3 is the UK’s formidable...
Q5D and Molrix To Supply US Army With Harness Robots
Q5D Technologies and Molrix will offer their advanced harness production manufacturing units to the US Army. One production cell will be used for the SkyFoundry project, while two further systems...
Largest Publicly Announced, Single Order in EOS History: Beehive Industries Spends $50M on M4 ONYX 3D Printers
Earlier this year, Beehive Industries received a $29.7 million contract to produce its Frenzy 6 and Frenzy 8 engines for the US Air Force. The metal additive manufacturing (AM) user...