
‘Ultimate Filament Colorer’: Sharpie marker colors 3D printer filament prior to extruding


 One problem that a lot of people seem to have when needing to 3D print an item on an FDM printer, is the fact that purchasing and storing multiple rolls of filament can be both expensive, and annoying. There are dozens upon dozens of different colors of filament that you may need at any given time. It just isn’t feasible to have multiple rolls of filament sitting around your home. One Nebraskan man, by the name of Mathew Beebe, has come up with a rather simple and reliable solution.
He calls his design, the “Ultimate Filament Colorer”. The name may be a bit over the top, but the idea works, and can be replicated quite easily.
The “Ultimate Filament Colorer” takes the idea of using a Sharpie marker to color filament before it is extruded onto the print bed. This is an idea that several other designers have attempted in the past, with a varying degree of success. Beebe’s design seems to work quite well though.
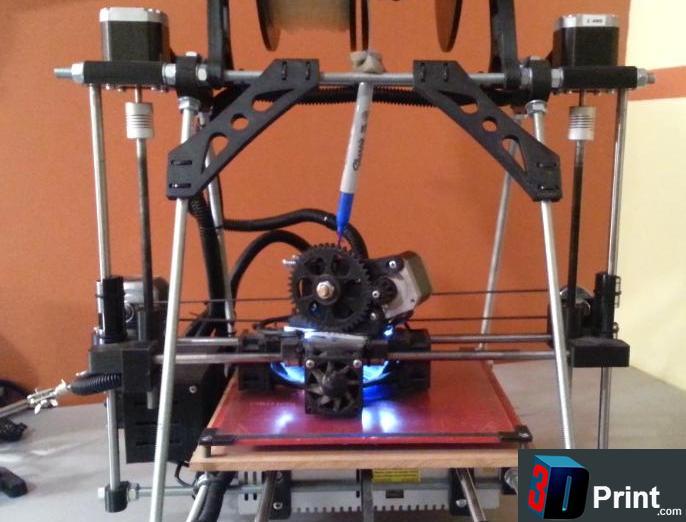
“The ‘Ultimate Filament Colorer’ works by feeding 1.75mm filament directly through the ink cartridge of a Sharpie marker of anyone’s favorite color,” explained Mathew Beebe to 3DPrint.com in an interview. “The filament is completely coated by the ink inside the Sharpie ink cartridge. The ‘Ultimate Filament Colorer’ can be installed directly before the hot-end / extruder of a printer, which allows it to also function as a filament cleaner, since the ink cartridge of the Sharpie marker consists of a fiber/foam type material which catches dust particles quite nicely.”
Beebe, has tried three different methods of coloring his filament. He first tried a design that consisted of two markers. It worked decently, but the end result gave his printed objects a distinct colored tint, that he was not satisfied with. It also consumed a large amount of printing area above the extruder on his RepRap Prusa Mendel. He also experimented with a 4-marker design, but that even consumed more printing space above the extruder, making the Z-Axis clearance very minimal. It was also very difficult to ensure that all the markers remained in contact with the filament 100% of the time, so Beebe had to come up with a design that worked.
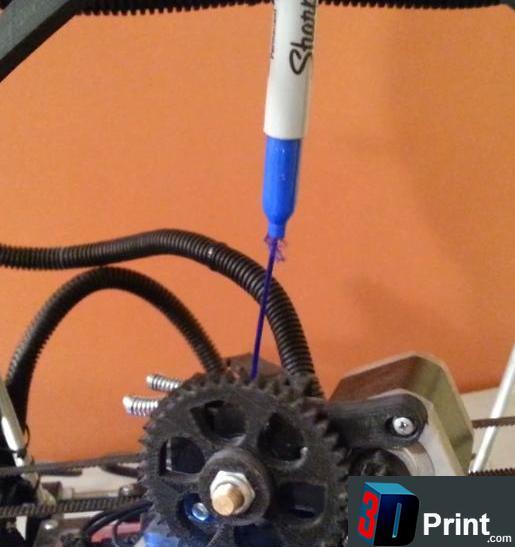
“As I was pondering these ideas, I was holding a Sharpie marker in my hand,” explained Beebe. “I looked at the butt of the marker and thought, ‘That divot is about the same diameter as the filament I am using.’ BAM, it hit me. The housing was already made and even pre-aligned for drilling! I immediately grabbed my drill and my 5/64” drill bit and drilled away. As I plunged in to the marker’s ink cartridge, after piercing its shell, I removed the drill bit. I was happy to see the drill bit completely dowsed in ink.”
Beebe then completely removed the felt tip from the marker, and then snipped off a piece of 1.75mm natural PLA filament. He attempted to plunge the raw end through the marker, but it stopped about one quarter of the way in. He realized that a tapered end would have been more useful. He applied a little heat, and grabbed the end of the filament and pulled it steadily. The filament then stretched thin and proceeded to break. Beebe trimmed the slimmest part of the tapered filament end and slowly inserted the remaining pointed tip into the butt of the marker. It steadily moved, uninhibited through the body of the marker. The filament then came out of the fore-end of the marker, covered in deep blue ink.
“I excitedly fed the freshly colored filament into my extruder and loaded up an object to print,” said Beebe. “A key-chain that looked like a jeep grill was on deck for being more than just translucent. I hit print and watched. Perfection!”
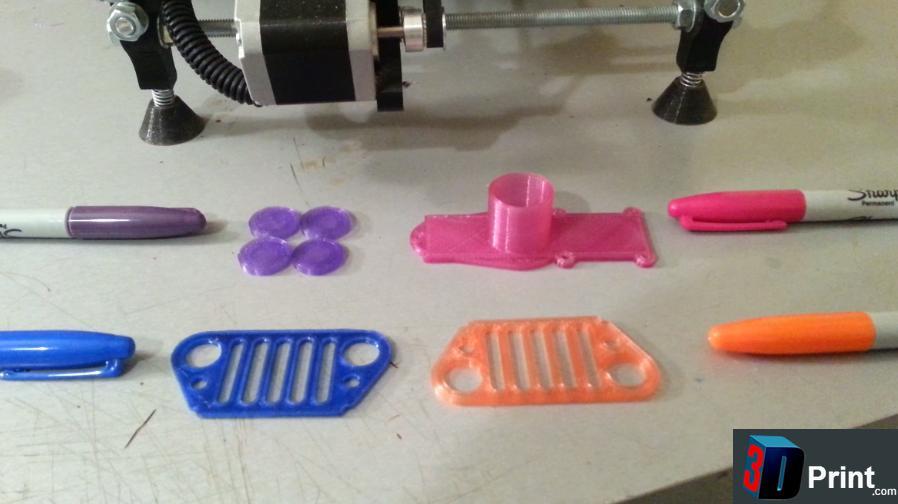
Items printed using the ‘Ultimate Filament Colorer’
The simple explanation of how the “Ultimate Filament Colorer” works, is that the filament is fed into a Sharpie, where the internal ink cartridge of the marker coats the entire exterior surface of the filament. The color remains once the filament is extruded and laid onto the print-bed.
Check out the video demonstration below.
1) Drill a 1.75mm hole in end of a Sharpie casing.
2) Remove the Sharpie tip with needle nose pliers.
3) Heat the end of your filament with a cigarette lighter (about 20mm from the end).
4) Pull the 20mm piece of filament away from the heated section to create a pointed tip.
5) Cut the stringed filament from the pointed tip (make it as smooth as possible).
6) Straighten about 15cm of filament after the pointed tip.
7) Slowly insert the pointed tip into the drilled out end of the Sharpie.
8) The filament may need to be rotated a few times to pass all the way through the Sharpie
9) Print Away!
There are currently 31 different colors of Sharpie markers on the market, plus a metallic silver, thus this invention greatly reduces the need to purchase multiple rolls of $40 filament in order to print in more than one color. Using Beebe’s design you can easily 3D print using 31 different colors and just a single roll of filament. I asked Beebe how long each Sharpie lasts. He explained to me that he has yet to have one run out, and he estimated that one marker would probably last approximately 1kg of filament (1 roll). Discuss this design, and let us know if you have tried it in the ‘Ultimate Filament Colorer’ thread on 3DPB.com.
Subscribe to Our Email Newsletter
Stay up-to-date on all the latest news from the 3D printing industry and receive information and offers from third party vendors.
Print Services
Upload your 3D Models and get them printed quickly and efficiently.


You May Also Like
How the World’s Most Advanced Tech Companies Are Using 3D Printing
3D printing has been around for decades. For most of that time, it was a prototyping tool. Engineers used it to check if a design looked right before spending money...
The New Dental Lab: “Three Technicians Can Handle a Hundred Arches,” Says Digital Dentistry Expert Josh Jakson
Josh Jakson’s path into digital dentistry started long before he had a job title. He grew up around it. His father, a Polish immigrant, started the family’s dental laboratory in...
Why Beam Control Could Redefine the Future of EB-PBF
In Part 1, Ulf Lindhe examined how advances in beam control, point melting strategies, and process monitoring are changing the way engineers think about electron beam powder bed fusion (EB-PBF)....
Additive Manufacturing at a Crossroads
Additive manufacturing is at a crossroads. Simultaneously, we find ourselves between certain very different modalities, applications, and industries. Rather than being able to explore them all, companies will now have...


