
The other week we had a little party our house where I just happened to have two 3D printers hooked up working and churning our pieces for a recent DIY project of mine. For about half an hour, the printers were the center of attention at the party, and by the time everyone had left 12 of our 18 guests had asked where they could get an affordable machine of their own.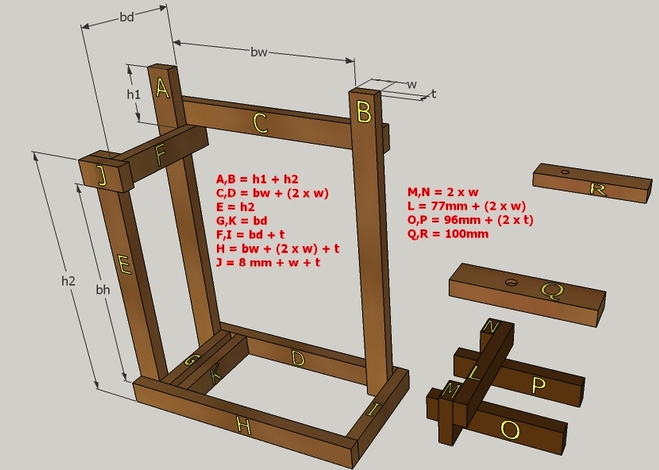

Once someone sees a 3D printer in action it’s nearly impossible for them to avoid the urge of getting or even making one themselves. With that said, decent machines can often be pricey, and even the most affordable machines will run $300 or so. One Thingiverse user who goes by the handle ‘Skeat‘ was at one point just like these other people at the my party. The problem though is that he just didn’t have the money required to purchase a brand new 3D printer. Instead he came up with a design for a machine himself, which he could make within his own home. Skeat had another problem though. He didn’t have any major power tools or large screws/nails.
Instead of giving up, he modified his idea for the DIY printer which he designed based off of the Prusa i3, with his ultimate objective being the creations of a “repstrap or a temporary 3d printer that anybody can build at home using cheap and easily available materials [and] to learn about 3d printers and print [his] own parts required for [his] next printer. ”
Although Skeat was able to obtain some of the more important components of his machine, he did’t have the money or access to the larger pieces such as the frame of the printer. Instead of buying them, he improvised with the intention of eventually using this makeshift 3D printer to print the parts for his next, more refined machine.
To get started he gathered up the following materials and components:
- 6 smooth rods
- 1 M5 threaded rod
- 12.5 x 24 mm timber and 6mm plywood
- 11 LM8UU linear bearings
- 4 stepper motors
- liquid nails and hot melt
- 2x 608 ball bearings
- belts and pulleys
- 1 coupling
According to Skeat, the cutting of the wood does not need to be tremendously accurate and the only accuracy that’s required is with the alignment of the various parts. Instead of using nails or screws to attach the components such as the pieces of the wood frame, bearings, rods, the Z-axis motor and the limit switches, he used liquid nails and hot melt. This actually works in his advantage as it absorbs any warping found within the wood frame.
While the pictures certainly don’t make this look like a quality 3D printer, if you watch the video below you will see that it works fairly well, and appears to be pretty precise. When all is said and done, the machine is capable of building objects as large as 120 x 120 x 100 mm, which certainly isn’t huge, but according to Skeat will allow him to print out the parts required for his more sophisticated machine.
All the information and complete instructions on how to build the RepStrap 3D printer can be found on Thingiverse. Let us know if you take on this project and how it turns out. Discuss in the RepStrap 3D Printer forum thread on 3DPB.com.