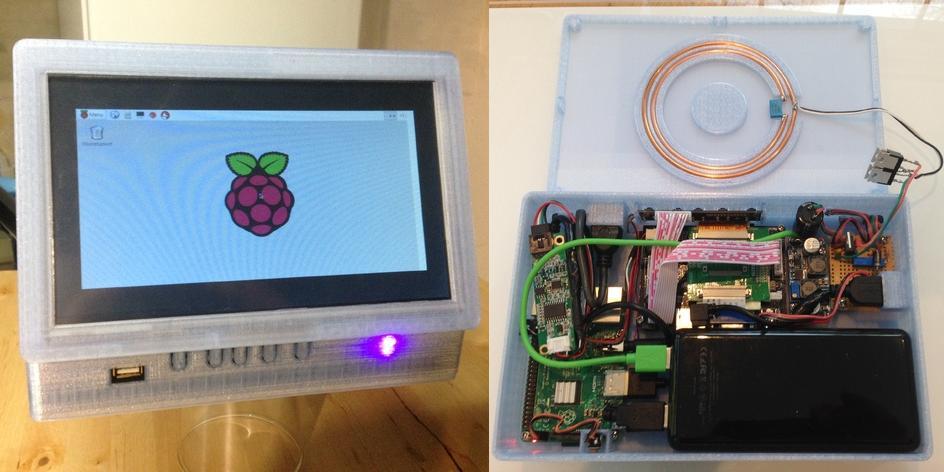
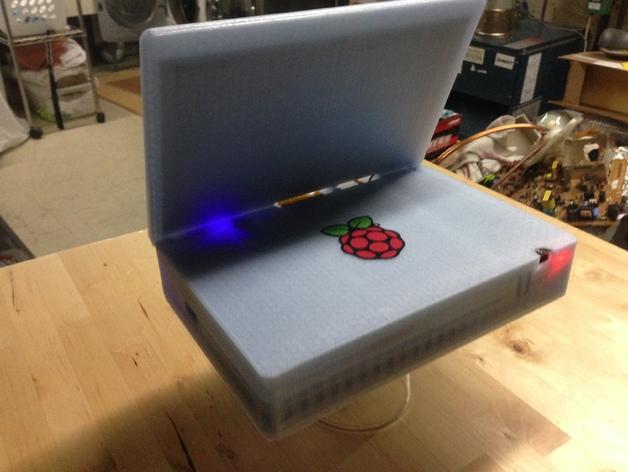
Like a lot of engineers, however, Choi is never satisfied. He is always looking to create new products, new inventions, and new iterations upon already existing products. Today he has informed 3DPrint.com that he has utilized the same basic technology in his desk lamp to create a one-of-a-kind wirelessly powered and wirelessly charged Raspberry Pi 2 computer, which he calls the PiBook.
“I wanted to evolve the wireless lamp into something a bit more practical,” Choi tells 3DPrint.com. “What could be more practical than a computer? The Raspberry Pi 2 was just released, so I decided why not build a wirelessly powered open source computer? I’ll throw in a touch screen to boot. The only difference between this power receiving circuit and the lamp circuit is that the power needed to be rectified to DC and brought down to a safe operating voltage for the electronics.”
A while back Choi set out to create a wirelessly charged cell phone case, a project which he ended up abandoning. However, what he learned from that endeavor aided him greatly in creating this unique computer, particularly when it came to the coil setup within his design.
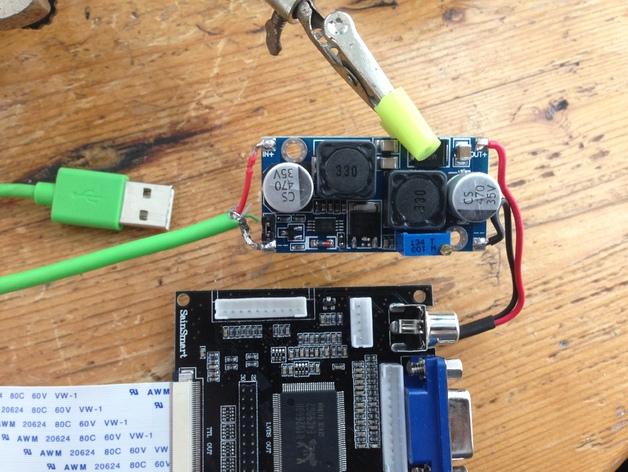
“I knew the coil wouldn’t need as many winds (one wind was enough) so I could make the coil small enough to fit in the footprint of the screen itself, which determined the overall dimensions of the computer,” Choi tells us. “The rest of the innards involved final placement of the Raspberry Pi, the video board, a voltage boost converter, the coil voltage regulator, and the battery.”

Everything but the coil and the electronics was 3D printed on Choi’s MakerBot Replicator 5th Generation 3D printer. The lid of the PiBook, which contains the screen, was printed in two separate parts with conduits in them for wiring. The 3D printed buttons are tabs with three-quarters of the profile cut out so that they can bend, yet also stay in place quite well. The 3D printed body features supports for all of the various boards and input/output jacks.
“The hardest part was getting all those wires to fit inside as tightly as possible,” Choi explains. “I ended up buying 4 different HDMI cables until I settled on an ultra thin 1 ft HDMI cord which worked perfectly.”
“I did not need more winds since I only needed to ultimately supply 5VDC,” Choi tells us. “Again, this is where 3d-printing shines. All I had to do after making my calculations and printing the loop outline was lay the 1/8″ copper tubing into place. It was a snap fit.”
The PiBook works by using the electricity which is transferred through magnetic coupling using four coils. The first coil is the primary transmitting coil, and it transmits power to the large secondary receiving coil. The third coil is the single loop, and fourth is also a single loop which has the ability to pick up the fluctuating magnetic field of the third and then deliver 6.5MHz of AC power to a bridge rectifier which converts it a DC current. And voilà! You have a working, wirelessly powered Raspberry Pi 2 computer, called the PiBook.
Simple enough, right? If you really think so, then you can download the designs and 3D print your very own PiBook via Choi’s Thingiverse page. If you are like me and totally lost by all of this technical talk, you can still check out Choi’s video of the PiBook in action below. What do you think about this unique creation? Discuss in the PiBook forum thread on 3DPB.com.