Crash Land This Electrified 3D Printed Seasonal Spaceship in Your Christmas Tree Thanks to Functionalize
Michelle Matisons
This year, you have new options for 3D printed seasonal décor that will really get your attention with all its extra bells and whistles. This is because the people at Functionalize bring you an “LED flashing, laser-shooting circuit board and spaceship STL, printable with F-Electric conductive filament.” And it is very appropriate that Functionalize are the ones to make such a project. After all, the company, whose motto is “Join the personal industrial revolution,” is the first ever to make highly conductive filament for use in 3D printing. This filament, F-Electric, makes it easy for you to 3D print power connectors, buttons, and circuits, and the filament is conductive enough to let you build battery packs and power connectors inside your plastic prints. Even better, the filament works with all standard size printer nozzles, and it is compatible with most popular 3D printers. Just as one example, the Functionalize team has designed a 3D printed spaceship ornament, and it has made STL files and some instructions available here, too.
“Your 3D printed seasonal decor isn’t yet electrified?” Functionalize demands. “Rudolph’s nose is the same monochrome PLA as his antlers and tail? Your Chistmas tree doesn’t twinkle enough? Kwanzaa candles don’t flicker? Hanukkah dreidel doesn’t flash? Maybe your Festivus (for the rest of us) pole is unadorned?”
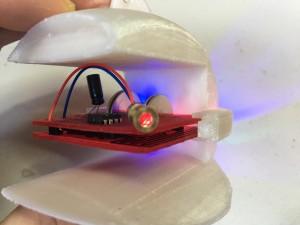
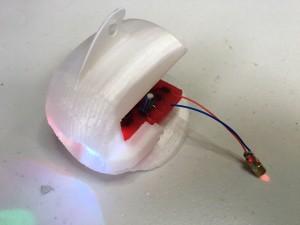
A spaceship should help spruce up your 3D printed decorations, right? Good news, you’ve still got time to print this flashy, modern ornament. The other good news is that this circuit board was designed so you could print it on a single-head printer. In addition to the STL files, you’ll also need the following items to 3D print your very own spaceship with circuit board: normal PLA filament for the circuit board base; F-Electric PLA filament for circuit traces and connectors; one capacitor (from 22 – 56 uF), which determines laser blink speed (smaller is faster); an 8-pin 555 timer chip; a laser component; 2 multicolor LEDs (you can get these slow change or another 5mm fast change); and one silver conductive pen, to attach LEDs, timer chip, and capacitor (MG Chemicals 8420 Silver Conductive Pen is recommended or you can try the nickel conductive pen). Once you’ve gathered all of your materials, you can check out the assembly photos which give you an idea of how things come together!
If you happen to be going to CES 2016 in January and want to see a live demonstration of the spaceship and other designs being printed, follow Functionalize on Facebook or Twitter to find out more details of where they’ll be at the convention. In the meantime, you can watch the below video to see your spaceship in action creating a nice space-age light show in a Christmas tree! Discuss this unique design in the 3D Printed Electronics Spaceship forum on 3DPB.com.