Magic of Magnets: You Can Now 3D Print Your Own Anti-Gravitator to Amaze Your Friends

 3D printing is a technology that can be quite amazing and fun to watch. In fact, my lineup of 3D printers have become somewhat of a pastime when it comes to having friends and family over my house. It has replaced my air hockey table, and my television set as the attention grabber within my home. This is especially true when I have something interesting being printed as my friends and family come for a visit.
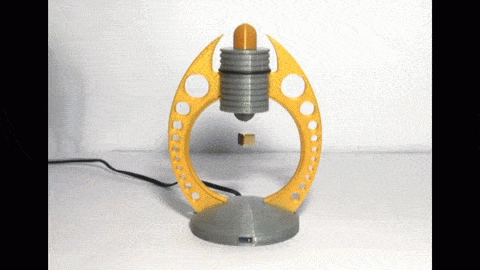
Equally impressive, however, is the ever growing list of unique designs and functional objects that can be printed on these futuristic machines. At 3DPrint.com we tend to cover a lot of these on a daily basis, but few compare to a device which a German man named Stefan Kneip has come up with. Kneip, who loves to indulge in physics, originally came up with his idea after seeing a design for an anti-gravitator, created by Andreas Titze. He enjoyed the idea of the design so much, that he set out to 3D print his very own anti-gravitational device.
“Of course it is not possible to disable the [forces of gravity],” Kneip explains. “The principle of the Anti-Gravitator is to compensate the gravity by a magnetic field generated in a copper coil. Referred to as Earnshaw´s Theorem (Samual Earnshaw, 1805-1888), it is not possible to get a stable magnetic levitation with permanent magnets. In this experiment the magnetic attraction force, generated by the electric coil, is controlled by a hall magnetic field sensor. If the floating magnet lifts up and approaches the sensor, the current through the coil will be reduced, leading to a lower magnetic force and a drop down of the sphere. If the floating magnets descents, the hall sensor indicates a lower magnetic field to the OPAMP resulting in a higher coil current and a stronger magnetic force.”
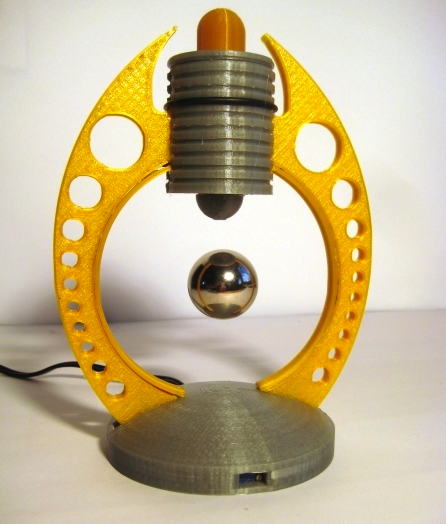 This process takes place approximately 4 million times a second, resulting in a levitating metal object.
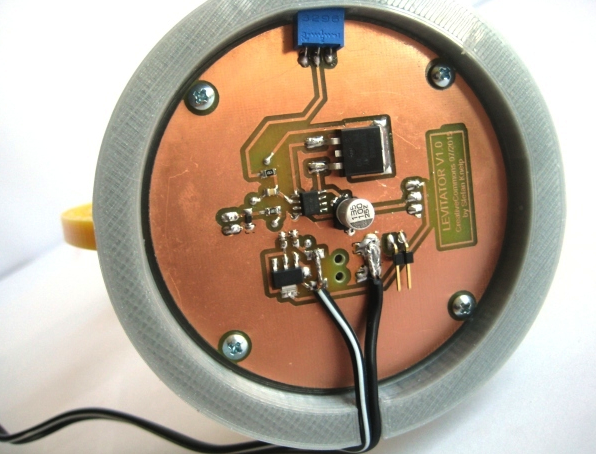
The device consists of a dozen 3D printed parts, all of which must be assembled, along with a laundry list of other parts, which include:
- (1) Hall sensor (A1302 or similar)
- (1) Nd-ball magnet (15 – 30 mm diameter)
- (1) Hexagon socket head cap screw M6x40mm as an iron core
- (1) M6 nut & washer
- 100g Cu wire Ø 0.28 mm
- (1) Electronic board
- (1) Power supply 15 V, 800 mA
- (2) M4 Hexagon socket button head screws
- (4) Self-tapping screws (approx. 2,5 mm)
Kneip warns that the use of Neodymium magnets can be a bit dangerous and asks that you be cautious when handling them, as they are very powerful and can break into many sharp pieces. The complete instructions, as well as the STL files for the 3D printed parts can be found and downloaded for free on Thingiverse, where he also issues some tips on getting your Anti-Gravitator to work correctly.
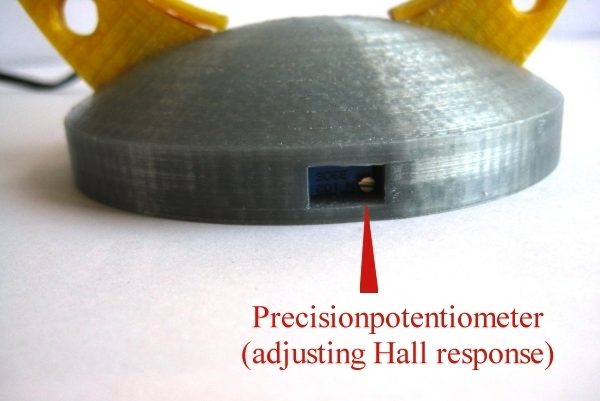
“Turn the precision potentiometer to the right end,” he explains. “Hold the magnet sphere below the coil (approx. 15 mm), turn-on the power supply and turn the potentiometer screw slowly to the other end (as you can see in the video). If you reach the resonance point, the sphere will begin to levitate. If you turn further it will bounce to the coil cylinder above. Reduce the potentiometer than a small portion to get the system stable. If you are not successful [in getting] a stable levitation try at least to change the connections of the coil to the electronic board (exchanging the poles of the electromagnet).”
What do you think about this unique 3D printed device? Will you be attempting to make your own? Can you think of any other 3D printed gizmos which could utilize neodymium magnets Discuss in the 3D Printed Anti-Gravitator forum thread on 3DPB.cm. Check out the video of the device in action below, where Kneip shows it working to levitate a metal cube, a ball, and even a tiny figurine.
Subscribe to Our Email Newsletter
Stay up-to-date on all the latest news from the 3D printing industry and receive information and offers from third party vendors.
You May Also Like
3D Printing Unpeeled: New Arkema Material for HP, Saddle and Macro MEMS
A new Arkema material for MJF is said to reduce costs per part by up to 25% and have an 85% reusability ratio. HP 3D HR PA 12 S has been...
3D Printing News Briefs, January 20, 2024: FDM, LPBF, Underwater 3D Printer, Racing, & More
We’re starting off with a process certification in today’s 3D Printing News Briefs, and then moving on to research about solute trapping, laser powder bed fusion, and then moving on...
3D Printing Webinar and Event Roundup: December 3, 2023
We’ve got plenty of events and webinars coming up for you this week! Quickparts is having a Manufacturing Roadshow, America Makes is holding a Member Town Hall, Stratafest makes two...
Formnext 2023 Day Three: Slam Dunk
I’m high—high on trade show. I’ve met numerous new faces and reconnected with old friends, creating an absolutely wonderful atmosphere. The excitement is palpable over several emerging developments. The high...