Your Own 3D Printed Mac Pi Used as a 3D Printing Monitor

We’ve got a Raspberry Pi recipe for classic Mac and 3D printing fans: Combine your nostalgia for the good old days of 128k with the DIY culture of Arduino, Raspberry Pi, and 3D printing and voila! You’ve built yourself a Mac Pi, a working mini-Mac!
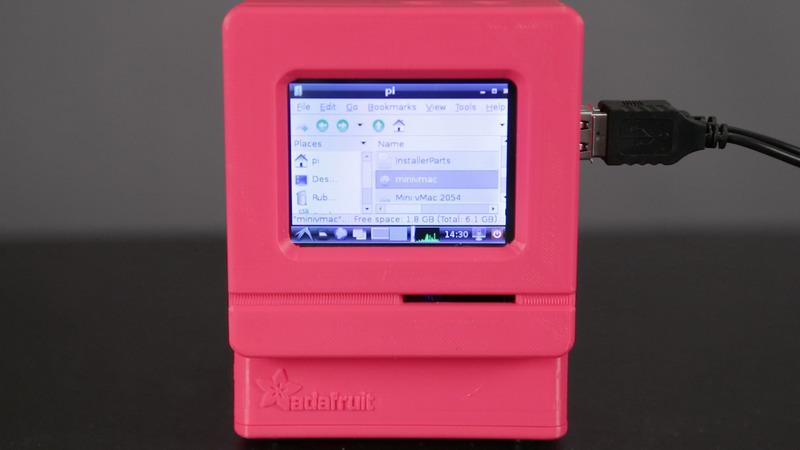
Way back in August of last year Adafruit contributors the “Ruiz Brothers” shared instructions for creating this frankly adorable, 3D printed Mac Pi that features a Raspberry Pi Model B and a 320 x 240 miniature touch screen display. A few days ago, however, Adafruit posted a bit of an update, this time modifying the cute little Mac Pi to become a 3D print monitor. They upgraded the original device with a resistive touch PiTFT image, and then installed Astroprint on it so that the box became a rather useful 3D print monitor.
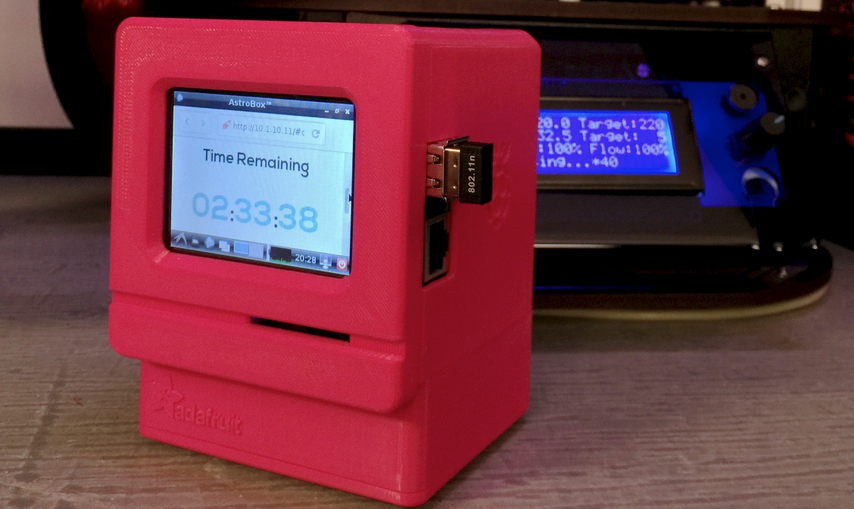
The Raspberry Pi is programmed to run a version of Mini vMac, an emulator that lets a modern computer run software from early Macs from 1984 to 1996 (they were based on Motorola’s 680×0 microprocessors). Note that, while the Mac emulator definitely boots up, you can expect only minor application support and no audio support. It’s limited to Mac 7 and networking isn’t possible. We don’t suppose maximum usefulness is necessarily the point of this device, however.
The project, while pretty accessible to a moderately experienced DIYer with a familiarity with the cool new Arduino and Raspberry Pi hardware, does require an investment and a bit of know-how with a soldering iron. Having a 3D printer isn’t a must as you can use a friend’s, a local, or web-based 3D printing service like Shapeways. A link at the bottom of the Adafruit page takes you to a 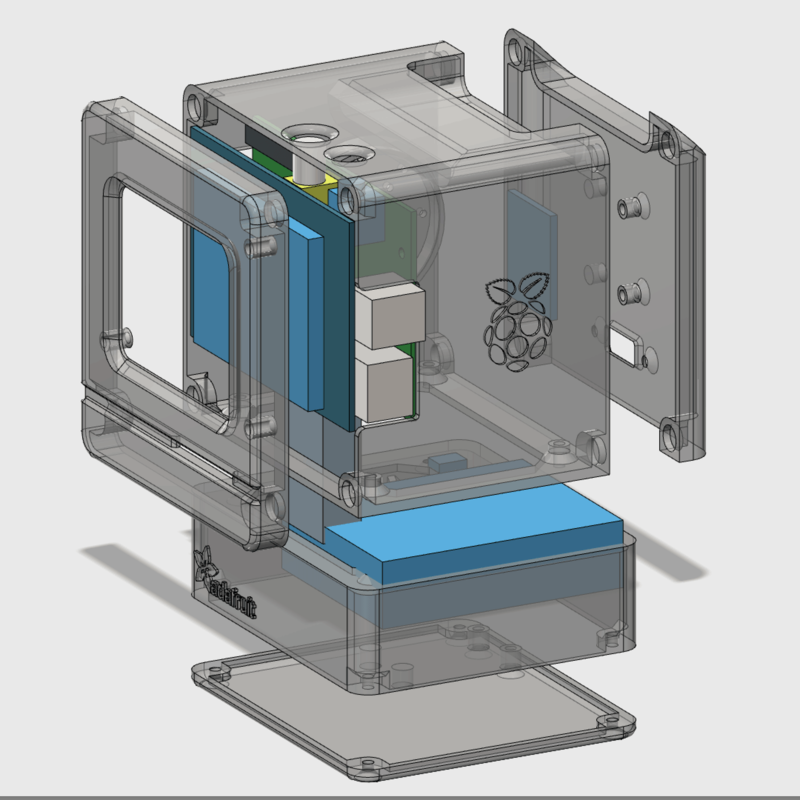 second page that provides more information regarding the 3D printed components of the Mac Pi along with the STL files. If you are doing the 3D printing yourself, the Ruiz Brothers recommend using 1.75mm or 3mm diameter PLA filament as they have observed that ABS prints “tend to warp.” They tested the part printing on both a MakerBot Replicator 1 and a Replicator 2.
Be prepared to pull together a fairly extensive collection of parts, tools, and supplies before you begin what the Ruiz Brothers refer to as this “weekend project.” Also, it doesn’t seem to be an undertaking for smaller budgets. You’ll need a PiTFT 320×240 2.8” Touchscreen ($34.95), a Raspberry Pi B ($39.95), a 6600mAh Lithium Ion Battery to make your Mac Pi portable ($29.50), a slide switch ($0.95), a Powerboost 500C ($14.95), a Stereo Class D ($24.95), a thin plastic speaker if you want internal sound ($0.95), and a 40cm panel mount HDMI cable ($4.95). All of the aforementioned components are available through Adafruit, just click on the links in the list. Or, source your own parts if you’re looking to save money.
Of course, you’ll need a 3D printer and ABS filament in the color of your choice (I’m leaning towards raspberry) or you should budget for outsourcing the printing. Also have a wire stripper, a soldering iron and solder on hand along with the recommended tools and hardware.
These very thorough makers have shared their 3D designs created in 123D Design and have also very generously added a link to a 123D tutorial for those of you who are new to 3D modeling. The Ruiz Brothers encourage you to customize your Mac Pi and offer suggestions for “hacking the STLs” they’ve shared. Also, they’ve provided instructions for installing and wiring the electronic components and estimate that doing so should take you about 15 hours (so maybe this is a project for a longer weekend).
Subsequent pages for this great Adafruit project include software downloads and installation instructions, directions for assembly, We think this great Mac Pi project incorporates all of the components of what’s most exciting about the DIY/Maker movement — a nod to the past plus community-minded, open sharing of some pretty ingenious ideas.
Below is a video of the project in action. Let us know what you think about the tiny Mac Pi over at the Mini Mac Pi forum thread at 3DPB.com.
Subscribe to Our Email Newsletter
Stay up-to-date on all the latest news from the 3D printing industry and receive information and offers from third party vendors.
You May Also Like
Precision at the Microscale: UK Researchers Advance Medical Devices with BMF’s 3D Printing Tech
University of Nottingham researchers are using Boston Micro Fabrication‘s (BMF) 3D printing technology to develop medical devices that improve compatibility with human tissue. Funded by a UK grant, this project...
3D Printing Webinar and Event Roundup: April 21, 2024
It’s another busy week of webinars and events, starting with Hannover Messe in Germany and continuing with Metalcasting Congress, Chinaplas, TechBlick’s Innovation Festival, and more. Stratasys continues its advanced training...
3D Printing Webinar and Event Roundup: March 17, 2024
It’s another busy week of webinars and events, including SALMED 2024 and AM Forum in Berlin. Stratasys continues its in-person training and is offering two webinars, ASTM is holding a...
3D Printed Micro Antenna is 15% Smaller and 6X Lighter
Horizon Microtechnologies has achieved success in creating a high-frequency D-Band horn antenna through micro 3D printing. However, this achievement did not rely solely on 3D printing; it involved a combination...